Author:
Mark Sanchez
Date Of Creation:
3 January 2021
Update Date:
27 June 2024
Content
1 Prepare the necessary materials. To make a quality piggy bank from a plastic bottle, you need a variety of materials. Everything you need can be easily purchased at your nearest handicraft store. But it is likely that most of the materials you need (if not all of them) are already in your home.- An empty plastic bottle will become the main container of the piggy bank.
- A utility knife and scissors will be required to cut out the details.
- With a hot glue gun, you will glue the individual parts of the piggy bank. Please note that the glue gun should only be operated under adult supervision.
- You will need an egg carton and a pink craft brush.
- You will also need accessories for decorating the piggy bank. It is recommended to use markers, acrylic paint and eyes with movable pupils. However, other materials such as cardboard and pink spray paint will help you make a more realistic piggy bank.
 2 Wash out the plastic bottle. There are no specific restrictions on the size of the piggy bank. Nevertheless, it is recommended to use a plastic bottle of 0.5 to 1 liter in size. Wash it off with water and then wipe off excess water with a paper towel.
 - Leave the cap on the bottle. She will become a pig's heel.
3 Make a slot for the coins. Ask an adult to help you cut the coin slot in the middle of the side of the bottle with a utility knife. If you are not sure if the slot is large enough, try slipping coins into it. If the coins do not fit, enlarge the slot. In order for the largest 5-ruble coin to pass through the slot without difficulty, its length must be at least 2.5 cm.Remember that the size of the slot in the piggy bank must correspond to the diameter of the coins that you are going to save in it. 4 Attach the legs to the bottle. Use scissors to cut the four tapered legs out of the egg carton. Ask an adult with a glue gun to symmetrically glue these legs on the opposite side of the bottle (in relation to the slot) so that the slot is on top of the piggy bank standing on the legs. The open cuts of the cardboard legs should fit snugly against the bottle itself. So the legs and body of the piggy bank will seem to be one. 5 Make your piggy bank pink. This step is not necessary, as the homemade piggy bank has a certain charm even in its original form. Many common art supplies (including markers, tempera, and acrylics) don't hold well on plastic bottles. However, you can use other means to color the piggy bank. - Paint the body and legs of the piggy bank pig with pink spray paint. Remember to work with spray paint only in a well-ventilated area (preferably outdoors).
- Create a collage of pieces of paper napkins on the surface of the piggy bank using an acrylic decoupage base (you can find it in the craft store in the section that sells different types of glue). Apply a thin layer of decoupage base with a brush to a small area of the bottle, place a piece of paper napkin on top and cover it with another thin layer of base on top. Continue to work in the same way until you completely cover the entire piggy bank.
- Try to wrap the bottle itself in felt or heavy paper, and paint the cardboard legs pink with tempera or acrylic paint.
6 Decorate the piggy bank. At the moment, your piggy bank only vaguely resembles the outline of a pig, so it's time to make it more realistic. You will need a glue gun to secure most of the additional parts, so it is recommended that you get an adult to help you with this. - Use a pink craft brush to make a pigtail by twisting it into a spiral. Ask an adult to glue the ponytail from the back of the bottle (opposite the patch).
- Make pig eyes, for which you take ready-made eyes with movable pupils or draw and cut out the eyes yourself from scrap materials, and then glue them on the pig's face.
- Draw nostrils on the patch with a black marker.
- Cut two triangles out of pink paper or felt and stick them on the bottle as ears.
7 Use the piggy bank for its intended purpose. Now that your piggy bank is completely ready, put it in your room and do not forget to refill it every time you have free pocket money. Despite the fact that a piggy bank from a plastic bottle does not have a special hole for extracting funds, some small coins can be removed through the neck by unscrewing the lid. When the piggy bank is full, you can remove money from it with the help of a clerical knife, cutting off the back of the bottle. You can then easily attach it back with tape if you want to continue to use your piggy bank further. Method 2 of 3: Toilet Paper Roll Piggy Bank
 1 Prepare the necessary materials. Toilet paper rolls are probably the easiest base for homemade piggy banks. If you are not yet very good at doing handmade projects, then it is better to start with a cardboard piggy bank. You will probably find most of the materials you will need in your home (with the possible exception of just a glue gun). Even if you just have at hand something close to the materials from the list below, then this will suit you too.
 - Toilet paper tube. When the roll of toilet paper runs out, save the remaining cardboard tube from it. If you are just starting a new roll, you may find the old roll's straw in the trash can.
- Pink cardboard.Cardboard is thicker and more durable than ordinary paper. It can be purchased at any office supply store.
- Scissors and a stationery knife. You will need them to cut out the details and make a slot for coins in the piggy bank.
- Glue gun and hot glue sticks to it. Remember to be supervised by an adult when working with the glue gun.
- You can use a bottle cap as a piglet, but this is not necessary.
- Piggy bank decoration materials. Markers, felt, thick paper and collage elements are all perfectly acceptable materials with which you can decorate a piggy bank from a cardboard toilet paper tube.
- 2 Draw a pig's head on the pink cardboard. The head will be a good decoration for a piggy bank and will not allow coins to fall out from one of its ends. The head should not be much wider than the diameter of the cardboard tube. Since you will be glueing the head to the tubular body, do not dwell on the outline of the head, draw the eyes, patch, mouth, ears and any other features that you think the pig should have. When you're happy with the head pattern, cut it out.
- When in doubt about the size of the head, attach it to a cardboard tube and see how these parts look together.
- If you wish, you can ask an adult to glue a patch from a plastic bottle cap to the pig's head with a glue gun. Then draw two nostrils on the lid with a marker. Otherwise, you can simply draw a patch directly on the cardboard.
- 3 Make a cardboard base for the piggy bank. Take the pink cardboard again and place the cardboard tube vertically on top of it. Using a pencil, trace a circle on the cardboard along the contours of the straw. Once the circle is complete, draw another circle with a slightly larger diameter around it. Cut the part along the outside line. It will become the foundation of your piggy bank.
- Don't worry about the exact dimensions of this part, just remember that the outer circle should be about 1.5 cm wider than the inner one.
- 4 Attach the base to the cardboard tube. Along the entire perimeter of the round piece, make small cuts from the edges towards the inner circle that you drew with the cardboard tube. The step of the cuts should be about 1 cm. You will get a whole series of peculiar petals. Fold all the resulting petals to the center of the circle. With their help, you will securely attach the base of the piggy bank to the cardboard tube. Place the straw in the center of the petal circle. Ask an adult to apply a drop of glue one by one to each petal and glue it to the side of the tube. Make sure the base of the piggy bank is securely held in place before moving on.
- As a guarantee, you can stick a strip of tape over the base petals to keep them from peeling off.
- 5 Decorate the cardboard tube. You can do this with whatever materials you have on hand and which you like best: use makers, paints, collage elements, wax crayons or felt (all of which will work great for you). Since you're working on a piggy bank, pink is the obvious color choice. However, you can use whatever colors you think will suit your chosen piggy bank style.
- As soon as the first coins appear in the piggy bank, it will stand on its own without any problems. But if you want to put an empty piggy bank, you can equip it with a pair of legs for stability. Just cut a couple of triangles out of cardboard and glue them to the base of the piggy bank.
- 6 Attach the pig's head. Use a glue gun to glue the pig's head onto the free end of the cardboard tube. To do this, apply a thin line of hot glue along the perimeter of the entire edge of the tube and press the cardboard part of the head against it. Let the glue harden for a couple of minutes before moving on.
- If you want the piggy bank to really look like a pig, you can glue a second pair of legs to the tube at the bottom of the head.
- 7 Make a slot for the coins. Finally, take a utility knife and cut a narrow slot in the top of the piggy bank to fit the size of the coins you will be folding into it. The slot should be large enough for the coin to pass through, but no more. If necessary, try slipping a coin into the slot to check its dimensions. If the coin does not go through, enlarge the slot.
- It is recommended that you call an adult to help you work with the knife, as it is a very sharp and quite dangerous object.
- 8 Start putting money in your piggy bank. Even something as simple as a piggy bank made from a cardboard toilet paper tube can be the basis for serious savings. Saving money is an adult behavior; with the habit of saving money, you will quickly collect your fortune. Put the piggy bank somewhere in a prominent place and refill it every time you have free pocket money.
- When the time comes to take out the savings from the piggy bank, the piggy bank itself can be saved. Despite the fact that there are not many coins in the piggy bank, you can remove the pig's head from it and pour coins. If this ends in head damage, then doing it again will be much easier than the whole piggy bank from the very beginning.
Method 3 of 3: Papier-mâché Piggy Bank
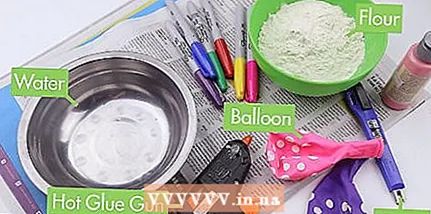 1 Prepare the necessary materials. You will need flour, water, a bowl for making pasta, newspapers / paper bags / wrapping paper, a balloon, egg carton, stationery knife, glue and materials for decorating the piggy bank (tempera or acrylic paints, paper napkins, acrylic base for decoupage, spray paint, markers, etc.), craft brush, movable pupil eyes (optional), marker and scissors.
 - You will most likely find flour, a bowl and water in your kitchen right away. You don't need much flour to work. Pour yourself one glass and remove the excess.
- For papier-mâché, it is best to use newsprint or brown wrapping paper. This requires paper that absorbs moisture well.
- You will need a hot glue gun for your work. As always, remember to supervise your glue gun.
- You will need eyes with movable pupils, a brush and an egg carton to give the piggy bank the shape of a pig.
- The balloon will become the basis for the piggy bank itself.
- You will need a clerical knife to make a slot for coins in the piggy bank.
- As materials for decorating a piggy bank, you can use anything from paints (aerosol or acrylic) to markers. Nevertheless, it is recommended to use paints, as their colors will be more expressive. You will need an acrylic base for decoupage if you decide to paste over the piggy bank with decorative paper elements.
- 2 Prepare paste. Thoroughly mix 1 cup flour with 1 cup water in a small bowl. Boil 4 cups of water on the stove and stir the flour and water mixture into boiling water. Leave the composition to simmer for 3 minutes and then let it cool. Ask an adult to help you use the stove beforehand.
- You can find powders for making papier-mâché paste at a craft store, but making your own paste for the same purpose is not difficult at all.
- 3 Prepare your paper. Find at least one thick newspaper or enough paper bags or wrapping paper. Crumple the paper into balls, straighten and crumple again. This will help the paper absorb the glue better. When you have finished this work, tear the paper into square pieces with a side about 1 inch (2.5 cm).
- You will need quite a few scraps of paper, so prepare more than you think you will need.
- 4 Prepare a balloon. Inflate the balloon to the size you want your piggy bank to be. The color of the ball does not matter, since the ball will only be the basis for papier-mâché and will not be visible.Tie a ball when it reaches the required size.
- 5 Cover the papier-mâché ball. Soak the prepared pieces of paper in the paste and place on the ball. There should be enough paste to keep the paper sticking, but not too much to keep the glue from dripping off. Spread the pieces of paper on the ball and try to evenly paste over the ball. The ball should be pasted over with a triple layer of paper, but if you decide that this is not enough, add more layers.
- The piggy bank will be stronger if you let each layer of paper dry before sticking on the next, but this is not strictly necessary.
 6 Let the papier-mâché dry. The piggy bank will take at least a couple of days to dry completely. To speed up this process, place the papier-mâché in a well-lit and ventilated area. Once everything is dry, you can start decorating the piggy bank.
 - 7 Make a slot for coins on the body of the piggy bank. Ask an adult to take a utility knife and make a slot for coins on the body of the piggy bank. If you are not sure if the slot is large enough, try inserting the largest coin into it. If it does not go through, enlarge the notch. Through the same slot, you can pull out the used ball from the piggy bank.
- In order for the largest 5-ruble coin to pass through the slot, its length must be at least 2.5 cm. When determining the size of the slot, you should always focus on the largest coins that you are going to put in the piggy bank. Since papier-mâché crafts are quite fragile, it is recommended to first mark the place for the slot and only then grab the knife.
- 8 Attach the pig's legs and snout. Cut out five tapered pieces from the egg carton. They will be needed in order to make legs and a patch. Ask an adult to take a glue gun and glue these pieces onto the appropriate spots on the piggy bank.
- Cuts of cardboard parts should face the body of the piggy bank. Subsequently, it will be easier to paint them.
- 9 Paint the piggy bank pink. The easiest way to do this is with tempera or acrylic paint. You can also use markers, spray paint, or paper towels. To decorate the piggy bank using the decoupage technique using an acrylic base and paper napkins, use a brush to apply a thin layer of the base to a small area of the piggy bank. Place a napkin over the top and cover it with another thin layer of acrylic decoupage base. Work this way until you cover the entire piggy bank.
- 10 Decorate your piggy bank. Piggy bank decoration is a creative process. You can decorate it as you wish. However, if you want the piggy bank to really look like a pig, you need to supplement it with the missing body parts.
- Spiral the pink craft brush to make a pig's tail, and have an adult glue it in place.
- Glue ready-made eyes with movable pupils on the pig's face, or draw, cut and glue homemade eyes.
- Use a black marker to draw the nostrils on the pig's patch.
- Cut two triangles out of pink paper or felt and glue the pig on the head as ears.
- 11 Enjoy using the ready-made piggy bank for its intended purpose. This type of piggy bank will probably take the most time and patience from you to make; but this particular craft will look just amazing if you pay enough attention to decorate it with high quality.
- It will be difficult to extract money from such a piggy bank. Since the entire piggy bank is one piece, you will have to take a knife and punch a hole large enough at the top to take out the coins. It is recommended to make an enlarged cut in the area of the coin slot. If you wish, you can then seal the cut with tape and open it again when it’s time to take the coins out of the piggy bank again.
Tips
- Traditional piggy banks are usually made in the shape of a pig. However, it is not necessary to follow this rule.Once you are familiar with the process of making a piggy bank, you can try to come up with your own original piggy bank.
Warnings
- When it's time to get your savings out of the piggy bank, you may need to cut it open. If you originally made a piggy bank without providing a hole for withdrawing money, then you will have to damage your craft in order to get something out of it.


