Author:
John Pratt
Date Of Creation:
17 April 2021
Update Date:
26 June 2024

Content
- To step
- Part 1 of 4: Cutting the pieces
- Part 2 of 4: Sewing the hat together
- Part 3 of 4: Assembling the hat
- Part 4 of 4: Finishing the hat
- Tips
- Necessities
Bucket hats are a trendy accessory that can complete just about any outfit. They are also very useful for protecting your hair from the sun. Instead of running to the store and buying one, you can make your own! They are quick and easy to make.Once you know how, you can make a new hat for any occasion!
To step
Part 1 of 4: Cutting the pieces
 Choose your fabric. You will need two different fabrics and colors, one for the outside of the hat and one for the inside. For example, use cotton for the inside and canvas or denim for the outside.
  Cut out two 20 cm circles. You have to cut one circle from each fabric. This will be the top of the hat. Assume a seam allowance of 1.3 cm. If you have a very small head, you can also cut a smaller circle. If you have a bigger head, make the circle a bit bigger.
  Cut the parts. You will need two rectangles measuring 12 by 3 inches for each fabric. You need a total of four rectangles.
 - If you want a larger hat, make the rectangles four inches wide.
- If you are cutting a larger / smaller circle, cut each rectangle so that it measures half the circumference.
 Cut the edge parts. You will need four identical parts in total, two of each fabric. The parts should be about 8.9 cm wide. They should be 30 inches long on the inside curve and 45.8 inches long on the outside curve.
 - If you want a wider brim, cut the arches 11.4 inches wide.
- If you are cutting a larger / smaller circle, adjust the inside bend of the border to the length of your adjusted rectangle.
 Consider cutting some fusible web. If your fabric is thin, you can add some stabilizer. Cut the stabilizer 1.3 centimeters smaller than your parts and iron them on the "wrong" side of the fabric. You only have to do this for the innermost or outer fabric parts, not both.
Part 2 of 4: Sewing the hat together
 Pin and sew the rectangles together. Pin the two outer rectangles together right sides together. Sew both narrow ends closed with a 1/2 inch seam allowance.
 - Repeat this step for the two inner fabric pieces.
 Pin and sew the edge pieces together. Pin the two outer edge pieces together, right sides in. Sew only the narrow, straight ends. Use a 1/2 inch seam allowance.
 - Repeat this step for the two inner fabric pieces.
 Press open the seams of the hat and brim pieces. Place one of the hat pieces on the ironing board with the seam facing you. Use your iron to spread the seam. Iron the seam open and flat. Repeat this step for all seams on all hat and brim pieces.
  Pin and sew the hat pieces to the circles. Pin the top edge of the outer hat piece to the outer edge of the matching circle. Make sure the wrong sides are out. Sew around the edge with a 1/2 inch seam allowance.
 - Repeat this step for the two inner fabric pieces.
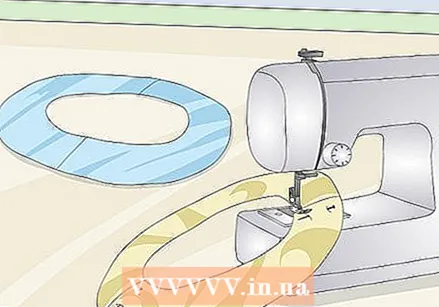
 Pin and sew the brim to the hat. Pin the inside edge of the matching brim around the bottom edge of the hat. Make sure the wrong sides are out - then sew with a 1/2 inch seam allowance.
 - Repeat this step for the two inner fabric pieces.
Part 3 of 4: Assembling the hat
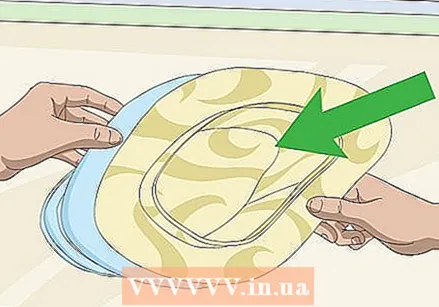 Put one hat in the other. Turn one hat right side out; but leave the other as it is. Tuck the first hat into the second so that the right sides are pressed together and the wrong sides are out.
  Pin and sew around the outside edge of the brim. Sew with a 1/2 inch seam allowance. Leave an opening of 10 cm wide for turning. Remove the pins as you sew.
  Cut notches in the seams to reduce size. Cut a notch in the seam around the top of the hat every 1.9 inches. Cut a notch in the seam every 2.5 inches around the outside edge of the brim. The notches should be just under half an inch in size so they don't cut into the stitching.
 - You don't have to cut the seam between the hat and the brim.
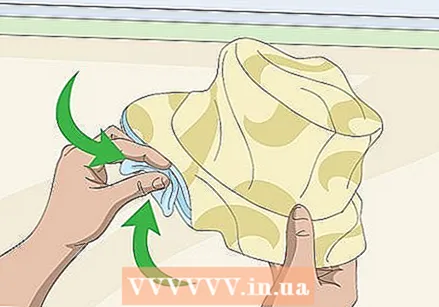 Turn the hat inside out through the opening. Shape the hat so that one piece is inserted into the other. If necessary, use a skewer or knitting needle to push the seams out along the edge.
Part 4 of 4: Finishing the hat
 Stitch and press the opening closed. Tuck the edges of the opening inward 1.3 inches to match the rest of the trim. Flatten the edge with an iron when you're done.
  Sew along the outside edge of the brim. Sew 0.6 to 1.3 inches from the outside of the brim.
 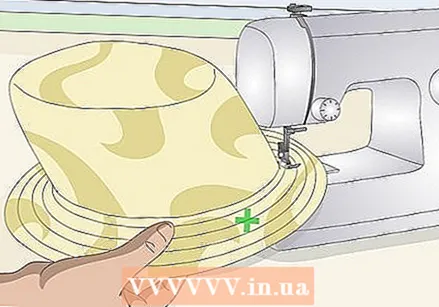 Topstitch more rows on the edge. You don't have to do this, but it will make your hat look more professional. Just topstitch 4-5 more rows around the edge. Leave a gap of 0.6 to 1.3 inches between each row.
  Topstitch the top and body of the hat, if desired. Again, you don't have to do this, but it will give your hair a nice accent. Topstitch around the top edge of the body about 1⁄2 inch from the seam. Next, stitch around the bottom edge of the body piece, also 0.6cm away from the seam.
Tips
- Backstitch at the beginning and at the end of your sewing.
- Trim any loose threads.
- You can use the same color of thread as your topstitching or a contrasting color.
- These hats are reversible!
- Decorate the hat with a hat band and decoration, such as a bow, button or flower.
- Don't forget to wash, dry and iron the fabric first.
- Wash, dry and iron your fabrics before you are going to cut them. This is to prevent shrinkage.
Necessities
- Two different colors of fabric
- Vlieseline (optional)
- Wire
- Sewing machine
- Sewing pins
- Fabric scissors


