Author:
Marcus Baldwin
Date Of Creation:
14 June 2021
Update Date:
1 July 2024
Content
The ability to take a screenshot of a portion of the screen (which can be saved, annotated, and shared with others) is one of the features of the Scissors utility included in Windows 7 and Windows Vista. The Scissors utility is superior in functionality to the tools built into previous versions of Windows for taking screenshots (screenshots).
Steps
 1 Run the Scissors utility. To do this, click Start -> All Programs -> Accessories -> Scissors. The utility window will open, and the superimposed screen (in the form of a white translucent background) will be displayed on the screen.
 2 Select a screenshot option. To do this, click on the arrow next to the "Create" button and select one of the options.
 - Free form. This option will allow you to create and capture an area of the screen of any shape (for example, triangular).

- Rectangle. This option will allow you to capture a rectangular area of the screen. To do this, drag the cursor around the desired object on the screen.

- Window. This option will capture one window (for example, a browser window).

- The whole screen. This option will capture the entire screen (for example, the desktop).

- Free form. This option will allow you to create and capture an area of the screen of any shape (for example, triangular).
 3 Select the area on the screen that you would like to capture. If you selected Freeform or Rectangle, you will need to draw (using the mouse or stylus) the selected area on the screen.
- 4 Save, add comments and share with others the screenshot you took. The screenshot will open in a separate window, where you can save, edit or send it by email.
- To save a screenshot, click "File" - "Save As". In the window that opens, enter the file name and select its format (if necessary).

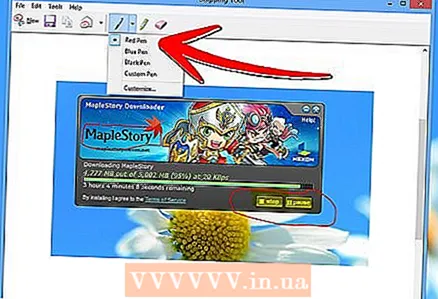
- Add comments. To do this, the Scissors utility contains the following tools: Pen, Marker, Eraser. They are easy-to-use tools for adding comments and making minor edits.
- To share a screenshot with others, click on the arrow next to the "Send snippet" button and select one of the options from the menu.

- To save a screenshot, click "File" - "Save As". In the window that opens, enter the file name and select its format (if necessary).
Tips
- If you are going to post a screenshot on a site, make sure that the size of the screenshot does not exceed the limits set on this site.
- To turn off the overlay screen, click "Options" and uncheck "Show overlay screen when scissors are active".
- On keyboards on mobile devices (including laptops), the Print Screen key must be pressed together with the Fn key or Function key.
- Every computer keyboard has a Print Screen key. Look for her.
- You can also download and install the Jing program. It creates screenshots and video files that can be immediately uploaded to the Internet or shared with others.
- The Scissors utility saves screenshots in a variety of formats, including HTML, PNG, GIF, and JPEG. The file format can be selected in the "Save As" window.
- The Scissors utility is not preinstalled in Windows Vista Home Basic. Therefore, use the free Capture screenshot lite utility. Its interface and operating principles are similar to those of the Scissors utility.
- To assign a keyboard shortcut to the Scissors utility, right-click the Scissors utility icon, select Properties, and click the Shortcut tab. Enter a keyboard shortcut in the Shortcut field.
- Users who create many screenshots are advised to download a special program that will simplify this process.
- The Scissors utility can be easily customized.For example, you can change the color of the border drawn around the grabbed object. To do this, click "Options" and in the menu "Ink Color" select the color you want. Borders around the captured object can be removed altogether. To do this, click "Options" and uncheck "Show selection line manually after recording fragments".
- All versions of Paint (since Windows 95) save images in different formats:
- BMP is the default format in Windows XP and earlier versions of Windows. It is an uncompressed format (the file size will be very large), so it is not recommended to use it.
- PNG is the default format in Windows 7. It is a lossless compressed format (the file size will be small and the image is high quality), so it is recommended to save screenshots in this format.
- JPG / JPEG is the default format in Windows Vista. This is a lossy format and is intended primarily for photographs, so it is not recommended to save screenshots in this format.
- GIF is not suitable for reproducing color photographs, but works well for images such as graphics and logos where there are clear transitions / borders between colors.
Warnings
- When saving a screenshot in some file formats (for example, BMP), you will get a very large file. Therefore, it is highly recommended to use PNG format.
- Some users will be unhappy if you send them a huge screenshot. Therefore, before submitting, crop the screenshot and save it in the appropriate format.


