Author:
Janice Evans
Date Of Creation:
3 July 2021
Update Date:
1 July 2024

Content
- Steps
- Method 1 of 3: On Windows 8/10
- Method 2 of 3: On Windows XP / Vista / 7
- Method 3 of 3: Using the Scissors utility
This article will show you how to take a screenshot (screenshot) on a Dell computer.
Steps
Method 1 of 3: On Windows 8/10
 1 Open the page you want to take a screenshot of. Everything you see on the screen will be displayed in the screenshot, including the taskbar (but not the mouse cursor).
 - For example, open a chat with a friend on Facebook.
 2 Press the key ⎙ PrtScr. Typically, it is located in the upper right side of the keyboard. Unlike keyboards from other manufacturers, the "PrtSc" key on Dell keyboards has no other markings.
 - The specified key can be labeled like this: "PrtSc" or "Prnt Scr" (these are the two most common options).
 3 Press the key ⊞ Win. On this key you will find the Windows logo; it is usually located in the lower left corner of the keyboard on a Windows computer.
  4 Press at the same time ⊞ Win and ⎙ PrtScr. The screen will dim for a moment, which means that a screenshot was taken.
 - If the screen does not dim, hold down ⊞ Winand then press ⎙ PrtScr.
 5 Open the start menu. To do this, press the key ⊞ Win or click on the Windows logo in the lower left corner of the screen. The cursor will move to the Start menu search bar.
  6 In the search bar, enter screenshots. The Screenshots folder appears at the top of the Start window.
 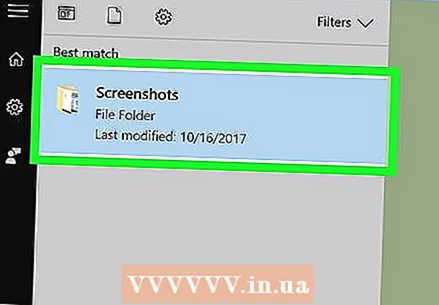 7 Click on the "Screenshots" folder. The folder will open; in it you can find the screenshot taken.
 - The Screenshots folder will be created inside the Pictures folder when you take the first screenshot.
Method 2 of 3: On Windows XP / Vista / 7
 1 Open the page you want to take a screenshot of. Everything you see on the screen will be displayed in the screenshot, including the taskbar (but not the mouse cursor).
 - For example, open a chat with a friend on Facebook.
 2 Press the key ⎙ PrtScr. Typically, it is located in the upper right side of the keyboard. Unlike keyboards from other manufacturers, the "PrtSc" key on Dell keyboards has no other markings.
 - The specified key can be labeled like this: "PrtSc" or "Prnt Scr" (these are the two most common options).
 3 Click on ⎙ PrtScr. The screenshot will be sent to the clipboard, from which it can be pasted into a graphics editor and saved as an image.
 - Some Dell keyboards are labeled with "PrtSc" in a different color than the rest of the keys (usually white). In this case, first press the key Fn (in the left corner of the keyboard), and then press ⎙ PrtScr.
 4 Open the start menu. To do this, click on the Windows logo (Windows Vista / 7) or on "Start" (Windows XP) in the lower left corner of the screen. You can also press the key ⊞ Win.
  5 In the start menu search bar, type paint. The Paint icon appears at the top of the Start menu.
 - In Windows XP, click All Programs> Accessories.
 6 Click on the Paint icon. It resembles a glass with brushes (Windows XP / Vista) or a palette (Windows 7).
  7 Pinch Ctrl and press V. The screenshot will be pasted into Paint.
  8 Click on File. This menu is in the upper-left corner of the Paint window.
  9 Click on Save. A window will open where you can enter a file name.
  10 Enter a name and then press Save. The screenshot will be saved in the default folder (usually the Documents folder).
 - To select a different folder, click on it in the left sidebar.
Method 3 of 3: Using the Scissors utility
 1 Open the start menu. To do this, press the key ⊞ Win or click on the Windows logo in the lower left corner of the screen.
 - There is no such utility in Windows XP.
 2 In the start menu search bar, type scissors. The Scissors utility icon appears at the top of the Start menu.
  3 Click on the Scissors utility icon. It resembles a pair of scissors. The Scissors utility will open.
  4 Click on Mode or & # x25BC;. A drop-down menu will open with the following options:
 - "Free form". With this option, you can draw a frame of any shape. The area inside the frame will be displayed in the screenshot.
- "Rectangle". With this option, you can draw a rectangular frame. The area inside the frame will be displayed in the screenshot.
- "Window". Using this option, you can take a screenshot of a specific window (similar to pressing the Alt + Print Screen keys). Select which window you want to take a screenshot of.
- "Entire screen". Using this option, you can take a screenshot of the entire screen (the "Scissors" utility window will not appear on the screenshot).
 5 Click on the form. It will be applied to the screenshot template.
  6 Change the border color. By default, the screen area is outlined with a red border. To change its color, click Options. A new window will open in which you can disable the display of the frame or change its color.
  7 Click on Create. It's on the left side of the Scissors utility pane. The screen will dim and the mouse cursor will turn into a crosshair.
  8 Hold down the left mouse button and drag the crosshair across the screen. A frame will appear on it, within which the desired area of the screen will be enclosed.
 - If you selected the "Full Screen" option, then when you click "Create", a screenshot will be taken.
 9 Release the mouse button. A screenshot of the area of the screen enclosed by the frame is taken.
  10 Click on File. This menu is in the upper left corner of the screenshot window.
  11 Click on Save as. It's in the middle of the dropdown menu.
  12 Enter a file name and then press Save. The screenshot will be saved in the default folder (usually the Pictures folder).
 - To select a different folder, click on it in the left sidebar.


