Author:
Virginia Floyd
Date Of Creation:
6 August 2021
Update Date:
1 July 2024

Content
- Steps
- Method 1 of 2: Conventional Seed Bombs
- Method 2 of 2: Frozen Bombs
- Tips
- Warnings
- What do you need
Seed “bombs” (or seed balls) are not purely guerrilla planting - in fact, this planting method is a great way to spread seeds, especially in large volumes and in poor soil. Using a nutrient-rich bomb gives the seed a great start and reduces its need for chemical fertilizers. Below you will find simple instructions for making seed bombs.
Steps
Method 1 of 2: Conventional Seed Bombs
 1 Buy or collect seeds. Buy or harvest quality seeds that will grow well over a large area or in poor soil without much attention on your part. Do not take seeds from plants that can cause environmental or any other harm (weeds, aggressive plants and species with a destructive root system). If in doubt, find out which plants are problematic in your area; do not rely on general information - plants that are ideal for one area can be dangerous pests in another.
 - Think about the general growing area. Are you looking for seeds that will create an entirely new environment, or simply add to your existing crop or plant? Seed Bombing Specialist Heather Sea Floors claims that you can use seeds of one species or hundreds of different plants at the same time.
 2 Soak the seeds for an hour or overnight in a mild algae solution or compost tea. Throw away seeds that are left floating on the surface - they are either damaged or will not germinate, or have weak genes.
  3 Prepare a seed bomb. There are 4 main ways to make a Seed Bomb:
 - Method One: Get a saturated loamy soil or other type of clay mixture that will form a strong ball. The soil should be favorable for the plants that you plan to germinate; make sure it's not too acidic. Form a ball about the size of a golf ball out of pure clay, adding water to make the mixture pliable. Insert seeds into each ball as soon as it is ready, or pour them into the clay before you start sculpting the "bombs".
- Method Two: Use half-dry, living (non-sterile) compost and red clay powder. Mix in the following proportions: one part seeds, three parts compost and five parts clay. Shape the mass into balls with your hands, adding water as needed. The mass should have the consistency of cookie dough.

- Method three. Alternatively, you can take a small box made of biodegradable cardboard (such as cardboard egg trays) or find a mesh biodegradable fabric (such as old cotton stockings). Fill the egg trays with the appropriate soil and seed mixture using the same method as described above. Press down on the tops to prevent the contents from falling out. In the case of stockings, you can fill them with a mixture of seeds and soil, then twist, tie and trim like you are making sausages.

- Method four. Mix 5 parts sawdust, 1 part seeds with biodegradable, non-toxic and preferably food-grade glue and a little algae extract.The mixture should not be wet, but damp enough to form a ball. This option is best done in small batches.

 4 Leave the seed bombs to dry for 24 hours. Spread the seed bombs on dry tarps or newspaper sheets, and place in a covered area such as a barn.
 - They are now ready to use.
 5 Plant seed bombs. If you have an area with planting rows and grooves already dug, place seed balls every meter (or as recommended by the seed manufacturer) and backfill with soil from the area.
 - If you want to restore vegetation in an open area with grass seeds and trees, then randomly scatter bombs to create a more natural landscape. And yet, do not forget to bury them well so that they retain the moisture necessary for the seeds.
- If you want to keep the seed bombs for a while, keep them in a cool, dark, dry place for no longer than a few weeks. Better to use the bombs right away, because the seeds can start sprouting!
 6 Watch your growth. If done correctly, shoots should appear in the next 2-3 weeks, and even earlier in warm climates. This technology will not speed up the germination process significantly, but when the sprout begins to grow in an environment where its roots receive nutrients directly, it will grow healthier.
Method 2 of 2: Frozen Bombs
 1 Find good growing soil. Moisten it liberally.
  2 Fill the ice cube trays halfway with damp earth. Place 1-3 seeds in the middle. Cover with very wet earth.
 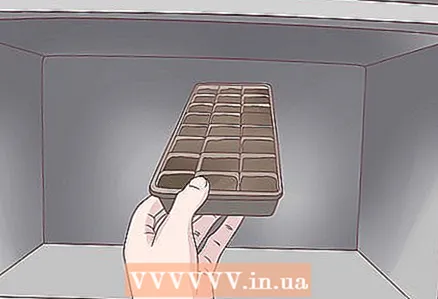 3 Place in the freezer as cold as possible if your freezer has a regulator.
 4 When the mixture is frozen, remove the cubes. Dip them in organic fertilizer to coat each cube lightly. Place back in the freezer until completely frozen.
  5 Remove from freezer. Place the cubes in a small refrigerated container with a little ice.
  6 Go outside and roll the cubes where you want to grow the plant.
Tips
- In fact, it is better to bury the "bombs". Left on the surface, they can disintegrate and be eaten by insects or animals.
- For very small spaces or few seeds, don't bother making seed bombs. It is best to plant the seeds in the usual way by digging a hole and placing the seeds with compost in it. Seed bombs are only justified in the case of large areas where the tractor cannot be used for seeding, and if you have many people willing to help.
- You can share seed balls with volunteer re-vegetation groups in badlands (find one that doesn't do anything illegal). This is a great way to meet new people.
Warnings
- When using sawdust, make sure it is not from any exotic (potentially toxic) tree or pressed wood.
- Do not do anything illegal or unethical. Many plants can devastate areas originally created by dedicated gardeners.
- Do not use clean compost as a seed bomb; undiluted, it is too concentrated.
- Seedbombing is rarely used in dry, hot climates, because without constant moisture, the balls will disintegrate and turn into dust, not providing the moisture that plants need.
- Seedbombing should not be carried out on foreign territory without permission.
What do you need
- Suitable potting mix
- Container for mixing soil
- Container for shaping balls (optional)
- Drying area with tarpaulin or newspapers
- Planting site where you will use the seed bombs


