Author:
Helen Garcia
Date Of Creation:
16 April 2021
Update Date:
1 July 2024
Content
- Method 2 of 4: Making the Lipstick on the Stovetop
- Method 3 of 4: Making Lipstick Using a Candle
- Method 4 of 4: Making Different Kinds of Lipstick
- Tips
- Warnings
- You will need
- Stove method
- Candlestick method
- container for contact lenses;
- an empty tube of regular or hygienic lipstick;
- an empty container for lip balm;
- an empty container for eyeshadow or blush;
- container for pills.
 2 Clean and disinfect the container of your choice. If you haven't already, wash it off with soap and warm water. Wipe with a cotton pad dipped in rubbing alcohol. Use a cotton swab to get to hard-to-reach places (such as corners).
  3 Leave the container open and set aside. The lipstick will start to harden quickly and you will need to fill the container before this happens. To keep it ready, make sure it is open and within reach. 4 Remove the paper from the wax crayons. To do this, hold them under running warm water, and then peel off the layer. You can also use a clerical knife to make a light cut along the entire length of the crayon and remove the wrapper.
 - Get rid of any parts of the crayon that were not covered by the paper. They can be contaminated with germs and bacteria, or spoiled with crayons of other colors.
5 Break the crayon into four equal pieces. To do this, hold it between your fingers and cut it into pieces. If you can't break the crayons, cut them with a sharp knife. Small pieces are not only easier to melt, but also easier to mix with other colors. Method 2 of 4: Making the Lipstick on the Stovetop
 1 Build a double boiler. Fill a saucepan with 2 to 5 centimeters of water. Place a metal or fireproof bowl over the edges of the pot. The bottom of the bowl should not touch the surface of the water.
  2 Turn on the stove and bring the water to a boil. To melt the wax crayon, you will need hot steam and a variety of oils.
 - 3 As soon as the water in the pot boils, turn the temperature down to almost the minimum. Since you are working with a small amount, the ingredients will melt faster. And the low temperature will prevent them from melting too quickly.
- 4 Place the pieces of crayon in a bowl and thaw. You can use one color or try mixing different colors to create your own unique shade. Stir occasionally with a fork or spoon.
- 5 Add shea butter and edible butter to a bowl. You can use any edible oil, but some types (like coconut oil) can make your lipstick taste and smell better.
- For a transparent lipstick, use ½ teaspoon of oil, and for a richer shade, use only ¼ teaspoon.
- 6 Continue stirring until everything is completely melted. At this stage, you can add additional ingredients, such as various extracts, essential oils or even cosmetic glitters.
- 7 Remove the bowl from the pot. Use oven mitts or a dish towel to avoid scalding yourself.
- 8 Fill an empty container with lipstick. To avoid smearing everything with melted wax, spoon the mixture into a container.
 9 Refrigerate lipstick. You can leave it chilled in the kitchen (or whatever room you are in), or place it in the refrigerator or freezer.
Method 3 of 4: Making Lipstick Using a Candle
 1 Place the candle on a fireproof surface and light it. To do this, you can use a lighter or a match. Work near a sink or nearby water source in case the candle tip overturns.
  2 Hold a spoon over the flame. At a distance of about 2.5 centimeters.
 - 3 Place the pieces of crayon into a spoon and let them melt. It will take about 30 seconds before they begin to melt. Remember to stir with a toothpick from time to time.
- 4 Add shea butter and cooking oil, stir a little more with a toothpick. You can use any edible oil, but some types (like coconut oil) can make your lipstick taste and smell better.
- For a sheer lipstick, add ½ teaspoon of your chosen oil.
- For a richer color, use ¼ teaspoon of your chosen oil.
- 5 Continue stirring until everything is completely melted. At this stage, you can add additional ingredients, such as various extracts, essential oils or even cosmetic glitters, to add a shine.If the spoon is too hot to hold, put on oven mitts or wrap a towel around the handle.
- 6 Fill the container with melted ingredients. Once everything is completely melted and lump-free, remove the spoon from the heat and gently pour the liquid lipstick into a container. Remember to blow out the candle.
 7 Refrigerate lipstick. You can leave it to cool in the room where you worked, or place it in the refrigerator or freezer.
Method 4 of 4: Making Different Kinds of Lipstick
 1 Add some shine with cosmetic glitters. Do not use glitter for crafts, even the smallest grains are too large for use in lipstick. Instead, try cosmetic glitters that you can buy at a beauty salon or order online.
 - To create a pearlescent lipstick, you can use metallic crayons.
 2 Shine your lipstick with castor oil. To do this, when making lipstick, use castor oil instead of edible oil.
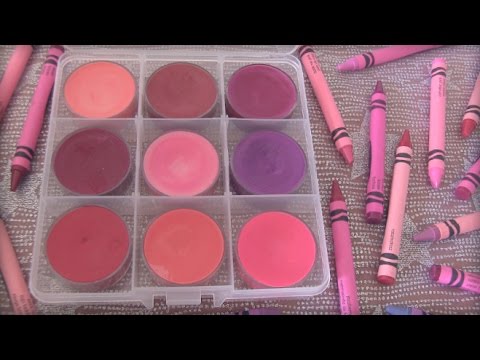
  3 Create your own unique shade by mixing two or more colors. You can mix as many colors as you like, the main thing is that they are all one chalk in size. Here are some combinations you can try:
 - To make the pink richer, add a bit of a juicy, winey hue.
- If the pink is too bright, add a small amount of peach-colored crayon.
- For a radiant reddish purple shade, mix 1 part gold and 2 parts reddish purple. You can add more shine with gold glitter.
- For a hot pink hue, use one part watermelon pulp and one part bright red.
- To create a bright red hue, use one slice of red-orange and one slice of strawberry.
- For a neutral, creamy shade, use one part deep orange-red and one part peach.
- For a silvery purple hue, use one part silver and one part purple.
 4 Use essential oils, edible oils, and extracts to add flavor and scent to your lipstick. You only need one or two drops of your chosen oil or extract. Remember that certain tastes and aromas can be stronger than others, so the proportions will be more or less. Also, keep in mind that the flavor and aroma will intensify after the lipstick has hardened. Here is a list of extracts and essential oils that work well for homemade lipstick:
 - Coconut oil;
- grapefruit or tangerine oil;
- mint essential oil;
- vanilla essential oil.
Tips
- Try to use high quality, well-known brands of wax crayons. Poor quality crayons (such as those used in restaurants) have a higher wax content and are less saturated in color.
- Try using a funnel to pour the liquid mixture into a narrow container, such as a used lipstick tube.
- Remember that some colors are richer than others.
- It is also good to know that if you want to make a clear lip balm or dull lipstick, it is better to use half of the crayon instead of the whole one.
Warnings
- Crayon manufacturers do not approve of their use in makeup. Crayola has even officially protested by not recommending the use of wax crayons for make-up. On the other hand, the share of "rigorous" testing of cosmetics is also negligible, so it's up to you to judge.
- Be wary of side effects and skin irritation. The wax crayons are tested for artistic rather than cosmetic use. Therefore, it is not known how the use of wax crayons affects the long term.
- Don't pour melted lipstick down the sink. Either pour the rest of the mixture into another container or throw it into the trash can. If you pour it into the sink, it will harden and form a blockage.
- Keep in mind that crayons have a higher lead content than regular lipstick. To avoid side effects, do not use your own lipstick on a regular basis. Better to apply it once or twice a month, or save it for costume parties and other events.
You will need
Stove method
- Pan
- Metal or fireproof glass bowl
- Stirring item
- Small containers (contact lens container, empty lipstick or chapstick tube, pill container)
Candlestick method
- Big spoon
- Candle
- Toothpick
- Small containers (contact lens container, empty lipstick or chapstick tube, pill container)


