Author:
Joan Hall
Date Of Creation:
25 July 2021
Update Date:
1 July 2024

Content
- Steps
- Method 1 of 2: Start Weaving Chain Mail
- Method 2 of 2: Weaving Process
- Tips
- Warnings
- What do you need
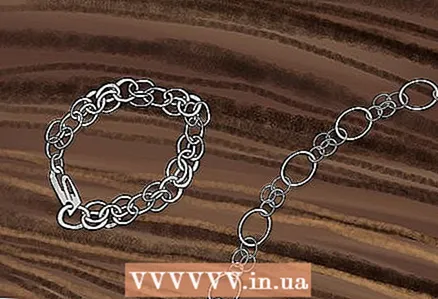
Chain mail is created by weaving rings in a specific sequence. Since this design distributes the force from a blow with a sharp weapon (sword or ax, for example) to a wider area of the body, chain mail has historically been used as armor. Today it can be used in costume performances, in the creation of jewelry, belts or in other decorative elements. In this article, we will show you how to make chain mail with butt-connected rings.
Steps
Method 1 of 2: Start Weaving Chain Mail
 1 Choose the braiding method you like. This article describes one of the most common weaving methods - European 4 in 1. The method is called so because four more rings are connected to each non-extreme ring.
 - This weaving method can be changed (for example, you can use extended weaving and European weaving 6 in 1, where not 4, but 6 rings are used).
 2 Select a drawing. If you're just starting out, grab something small and simple until you get your hands on it. A full chain mail shirt has thousands of rings and can weigh over 13 kilograms. Instead, try making a bracelet, belt, key chain, or just something small and uncomplicated.
 - Try making an unusual and elegant piece of chain mail to suit any occasion. When choosing a wire for jewelry, give preference to a thinner one - many will like such jewelry. Wire numbers 18 (this number indicates the thickness), 20 and 22 are commonly used. Wire number 24 is thinner. It will start to frizz and you may need a magnifying glass to work with it. Jewelry made of wire number 16 are more massive, not everyone likes them.
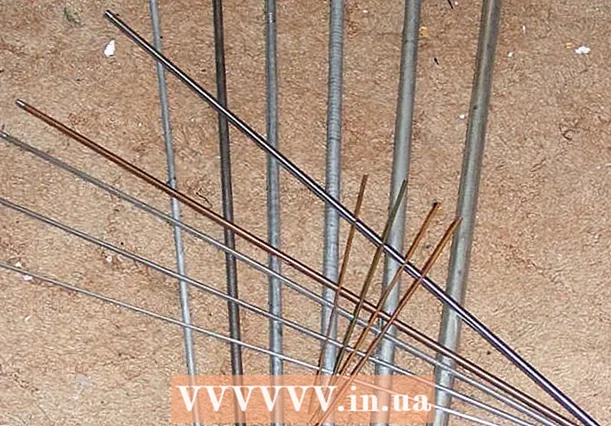
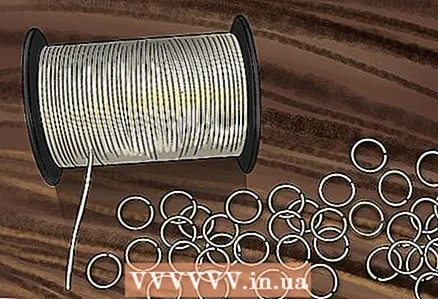 3 Choose a material. Decide whether you will make your own rings out of wire or buy pre-made rings. Rings are of very different diameters (the distance between the inner edges of the ring is measured; in abbreviated form VD - inner diameter) and thickness (meaning the diameter of the wire section; abbreviated as DP, or the diameter of the wire). The ratio between these two parameters is determined by the coefficient according to the VD / DP formula (abbreviated KS is the ratio coefficient).
 - Larger rings will cover a certain area with fewer rings with less weight, but the chain mail will come out more massive and coarse, regardless of the size of the COP.
- Rings with a higher COP will not be as strong as rings with a lower COP of the same material, regardless of the type of material. Larger wire is more reliable, but heavier and harder to work with.
- Rings are not only made of simple iron or steel. You can buy rings in galvanized steel, stainless steel, aluminum, titanium, inconel, niobium, silver, gold and rubber. You can buy multi-colored rings and make multiple layers.
- The simplest source of suitable wire is conventional metal hangers. They bend easily. The only drawback is that you will need to make the rings yourself, and the resulting chain mail will not be very strong.
- Another easy (but not the easiest) way is to go to the hardware store and buy a coil of wire for your electric fence. Such wire is usually inexpensive.
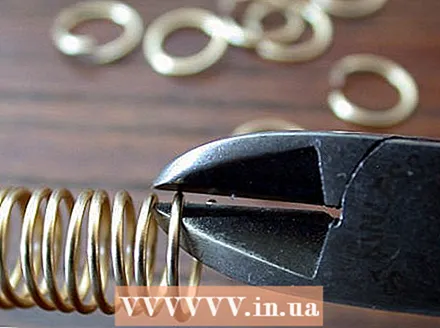
 4 Pick up your tools. You will need ring pliers and a metal bar around which you will bend the rings. The pliers must be suitable for the selected material. Different tools are required for working with poorly bendable steel wire and silver wire.
 - The prongs (that is, the projections) of regular pliers can damage the surface of the metal, especially if you have thin, soft metal wires. If you have relatively soft metal, look for non-serrated pliers or even eyebrow tongs (you will need these for working with very thin wires). You can also cover the prongs with something. The easiest way is to slide the cut plastic tube of the correct diameter onto the pliers. Pliers will be able to bend even strong metal, and they will be quite a handy tool, so you will be able to get the ring of the right size.
- You can wrap the wire around a Philips screwdriver or a steel bar (available at a hardware store). You can also look for something suitable at home.
Method 2 of 2: Weaving Process
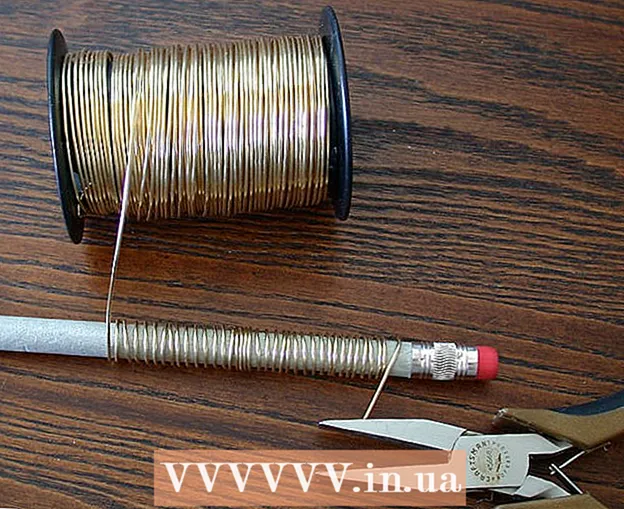
 1 Wrap the wire tightly (if you are starting with wire) around the metal bar. You should not use wooden pins or pencils for these purposes, because when winding the tree will shrink, and the rings will be of different sizes.
 - You may need to hold one or both ends of the wire with pliers. Strive to make even and uniform loops and try to avoid kinks in the wire.If the wire has been wound on a spool or bobbin, wind it in the same bends that it already has. Also try to put the loops as close to each other as possible. The further they are from each other, the longer the rings.
- To make a large number of rings, punch a small hole in the rod, secure the wire, and then start rotating the rod with a drill. It is recommended to wear durable gloves.
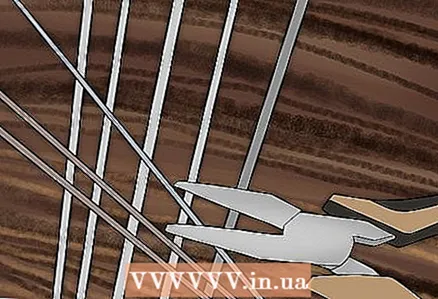
 2 Cut into rings (if you started with wire). It is especially important to wear safety goggles when doing this, as rings can fly off. Try to cut the full rings evenly (360º). A slight diagonal cut when cutting will allow the rings to be closed without play.
 - If you want smoother and flatter ring cuts, you can place the coiled wire in a vise (preferably leaving the rod inside) and cut it with a hacksaw. This ensures that the ends of the rings will not have any sharp notches that can cling to clothing and skin.
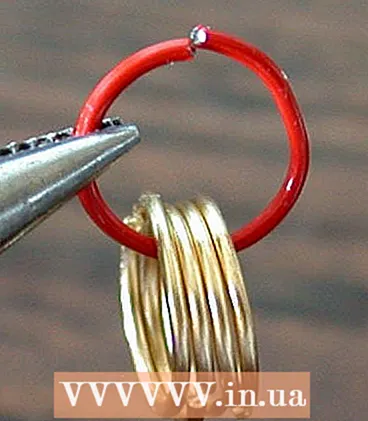 3 Close the four rings using pliers. Slip all four rings over the fifth (in the picture it is red) and close it.
 - Close all the other rings for a neat design and to keep hair out of the rings. When closing and opening the rings, move the ends away from each other so that their tips remain on top of each other, and connect them in the same way. Don't pull the ends in opposite directions, because the ring will no longer be even. You may need to bend the ring a little more than necessary and then return it to the desired position if required by the material you are working with.
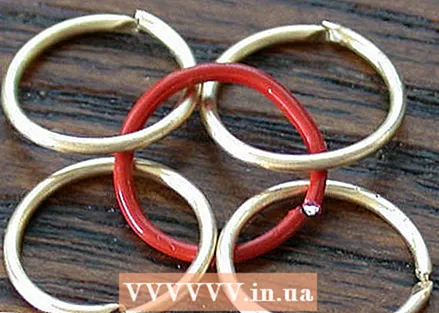 4 Lay out the five rings, as in the picture: two at the top and two at the bottom. Now it looks a little strange, because there are still no elements that will complete the drawing.
  5 Close two more rings. Slip them over another ring (also red), but don't close it yet.
 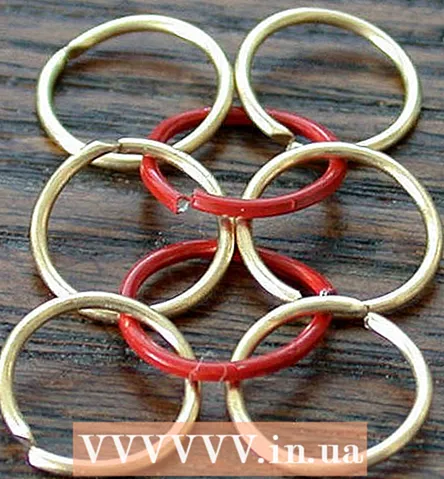 6 Pass the red ring through both lower rings as shown in the picture from bottom to top. Spread out the two lowest rings so that they form the correct pattern.
  7 Repeat the previous two steps until you have a strip of the length you want.
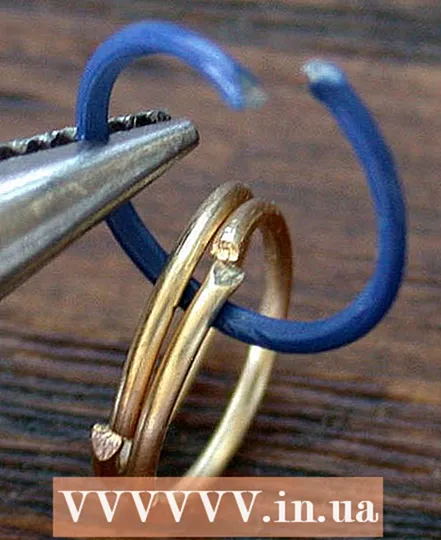 8 Place the two closed rings on the third one (it is blue here).
 9 Start to weave the next row. Pass the blue ring through the top two gold rings of the first row. As a result, it should lie the same as the red ring adjacent to it.
  10 Place one closed ring on top of the other (blue).
 11 Add it to your chain mail drawing by threading this blue ring through three other rings.
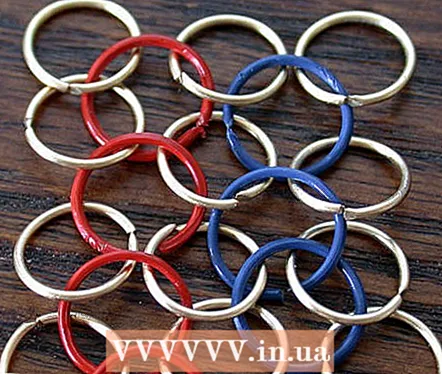 12 Continue to weave the mail, repeating the previous few steps.
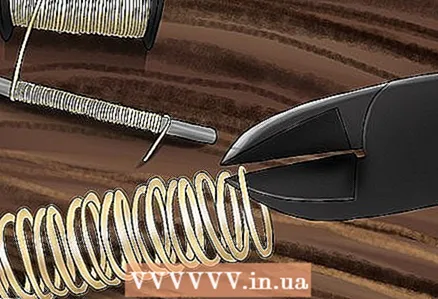 13 To add a new row, do everything described in this section until the fragment reaches the size you need.
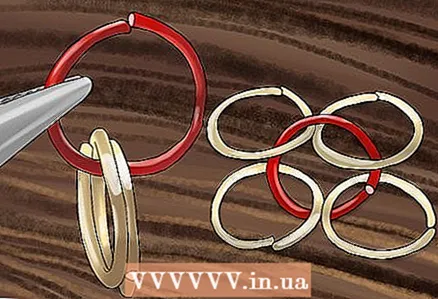 14 Now start doing the second half by repeating the steps in this section. This will make the back of the chain mail.
Tips
- Sometimes it is more convenient to weave chain mail if the elements are hanging from a rope, wire or rod. This can help you a lot, especially if you are just getting started.
- It may be helpful to attach a lining (or similar) underneath the mail to help it hold its shape and also to make the pattern more visible.
- Study the information on the ratio ratio (abbreviated to KS), as it relates to chain mail weaving. This will make your work easier and allow you to choose the right tools for each project.
- Look to other people's mails for inspiration. And remember that imitation, of course, can be the most sincere form of flattery, but it doesn't hurt to repay the authors with proper gratitude. If you are doing something inspired by someone else's idea, be sure to mention that person as the originator of the idea.
Warnings
- Chainmail jewelry and items worn over the head can become tangled in the hair. You can sandpaper the ends of the rings so that they fit tightly.If you are doing something big, polishing all rings in a turntable at the same time will take less time than sanding each ring separately. A scarf or cloth under the chain mail will prevent the chain mail from scratching your scalp or damaging your hair.
- If you plan to use chain mail for fencing rather than as an accessory, fancy dress, or decoration, make sure it is strong enough for what you intend to do. Chain mail can be strengthened by welding each closed ring or by forging closed rings (as was done a long time ago). Chain mail with diverging rings or rings made of aluminum (typical of fancy dress because they are lighter), can not protect from edged weapons. Remember that even the best chain mail only turns a swift, sharp sword into a swift metal bat: you won't get open cuts, but it won't save you from bruises and fractures either.
- Some metals have an unpleasant odor (especially galvanized steel), stain the skin, or corrode from chemicals in the body. Copper and aluminum are known to color leather green and black, respectively.
- The sharp edges of the rings tear the fabric, and some metals leave gray and almost black marks on the fabric. Wear special underwear made of heavy or dense fabric under the chain mail.
- Cut wire ends may be sharp. Handle the rings carefully and wear protective goggles. Store open rings in a secure container with a lid
- It is important to note that the instructions in this article allow you to make chain mail with butt-connected rings, that is, chain mail, in which the ends of the rings are simply pressed against each other. If a strong impact is exerted on the chain mail, the ends of the rings will disperse, due to which the structure of the chain mail will be disrupted, and the body may be harmed. In ancient times, chain mail was made from forged rings, and this was a more complex and lengthy process, but this technology did not allow the rings to diverge. However, none of the crafting methods allow for bulletproof chain mail..
What do you need
- Working surface. Preferably flat and well lit.
- Two pairs of pliers.
- Rings. Select the size and cross section that suits your purpose; consider material and finish. Do you want colored rings? Light weight? Corrosion resistance? Are you going to make jewelry or armor? Do you want to buy rings or will you make your own? If you are going to make your own rings, then you will need the following:
- Wire. Wire can be purchased in a variety of sizes, materials, and locations. Check out hardware stores, farm stores, blacksmiths stores, handicraft stores, and even construction and hardware stores in department stores.
- Metal rod or mandrel for wire winding. Do not use wooden pins because they shrink when the wire is wrapped around them, resulting in rings of uneven size. This is not so important if you are just indulging, but if you are working on a serious project, it is not worth it. Wood rods are also not as reliable as metal rods, so they are more prone to breakage when wound.
- Tool for cutting coiled wire. Bevel cutters, metal scissors, conventional cutters, nail clippers, bolt cutters, hacksaws, jewelry files, bow saws, rotary saws and slot saws are suitable for cutting rings. Some pliers have built-in nippers. Be aware that different cutting tools make different cuts. Pintuck cut - this is a cut in which the two ends of the wire are sharpened, and when closed, the following pattern is formed:>. Semi-flat cut has one flat and one sharp end; when closing, a smaller pattern is formed:> |. Diagonal cut leaves fairly smooth beveled ends, but may warp the rings slightly: //. Flat cut usually remains from saws; the ends are perfectly parallel, but the diameter of the ring is reduced by the thickness of the saw blade: ||.


