Author:
Janice Evans
Date Of Creation:
27 July 2021
Update Date:
1 July 2024

Content
- Steps
- Part 1 of 4: Hatching Duck Eggs
- Part 2 of 4: Taking care of the ducklings
- Part 3 of 4: Taking Care of the Ducks
- Part 4 of 4: Reasons for Raising Ducks
- Tips
- Warnings
- What do you need
If you decide to breed ducks, keep in mind that you will have to devote a lot of time to caring for them. And it may not be as easy as it sounds. Ducks are easier to breed than other types of birds, and in addition, many people enjoy raising and watching them. If you are interested in breeding ducks from eggs, young animals or adults, the information below is for you.
Steps
Part 1 of 4: Hatching Duck Eggs
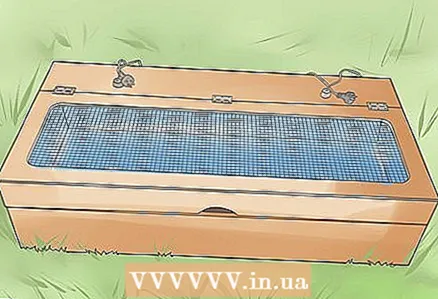
 1 Plan ahead. Ducks usually hatch from eggs after 28 days, but there are breeds that can take up to 35 days to do this. Be sure to check if your incubator is suitable for this before purchasing eggs and attempting to incubate them.
 - Duck eggs are larger than chicken eggs, so most chicken incubators cannot accommodate duck eggs. Make sure the incubator tray is large enough.
 2 Do not put eggs in the incubator right away, wait for the environment inside to stabilize. Set the temperature to 99.5 degrees Fahrenheit (37.5 degrees Celsius) and 55 percent relative humidity, or 84.5 degrees Fahrenheit (29 degrees Celsius) wet bulb.
 - The ventilation level should be exactly as indicated in the manufacturer's instructions.
- Allow the incubator to stabilize - wait a day or two, and only then lay eggs.
 3 Select the eggs you use carefully. For the ducklings to hatch, the eggs must be in good condition.
 - Avoid cracked, double-yolk, misshapen, too large or too small, and very dirty eggs.
- It will be ideal if you put eggs that were laid one or three days ago in the incubator.
 4 Check the incubator four times a day. After placing your eggs in the incubator, you will need to check them at least four times a day. Turn the eggs over each time you check. This way they get the same amount of heat from all sides.
 - On the first day, eggs should be checked every hour.
 5 Remove any unusable eggs one week after laying the eggs. If there are eggs with transparent shells among the eggs, it means that they are sterile. Eggs with spots on the shell are dead inside. Remove these eggs.
  6 After 25 days, transfer the eggs to the brooding tray. The eggs can be transferred to another incubator or the settings can be changed to create a suitable environment for the hatched eggs.
 - The temperature should be 99 degrees Fahrenheit (37.2 Celsius) and the humidity should be 65 percent.
- Raise the humidity level to 80 percent and ventilation to 50 percent, when the eggshell begins to crack or changes noticeably.
- For the last 6-12 hours of incubation, lower the temperature to 97 degrees Fahrenheit (36.1 Celsius) and the humidity to 70 percent. Open the ventilation slots fully.
 7 Take the hatched ducklings out of the hatchery. Once 90-95 percent of the ducklings are hatched and dry, transfer them to a brooder.
Part 2 of 4: Taking care of the ducklings
 1 Buy only two ducklings. If you are buying ducklings and not raising them yourself, buy two to four ducklings.
 - It will be easier for you to care for a small number of ducklings, especially if you are a novice breeder. But never buy one duckling, he will be very lonely. Ducks always need the company of their own kind.
- If you buy ducklings from the hatchery, you will be offered 10-15 ducklings as a minimum. This can be overwhelming, so try to give some of the ducklings to responsible relatives or friends.
 2 Dip the beaks of the ducklings in a shallow bowl of room temperature water. If you bought ducklings (they did not hatch from your eggs), you need to water them. To do this, you need to lower the tip of each duck's beak into a shallow bowl with plain or sugar water.
 - If you want to use sugar water, add 1/3 cup (80 ml) sugar to 1 gallon (4 L) water.
 3 Always give your ducklings enough water. Water helps them to swallow food easier and clears the nasal openings of their beaks. Water must be in a place accessible to ducklings for at least an hour before meals and an hour after meals.
 - Small vessels and basins of water are recommended for ducklings, because they are very fond of splashing and splashing water. Be prepared to clean up the area often.
- A weekly duckling typically drinks about ½ gallon (2 L) of water per week. A seven-week-old duckling will drink the same ½ gallon (2 L) of water in one day.
- Make sure the suggested water is no deeper than 1/4 inch (6.35 mm) to prevent drowning.
- Remember, ducklings don't make water-repellent fat until four weeks of age. In the wild, before this age, the mother duck herself greases the ducklings with fat. Domestic ducks, on the other hand, cannot swim until the age of four weeks, since they still do not produce such fat.
- Until the ducklings reach the age of one month, they can swim for a very short time and under close supervision. This can be achieved by pouring warm water into a small plastic container (bucket, tub) for 2-5 minutes. Dry the ducklings before returning to the brooder.
 4 Set up a brooder for ducklings. Keep your ducklings warm and safe in a brooder that protects them from predators, drafts and disease.
 - You don't need anything special. A free bathtub, a plastic container, a dog's basket, and even a cardboard box covered in plastic are perfect.
- Place a dish of water in one of the far corners of the brooder and put several layers of newspaper under it to absorb water, which the ducklings will sprinkle.
- When the ducklings are old enough to tell the difference between edible and inedible, line the brooder with wood shavings.
 5 Keep the brooder warm. Hang a heat lamp over the brooder and keep it on until 7-9 weeks of age. Until this age, ducklings are unable to regulate body temperature and need external heat sources.
 - Frozen ducklings always huddle together. Hot ducklings move away from the lamp as far as possible.
- The temperature for the first week of their life should be 90 degrees Fahrenheit (32.2 Celsius). Decrease the temperature by 1 degree Fahrenheit (1/2 degree Celsius) per day after the first week until the temperature in the brooder is equal to the ambient temperature.
 6 Provide shelter for your ducklings. Once the ducklings are fully fledged and accustomed to outside temperatures, move them to a shed (shed) instead of a brooder. The shed should protect the ducklings from predators and bad weather, as well as provide them with peace and quiet.
 - The barn should be well ventilated and provide enough space for ducklings (later adult ducks) to spread their wings.
 7 Feed your ducklings regularly. You can buy special food for ducklings or simple, no medicinal food for chickens. However, if you are using chicken feed, you will need to spray brewer's yeast on top of it to ensure you have enough niacin (vitamin PP).
 - You can gradually add raw oatmeal to the ducks as a source of additional protein. Add no more than one part oatmeal to three parts feed.
- Add brittle sand to your food to help the ducklings digest it.
- Offer your ducklings healthy treats every few days, such as dandelion greens, grass, unprocessed seaweed, worms, cabbage, peas, and wet oatmeal.
- Clean and remove feed every day, as it can get wet, moldy, and a source of bacteria if left on.
 8 Handle the ducklings often. If you are going to keep ducks as pets, they must be handled from childhood. It helps them socialize and form a bond with you.
 - It is for this reason that ducks are preferred to grow from childhood, or even hatch from eggs, because the social model and behavior of ducks is formed even at the age of ducklings.
Part 3 of 4: Taking Care of the Ducks
 1 Get a couple of ducks. If you are buying adult ducks rather than raising them from eggs or ducklings, you need to buy two or four ducks, especially if you are raising them as pets.
 - If you have more than four ducks, you cannot keep them in a small space. As a result, the selected area will quickly become dirty.
 2 Provide enough water for adult ducks. Just like ducklings, adult ducks need access to water during feedings so that they can easily swallow their food and clean the nasal openings in their beaks.
 - It is not at all necessary to provide the ducks with a pond. More precisely, if your pond is difficult to clean, then this should not be done at all - this can become a threat to the health of ducks ..
- Place a dish of water near a food source. Ducks need to drink while eating to avoid choking.
- Shallow plastic pools are great for duck swimming. Plus, they are inexpensive and easy to clean and move around.
- Place fine rolled gravel, sand, and sawdust underneath and around the pool to limit the amount of mud produced. Brush it all out once or twice a year.
 3 Feed adult ducks in a balanced way. Despite the fact that ducks get their own food: larvae, various grasses, as well as other pasture, add balanced nutritious food to their diet.
 - Commercial waterfowl food is recommended for ducks, but if you cannot find one, you can use bird food or chicken food, but no medicinal additives.
- You may need to add sand to duck food (to improve digestion) or calcium (to strengthen bones).
- The nutritional requirements of ducks change with age. As a general rule, young ducks should not get a lot of calcium, unless you plan on raising them for slaughter.
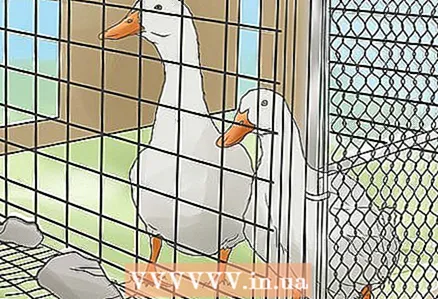
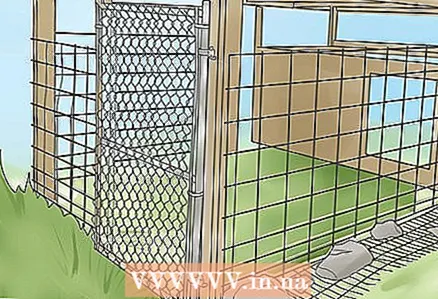 4 Maintain good duck housing. Ducks can become victims of wild predators or bad weather, and the main task of their housing is to protect against these threats.
 - In addition, the lodging provides the ducks with a relaxing break.
- Make sure the duck shelter is well ventilated and spacious enough for the ducks to spread their wings and clean their feathers.
- A separate house (shed), chicken coop or closed enclosure are perfect. It is not at all necessary for the duck dwelling to be perfectly closed.
- If you have enough strength and energy, consider getting a shepherd dog (like a shepherd dog) so you can train it to guard your ducks at all times.
 5 Keep the ducks behind a fence. Even if you allow the ducks to graze freely, you should keep a fence around their grazing area. A fence height of 2 - 2.5 feet (61 - 76 cm) will suffice for the fence. If you take good care of the ducks, they will not try to jump over such a fence.
 - If your ducks are a flying breed, trim the first-order flight feathers on one of the wings each year to keep them from flying away.
 6 Monitor the health of the ducks. Ducks are very susceptible to parasites and diseases, which often lead to pestilence in chicks. You need to make sure their basic sanitation needs are met.
 - Provide healthy ducks with ample open space for physical activity.
- Keep at least three ducks (females) per drake (male) to avoid unnecessary stress on females.
- Watch for signs of illness: ruffled feathers, changes in diet or drinking, lethargy, or bloody diarrhea.
- If a duck becomes ill, isolate and treat it immediately.
Part 4 of 4: Reasons for Raising Ducks
 1 Adopt a duck as a pet. The main reason for adopting a duck is simply for the sake of company. Ducks are fun to watch as they enjoy splashing around in the water and become attached to the people who care for them.
  2 Eat duck eggs. Duck eggs contain more protein, calcium, iron and potassium than chicken eggs. Many breeds of ducks lay more eggs per year than chickens.
 - Remember, if you are allergic to chicken eggs, you can tolerate duck eggs well. But be sure to check with your doctor before consuming duck eggs.
- Duck eggs are used almost everywhere chicken eggs are used, but keep in mind that they are usually larger. Keep this in mind when adding duck eggs to your recipes.
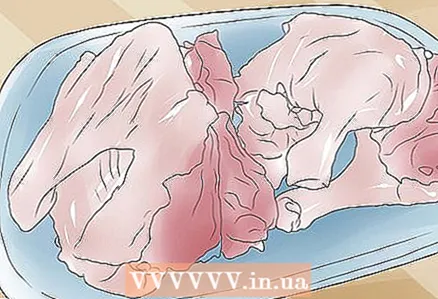 3 Use duck meat. If you have come to rearing a large number of ducks, some of them can be used for food. Duck meat is high in protein, iron, zinc and selenium.
 - Baked duck leg contains 217 calories and 11 grams of fat, which is comparable to the amount of calories and fat in a broiler chicken leg.
- Likewise, baked duck breast contains 140 calories and 2.5 grams of fat, while broiler chicken breast contains 165 calories and 3.6 grams of fat.
 4 Sell eggs, ducklings and adult ducks. If you have live ducks, ducklings and eggs for sale, you might find a buyer at a nearby farm or in the countryside. If you sell a little, you won't need a license. But before doing this, check your local legislation.
 - If you are planning to build a business selling ducks, you need to obtain suitable licenses at the city, provincial and state levels. In addition, you will have to follow strict sanitary regulations.
- If you are going to sell eggs or food, or duck meat, you will have to follow strict food and hygiene requirements during meat production.
Tips
- Raising ducks is cheaper than raising chickens because ducks use a higher percentage of pasture food in their diet than chickens. In addition, they take up less space.
- Ducks are beneficial to the garden as they hunt for larvae, snails and other pests. What's more, they rarely harm garden plants, even when they eat greens (unless they find a lettuce or strawberry that they love to chew).
- Find the breed that suits you best. If you need a cheap breed to use ducks for food and livelihood, go for the Common Mallard. If you are interested in a duck as a pet, choose among the thoroughbred ducks of the following breeds: Ancona, Cayuga (green duck), Khaki-Campbell, Whetstone duck, "Blagovarsky" cross-breed ducks.
Warnings
- Make sure all seedlings are protected in your garden if you are letting the ducks free to graze. The flat feet of ducks can trample on delicate seedlings.
- Buy eggs, ducklings and adult ducks from a reputable breeder to ensure the ducks you buy are healthy.
- Always wash your hands thoroughly after touching ducks or anything in their living area. Even seemingly healthy ducks can carry salmonella (bacteria can be found in droppings and on the body).
What do you need
- Duck eggs, ducklings or adult ducks
- Incubator
- Chick hatching tray
- Brooder
- Flat water dish
- Children's plastic pool
- Water
- Duck or chicken feed
- Newspapers
- Fence
- Small corral (barn)
- Trough


