Author:
Carl Weaver
Date Of Creation:
23 February 2021
Update Date:
1 July 2024

Content
- Steps
- Part 1 of 3: The Basics
- Part 2 of 3: Cutting
- Part 3 of 3: Sharpening, Sanding and Polishing
- Tips
- Warnings
If you've ever been to a tool store, you may have seen Dremel. It is a multipurpose rotary instrument with a wide range of attachments and attachments. It can be used to process wood, metal, glass, electronic components, plastics and many other materials. This tool is perfect for handicrafts and minor repairs, it is convenient for them to work in confined spaces and hard-to-reach places. Master Dremel and give it a try, and you'll appreciate this versatile tool.
Steps
Part 1 of 3: The Basics
 1 Select Dremel. Dremel was one of the first manufacturers to start producing rotary instruments and is still known mainly for these instruments. The company also manufactures many other tools, including electric screwdrivers and jigsaws. Check out their products and choose the tool that's right for you. Prices vary widely, so it is important to make the right choice. Pay attention to the following characteristics:
 - mains powered or wireless;
- lightweight and portable, or more durable and massive tool;
- operating time without recharging;
- fixed or variable speed: the former is cheaper and easier to use, while the latter is better suited for finer work.
 2 Read the instruction manual. Dremel is supplied with various drills and other attachments and tools, as well as instructions for use. Be sure to read the instructions before using the tool and become familiar with the controls. Learn how to turn the tool on and off, switch speeds, and change attachments.
 - Your instrument may differ from earlier models, so carefully read the instructions that came with it.
 3 Use appropriate protective equipment. Always wear work gloves or rubber gloves before working with Dremel to protect your hands from sawdust, shavings and sharp edges. Also wear safety glasses, especially when cutting, sanding or polishing.
 - Keep your work area clean. Keep children and other people away when using the tool.
 4 Practice installing and securing the attachments. To put on an accessory, loosen the tool collet and insert the accessory shank into the hole. Tighten the chuck nut so that the bit is firmly seated in the hole and does not twist. To remove the bit, press the release button and unscrew the collet nut - this will loosen the clamp and you can remove the bit.
 - Before installing or changing the attachment, make sure that the Dremel is turned off and unplugged.
- Some models are equipped with special collets that allow you to quickly and easily change accessories.
- Collets are also available in different sizes to suit different shank diameters.
- In some cases it is necessary to use a mandrel to hold threaded shanks. These shanks can be used in polishing, cutting and sharpening accessories.
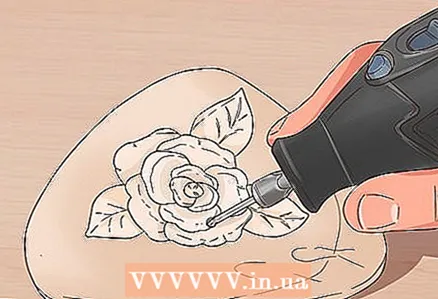
 5 Use suitable attachments. Use different attachments for different materials to be processed.Dremel manufactures many different attachments to work with almost all types of materials. For example, you can purchase attachments for the following jobs:
 - Carving and Engraving: Use high speed carving and engraving bits, carbide taper cutters, tungsten carbide cutters, and diamond-tipped spot cutters;
- shape milling: use cutters for contouring (straight, curly, corner, groove, etc.); do not put anything other than cutters on the milling head;
- Drilling small holes: use drills (they can be purchased one at a time or as part of a set).
 6 Before connecting Dremel to the network, make sure it is turned off. Set the minimum speed, connect Dremel to the network and test the operation of the instrument at different speeds.
 - To get comfortable with the instrument, try holding it in different ways. When carrying out delicate work, you can hold the Dremel like a pencil. If you have a rougher job, it is better to grip the tool firmly in your hand.
- Clamp the material to be processed in a vise or clamp.
- Consult your owner's manual to determine the optimal speed for a particular job.
 7 Clean the Dremel every time after work. When finished, remove the accessory and put it back in the box. Wipe down the tool after work - this will significantly extend its service life. Read the instructions before disassembling the tool for general cleaning.
 - Blow out the tool openings with compressed air frequently to prevent damage to electrical circuits.
Part 2 of 3: Cutting
 1 Use Dremel to cut small pieces. Due to its low weight and small size, Dremel is well suited for cutting small objects. However, it is a hand tool, so it is difficult to get an even long cut with it. However, you can make several straight cuts and then smooth the surface with a sander.
 - Do not use the Dremel to cut thick and bulky objects - a larger tool is better suited for this.
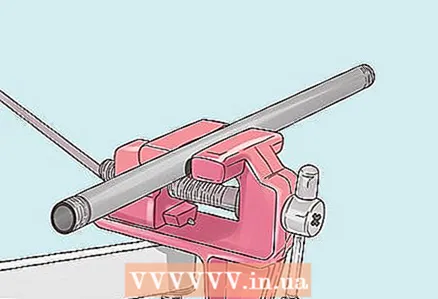 2 Secure the part. Use a vise or other fastening tool for this, depending on what exactly you are going to cut. Do not try to hold the object to be cut in your hands.
  3 Set the speed appropriate for the material and tool. Too high or low speed can damage the motor, cut-off wheel or material being cut. If you are not sure, check the instructions for the recommended speed for your tool and material.
 - If you are cutting thick or hard material, do it in several steps. If the material is too thick or hard and difficult to cut, a pendulum saw may be required instead of Dremel.
- If smoke appears or the color of the material changes, then you are using too high a speed. Intermittent or sluggish motor operation indicates that you are applying too much pressure on the tool. Release pressure and adjust speed.
 4 Try cutting up the plastic. Place the cut-off wheel on the Dremel. Remember to wear safety glasses and ear protection before work. Set the speed between 4 and 8 for enough power without burning out the motor. When finished, clean the sharp edges of the cut.
 - Do not press too hard on the tool to avoid damaging the Dremel and the cut-off wheel.
- For convenience, you can draw cutting lines on the plastic. This will help you cut the material more easily and accurately.
 5 Practice cutting metal. Attach a metal cutting circle to the Dremel chuck. Put on safety glasses and ear muffs before starting work. Turn on the tool and set the speed between 8 and 10. Make sure the metal part is securely fastened. Lightly touch the cut-off wheel to the metal for a few seconds and make a small cut. In this case, sparks will fly from under the circle.
 - Reinforced cut-off wheels are stronger than conventional abrasive wheels. The abrasive wheel can crack when cutting metal.
Part 3 of 3: Sharpening, Sanding and Polishing
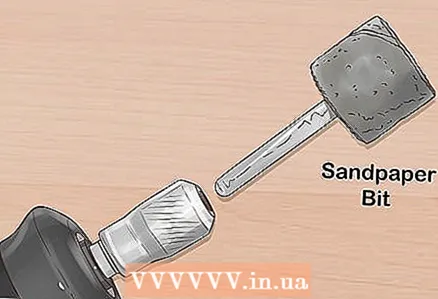
 1 Use Dremel for sanding. Grinding stones can be connected to the tool. Insert the sharpening stone into the Dremel chuck or mandrel and secure it. Use a low speed to prevent overheating of the material. Carefully bring the whetstone close to the material and start sanding.
 - For grinding, you can use sharpening stones, grinding wheels, chainsaw sharpening stones, abrasive wheels and grinding heads. For grinding metal, porcelain and ceramics, carbide tools are best.
- For grinding rounded surfaces, use cylindrical or triangular tips. Use a flat circle to cut or sand the inside of a corner. For grinding rounded surfaces, cylindrical or triangular tips are suitable.
 2 Use Dremel for sharpening. Choose a suitable emery pad and clamp it in the Dremel. There are emery bits in a variety of grit sizes and should all fit the same chuck. Insert the shank of the emery tool into the chuck and tighten the nut. Turn on Dremel and set the speed from 2 to 10. For sharpening and polishing wood or plastic, select a lower speed. Use a higher speed when working with metal. Secure the workpiece securely and bring the emery tool up to it so that it is firmly in contact with the surface to be sharpened or grinded.
 - Make sure that the emery tips are of normal quality, otherwise they can scratch and damage the surface to be treated. The attachments must not be worn out and must be firmly inserted into the tool holder. Keep a few emery bits so you can quickly change them if needed.
- For sharpening, you can use emery bits, sharpening discs, grinding wheels, finishing abrasive brushes and finishing brushes.
 3 Go from coarse to finer emery bits. If you need to cut a large surface, start with coarse emery bits and then work down to the finer ones. This way you can quickly remove large scratches and smooth the surface. If you start right away with a fine emery tool, you will take more time to erase that tool.
 - Check every one to two minutes to make sure the attachment is not worn out or damaged. In this case, do not forget to turn off Dremel and disconnect it from the network.
 4 Polish metal and plastic. Dremel is perfect for polishing small parts and hard-to-reach areas. Apply a polishing compound to the surface to be treated and place a felt tip or polishing wheel on the Dremel. Start at a low speed (eg 2), walk over the surface and spread the polishing compound evenly over it. Polish the surface in a circular motion. Work at a low speed (no higher than 4).
 - You can do without polishing paste, but this will result in a less smooth surface.
- Use rubber tips, rag buffs, and buffing brushes for cleaning and polishing. Choose brushes with suitable stiffness. Polishing brushes are great for removing old paint from metal or cleaning tools or grills.
Tips
- Secure the workpieces properly. Correct the mount if it is loose.
- Do not press too hard on the tool when cutting and sanding. Let the emery pad and cut-off wheel do their job.
- Start working with the material after the rotation of the tool reaches a predetermined level.
- Dremel brushes are designed for 50-60 hours of operation. In case of failures or problems, contact support.
Warnings
- Keep your work area clean. Work outdoors or in a well-ventilated area.Drilling, sanding, cutting and sharpening will leave small debris on you, on the floor, and in the air around your work area.
- Always wear safety glasses when working with Dremel.


