Author:
Janice Evans
Date Of Creation:
23 July 2021
Update Date:
1 July 2024

Content
- Steps
- Method 1 of 3: Making a stand
- Method 2 of 3: Fabric decorating
- Method 3 of 3: Other ways to decorate your stand
- Tips
- Warnings
- What do you need
To prevent the phone from lying around while charging, it needs a stand to ensure its safety. However, there is no need to run to the store and buy a ready-made device: you can easily make a stand for charging your phone from a flat plastic bottle yourself. And most importantly, such a stand can be used to charge other gadgets of similar size.
Steps
Method 1 of 3: Making a stand
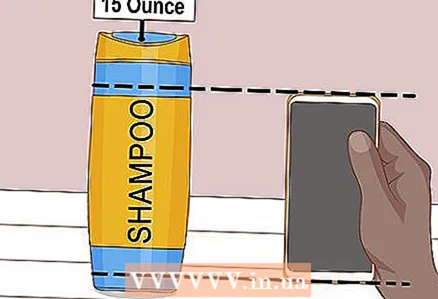 1 Find a flat bottle that fits your phone. Try to find a flat bottle rather than a round one. This shape will give the stand a better fit to the wall when you hang it. For most mobile phones, a shampoo bottle with a volume of about 400 ml will work.
 - Place the phone against the bottle to match the dimensions. The edges of the bottle should protrude beyond the edges of the phone.
 2 Remove labels from the bottle and wash inside and out. Rinse the bottle with hot water to remove any remaining contents. Peel off the labels and wipe off any remaining glue with white vinegar, oil, or a glue remover. Dry the bottle upside down before proceeding.
  3 Use a permanent marker to mark the desired height for the front edge of the stand. Place the phone against the bottle, aligning it with the bottom of the bottle. See how high the front of the stand is best for you and mark its level with a permanent marker. In most cases, it is ideal to use two-thirds of the height of the phone.
  4 Draw a line from the mark in front to the back wall where you will need to provide a smooth upward protrusion. First, draw a horizontal line on the front of the bottle along the previously marked mark. Extend the line to the sidewalls of the bottle. When you reach the back wall, draw an arcuate ledge up on it.
 - The height of the tab depends on the level at which you intend to position the charger.
 5 Transfer the outline of the back of the charger to the back of the bottle. Attach the charger to the back of the bottle with the fork facing up. Make sure it is about 1 cm below the drawn arched ledge. Trace the outlines of the charger with a permanent marker and then remove the charger.
  6 Cut the plastic of the bottle along the marked lines. First, cut out the outer contours of the stand, and then the hole for the charger. The easiest way to do this job is with a craft knife or utility knife. But some people find it easier to work with scissors when cutting plastic bottles.
  7 Sand the sections of the plastic with fine-grained emery paper. This will remove the sharp edges. If you plan to decorate the stand further, it is also a good idea to rub the entire outer surface with sandpaper to give the plastic a slight roughness. Remember to rinse the stand afterwards.
 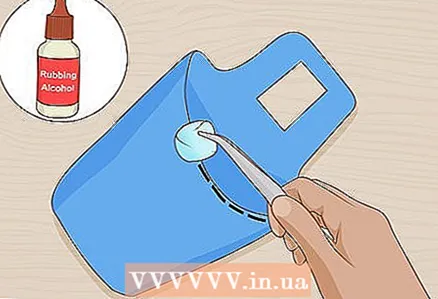 8 Wipe off any remaining marks of the marker with rubbing alcohol or nail polish remover. Simply moisten a cotton ball or disc with your preferred product, and then wipe the plastic with marker marks with it. Most of the time rubbing alcohol will erase the marker successfully, but if you need a stronger solution, try nail polish remover or acetone.
 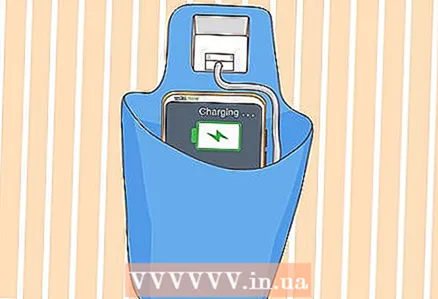 9 Use a new stand. Plug the charger into a power outlet, and then slide the hole in the stand over it so the phone pocket faces out. Connect the cable to the charger and then to the phone. Lower the phone into the cradle and tuck the excess cable into it.
 - Important note: make sure that the stand hangs on the plastic part of the charger, do not let it slide onto the metal contacts of the power plug.
Method 2 of 3: Fabric decorating
 1 Choose an elegant fabric that matches your home decor. Make sure you have enough fabric to wrap it completely over the stand with a one centimeter overlap. You can use either plain or patterned fabric. Cotton is best suited for this purpose.
  2 Cover the outside of the stand with decoupage glue. Use a sponge brush to apply the glue. To simplify the task and reduce clutter, it is wise to apply glue to the stand only from the front first.
  3 Pull the fabric over the stand so that the edges meet at the back. Press the fabric against the front of the stand and smooth out any wrinkles. Next, apply extra glue to the sides and back of the stand, then wrap it tightly with a cloth. From the back, overlap the fabric with a 1 cm overlap.
 - Make sure that the flap of fabric is located strictly symmetrically. You will have a lot of excess material in front. Don't worry about it, you will cut it later.
 4 Let the glue dry. Place the stand upside down on a long, narrow object, such as the neck of a bottle or a candlestick, to allow it to dry. Even a paper towel tube will work for this.
  5 Trim off excess fabric around the outside edge of the stand and at the charger hole. When the glue is dry, trim off excess fabric along the outer contour of the stand at the top and bottom. Then place the stand with its back on the cutting mat and cut the fabric from the charger hole.
 - You can use scissors or a craft knife to remove fabric along the top and bottom contours of the stand.
- Use only a craft knife to remove the cloth from the charger slot.
 6 Apply a second coat of decoupage glue to the stand, paying special attention to the edges, then let it dry. Apply the adhesive using the same method as before. Only this time, work it over the edges of the plastic, including the top, bottom and the hole for the charger.
 - This will be the topcoat for your product, so use the type of adhesive that will give you the surface texture you want: matte, semi-gloss, or glossy.
 7 Cover the bottom of the stand with a cloth if desired. Use a pen to trace the contours of the bottom of the stand on the wrong side of the fabric. Cut out the resulting part, and then glue it to the bottom with decoupage glue.Leave the stand to dry with the bottom up (as before), and then additionally cover the bottom with a finishing layer of decoupage glue.
Method 3 of 3: Other ways to decorate your stand
 1 Use patterned colored self-adhesive paper if you can't find a suitable fabric. Cut out a rectangle of paper according to the height of the stand and the size of its circumference. Remove the protective backing from the paper and stick it onto the stand. Trim off excess paper at the top and bottom, and then from the charger hole.
 - If you want to glue the bottom, trace its outlines on self-adhesive paper, and then cut out the resulting part. Remove the backing from the paper and stick to the bottom.
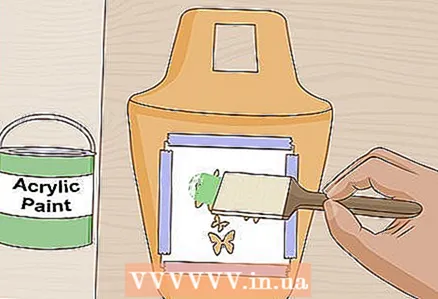
 2 Spray paint the stand for an easy and quick solution. Move the stand to a well-ventilated area. Cover it with 1-2 coats of spray paint, letting each coat dry for 20 minutes. Then protect the paint with a layer of clear acrylic spray.
 - Paint the front side first, then the back side, then the bottom.
 3 Liven up the boring look of your stand with stencil patterns. Place the stencil on the front of the stand. Secure it with tape, and then paint on top with a sponge brush. Remove the stencil and let the paint dry.
 - This can be done both on bare plastic and on painted with paint or pasted over with cloth.
- Also, if you have artistic talent, you can draw patterns by hand or use stamps and acrylic paint.
 4 For a bold design, wrap a wide ribbon around the stand. Take a piece of tape that is 5–7.5 cm wide, just enough to wrap the stand around with an overlap of about a couple of centimeters. Apply glue or double-sided tape to both ends of the cut, and then wrap the tape around the center of the stand. At the back, place the ends of the tape on top of each other, as far as the margin of length allows.
 - This step can be combined with raw and painted plastic.
 5 As a simple step, decorate the stand with stickers. Paint the stand first or leave it as it is. Next, decorate the stand with stickers or self-adhesive rhinestones. You can also use decorative tape with patterns if you like linear geometric designs.
Tips
- Do not add to stand right away all possible decorations. Stop at one or two ideas and implement them!
- You can leave the stand unadorned if you like.
- Be aware that matte bottles look better than transparent ones, especially if you choose not to decorate your craft.
- If the stand is too long for the level of the outlet, it may rest on the floor. Shorten the upper mounting part and make the hole for the charger lower.
Warnings
- Do not leave such a stand unattended if attached directly to the charger. If the plastic touches the pins of the plug, it may melt.
What do you need
- Empty flat bottle for shampoo, balm, or hair conditioner
- Scissors, utility knife, or craft knife
- Permanent marker
- Fine-grained sandpaper
- Cloth, paint, jewelry, and the like (optional)


