Author:
Sara Rhodes
Date Of Creation:
17 February 2021
Update Date:
1 July 2024
Content
- Method 2 of 4: Grip the blade or pinch clamp (Professional grip)
- Method 3 of 4: Guiding the Knife While Cutting
- Method 4 of 4: Directing the Knife While Pounding
- Note that a bolster is a blunt piece of metal between the tip and the handle of the knife.
- The hammer grip is most popular with most aspiring chefs; it is generally considered more natural than blade grip. This method is also good for chefs with very small hands. On the other hand, in this hammer style, the wrist is not aligned with the palm and fingers, thus limiting your control of the knife.
 2 Place the rest of your fingers around the handle. Grasp the entire length of the handle with your middle, ring and pinky fingers, aligning them with your index finger.
 - Keep your fingers close together for the best grip and strength. Ideally, there should be no gaps between the fingers when squeezing the handle of the knife.
3 Hold your hand confidently. Slice food by grasping the knife handle tightly. None of the fingers should change their position during your work. - Many aspiring chefs have a habit of extending their index finger over the blunt upper side of the blade while cutting. However, this is a rash act. The index finger itself does not provide enough force to control the blade, and you can only injure that finger while cutting in this way.
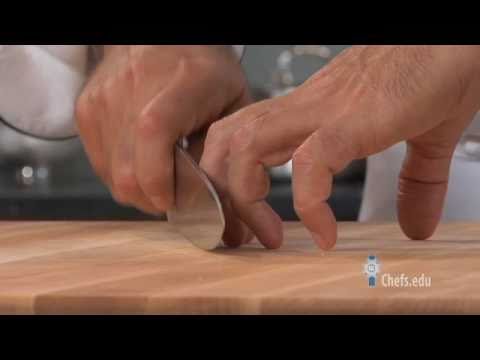
Method 2 of 4: Grip the blade or pinch clamp (Professional grip)
- 1 Grasp the base of the blade. Grasp the blade between your thumb and forefinger. These fingers should be where the blade meets the handle.
- If desired, you can grip the base of the blade with your thumb, forefinger, and middle finger. Some chefs find this position easier to work with than holding the base with only thumb and forefinger.
- When using a knife with a clearly thin blade versus a utility or meat knife, you may find it easier to grip the base of the blade with your thumb and middle finger, resting your index finger over the blunt upper edge of the blade.
- In general, this professional grip provides greater precision and control during cutting.
- 2 Position the middle finger behind the bolster. Bend your middle finger just behind the knife bolster. It should wrap around the top of the knife handle.
- A bolster is a blunt strip of metal between the tip and the handle of a knife.
- While holding the blade in your hand with your index and middle fingers, you will need to position your ring finger behind the bolster.
- 3 Place the rest of your fingers loosely on the handle. Wrap your other fingers lightly around the knife handle, bending them along the entire length of the knife handle without pressing tightly.
- These fingers are wrapped around the handle for support. All of the actual force must be directed by the fingers that grip the blade.
- 4 Keep your hand loose. Your grip should be strong enough to hold the knife. Use a minimum of force while cutting.
- Gripping the knife too tightly will strain your hand excessively. In this case, it will tire faster, and the accuracy, safety and speed of slicing will only decrease.
Method 3 of 4: Guiding the Knife While Cutting
- 1 Take the knife in your main hand. Grab the handle or knife blade of your choice.
- The main thing is the hand with which you write and do the rest. It is in this hand that you must hold the knife. The second hand will be responsible for the direction of the knife in the process.
- Gripping the blade is only recommended if you are comfortable with it. In this knife guiding technique, you can use a grip on both the blade and the handle.
- 2 Hold the food with your bent fingertips. Place the food to be sliced on a cutting board. Use your fingers to hold the food in place.
- Place your fingers over the food, then round or slightly bend them so that the fingertips are hidden under the bent bones. By holding the food in this way, you reduce the risk of cutting yourself.
- Due to the peculiar position of the non-dominant hand, this technique is often referred to as the “claw” cutting position.
- The product must remain stationary. Ideally, it is recommended to lay it flat side down on the board. If the food does not have a flat side, it is a good idea to start by cutting off a piece or cut to create a flat surface. This flat surface must remain upside-down on the board to continue the process.
- 3 Use your knuckles to guide the knife. When making a cut with a knife, try to guide the blade with the knuckles of your non-main hand.
- Lower the blade towards the food and keep it at this level throughout the entire cutting process.
- Before starting the actual cutting, lightly press down on the smooth, flat side of the blade with the top knuckles of your index and middle fingers.
- During cutting, moving along the cut product, gradually relaxing the whole hand. Your knuckles should be in constant contact with the blade.
Method 4 of 4: Directing the Knife While Pounding
- 1 Take the knife in your main hand. Hold the knife in your main hand by the blade or handle.
- You will be holding the knife with your dominant (writing) hand, guiding it towards the knife with your non-dominant hand.
- In this case, grabbing the blade is recommended, but you will be equally good at grabbing the handle.
- 2 Point the tip of the knife down. Place the tip of the blade directly on a cutting board.
- The product to be pounded should be located under the sharp edge of the knife. The tip of the blade should go all the way through the bases of the product.
- 3 Press down on the tip with your free hand. Hold the tip of the knife in place with two or three fingers.
- Use your index and middle fingers most often. If you find it easier to work with three fingers, place your ring finger on the top of the blade.
- Press firmly with your fingers to secure the blade. But the knife should not be completely motionless.
- 4 Swing the blade up and down. Use your main hand to push the ingredient up and down while holding the tip with your free hand. As a result, you should have a characteristic reciprocating motion.
- As you swing the blade up and down, you also need to gradually swing it from side to side.
- While swinging the knife, you must crush the ingredient at small intervals, creating a coarse mince. The longer you do this, the finer your crushed mass will turn out.


