Author:
John Pratt
Date Of Creation:
12 April 2021
Update Date:
1 July 2024

Content
- To step
- Part 1 of 3: Choosing a paint roller
- Part 2 of 3: Cover the roller with paint
- Part 3 of 3: Painting a wall
- Necessities
Using a paint roller is a quick way to change the interior and exterior walls of your home. While paint brushes seem like an easy option, you actually save yourself a lot of time by choosing a paint roller. Paint rollers cover a larger area than brushes and provide an even finish on large and small areas. Before you start rolling paint, buy the right kind of roller for the job and learn how to apply the paint effectively. Otherwise, you may end up with streaks and spots on your wall.
To step
Part 1 of 3: Choosing a paint roller
 Buy a paint roller with a solid metal frame so you can use it again. Find a paint roller with small teeth or pins that will grip the roller sleeve when it is placed. The teeth will prevent the sleeve from twisting or falling off when you paint. You can usually buy a good paint roller for less than 20 euros.
 - Avoid buying a disposable paint roller as a low quality frame will limit the control you have while painting.
 Attach a stick to the roller frame so that you can easily paint high or large surfaces. The stick gives you more control when painting large areas that require long, even strokes. It will also save you the time of climbing up and down ladders. Buy a 120 cm wooden paint stick from your local DIY store for around 2.50 euros or attach a threaded broom stick.
 - If you are painting a small or easily accessible surface, there is no need to attach a stick to the frame.
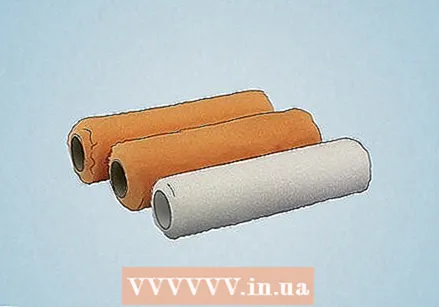 Buy a sleeve based on the surface you need to paint. Long sleeves work well for painting large areas, such as walls, and shorter sleeves are ideal for painting small or narrow areas. Choose a thickness that best suits the texture of the surface you will be painting. Walls with a coarse texture need a longer pile than walls with a light texture.
 - For oil-based paint, use a synthetic sleeve or a natural fiber sleeve, and for latex paint, use only a synthetic sleeve.
- Use a thickness of 1 cm for internal walls with a light texture and use a thickness of 2 cm for external walls with a coarse texture, such as stucco.
- Avoid purchasing an inexpensive disposable sleeve or sleeve. It will not hold as much paint and will not distribute the paint as evenly. An average wool-polyester blend sleeve costs only about $ 5 at a local DIY or paint shop.
Part 2 of 3: Cover the roller with paint
 Pour your paint into a bucket with a roller screen or into a paint tray. Fill the bucket with three to 10 inches of paint, or until the surface of paint touches the bottom of the roller screen in the bucket. The roller screen helps to spread the paint over the sleeve, so it should not be in the paint. If you are using a paint tray, pour in about an inch. Do not overfill the container.
 - If the bin is too full, it is easy to spill paint when spreading the paint over the sleeve.
- For large surfaces, use a bucket with a roller screen in it. More paint can fit in a bucket than a container and it is not that easy to shift or spill.
 Prepare the sleeve by removing the loose fibers and dampening it with water. Use a piece of tape or a lint brush to remove loose fibers from the sleeve, as these can cause the paint to clump during application. Then dampen the sleeve with water to complete the preparation. Shake the roller to remove any water that has entered the frame and pat it dry with a cloth. The sleeve should be slightly damp, not soaking wet.
 - This technique saves you time as it takes longer to evenly cover a dry sleeve with paint.
 Dip the sleeve in the paint and roll it over the screen or tray. Keep rolling the sleeve until it has an even coat of paint. The screen and knobs on the tray help distribute the paint evenly across the roller. Avoid dipping the prepared sleeve back into the paint. Too much paint on the sleeve can cause the paint to drip down the wall when you apply the paint.
 - If you have not wetted the sleeve, dip and roll the sleeve at least 5 or 6 times to cover it completely.
Part 3 of 3: Painting a wall
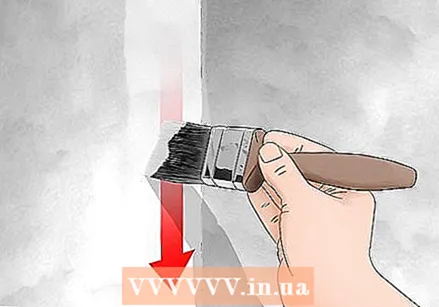 Use a paintbrush to paint the outline of the wall. Paint with long, horizontal strokes for even coverage. The thickness of the sleeve makes it difficult to apply paint in corners, ceilings, moldings, doors and windows. Even if you can reach those areas, the paint will likely dry with streaks in it.
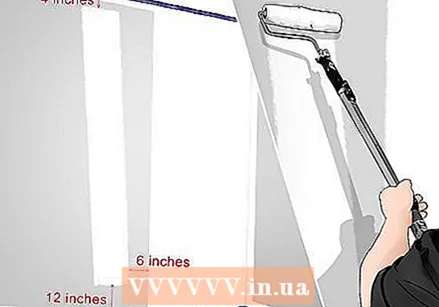
  Roll the paint on the wall in an upward motion at a slight angle. Start painting about 6 inches from the corner of the wall and about 12 inches from the bottom of the wall. Then stop the strip at a distance of 5-10 cm from the ceiling. Most of the paint on the roller will get on the wall in this first stroke. Leaving areas near the ceiling and corners bare will give you the space you need to spread all the paint applied properly.
 - For the best coverage, mentally divide large walls into sections that are about two feet wide, and divide other, smaller areas into thirds. Then work in one section with one load of paint before moving on to the next section, with another load of paint.
 Spread the paint to unpainted areas by moving the roller up and down. Aim to cover the areas near the corners, the ceiling, and the lower parts of the wall that you intentionally left bare. Use continuous movements, up and down like a vertical zig-zag. Continue this movement until the applied paint is evenly distributed over the appropriate wall section.
 - Always apply light pressure while rolling and spreading the paint. Forced movements and too much pressure can streak the paint and cause paint to build up on the sleeve.
- If the paint roller starts to stick to the wall and the paint is no longer spreading properly, don't apply more pressure. This means that the roller needs more paint.
 Cover the roller with paint again and start painting the next wall section. To get a smoother surface, always spread the paint towards the previously painted section. Leave about 6 inches of space between the section you just painted and the new section.
 - Continue this process until the entire wall has been painted.
 Connect the individual sections together with overlapping strips. Use the same up and down, zigzag motion you used to spread the paint. You don't need to clean the roller or use a new one for this process. The paint left on the roller will help mix the wet paint on the wall without getting too much paint on it.
 - Spreading the paint towards the ceiling and floor in a vertical motion is a challenge if you've never used a paint roller before. Use a horizontal motion to smooth the paint in those areas.
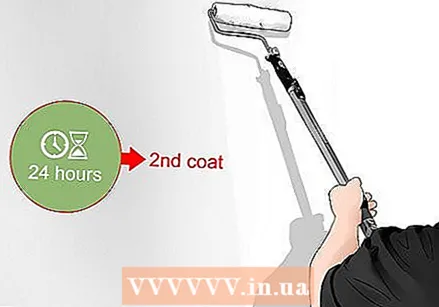 If necessary, apply a second coat of paint when the first coat has dried. Examine the painted surface in daylight and see if the color pigment is even. Most light colors need to be applied 2 times to adequately cover a wall. Some darker colors need 3 coats.
 - You can apply oil-based paint again after the first layer has dried for 24 hours. Latex paint dries quickly, so you can apply a second layer after drying for 4 hours.
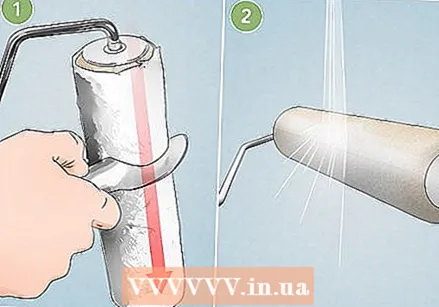 Clean the paint roller frame and sleeve when you are done. Use a scraper to remove excess paint from the roller. Pull the scraper along the length of the sleeve. Remove as much paint as possible before washing the sleeve. Then wash the sleeve with water until the water you squeeze out is clear. Allow to dry overnight before placing the sleeve back on the metal frame.
 - Scrapers are for sale in the paint section of a DIY store. If you don't have a scraper, you can also carefully use a putty knife.
Necessities
- Paint roller
- Sleeve
- Bucket or paint tray
- Roller screen
- Paintbrush or masking tape (optional)
- Paint
- Water
- Cloth
- Lint brush or tape (optional)
- Scraper or putty knife


