
Content
Painting on the ground is harmful and uncomfortable for your back. This guide will help you make a homemade paint stand in your garage or yard. Large stands can cost hundreds of thousands of rubles, while smaller ones for painting can cost less than 350 rubles and can handle a variety of spray paints.
Steps
 1 Visualize your design. If desired, select the size of the surface to be painted, depending on your needs. 8 feet (2.43 meters) wide; this paint stand is suitable for a two-car garage or patio. For narrower stands, use three 8ft tubing and two upper mid-length tubing.
  2 Connect the two end points and mark them in order to trim if necessary. Make a notch if using a saw, adding approximately 1/16 or 1/32 inch (1.6 or 0.8 mm). This is an extra space for the thickness of the blade (called a "cut"), and any uneven end must be sanded.
 - Most purchased 10ft pipes will be slightly longer than advertised. This allows contractors or pipeworkers to make a small cutting gap. Often a 10 ft 2 in (3.1 m) pipe is sold as a 10 ft (3.05 m) pipe.
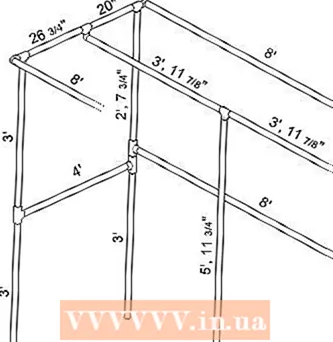
- For an example of correct pipe cuts, you will need (see the "Tips" section for a pipe cut diagram):
- three pipes of 8 sections (2.43 m)
- one 5'11 "/4 section (1.82 m)
- two 4 'sections (1.22m)
- two 3'11 "/8 sections (1.22 m)
- six 3 'sections (91cm)
- two 2'7 "/4 sections (80.6 cm)
- two 26 "/8 sections (67 cm)
- two 20 "sections (50.8 cm)
- eight 2 "/2 sections (6.35 cm)
- 3 Cut the pieces to length according to the marks you made.
- Secure each pipe before cutting... Use a small workbench (common definition) with two planks to serve as a vise. (

- Cut the pipes with a saw or a special pipe cutter... You can cut the pipes neatly with a cutter blade, but it will be slower than using a saw. The saw will leave one side smooth and the other rough. Remember to cut out the eight 2.5 "connecting pipes for connecting the pairs of connectors.

- Sand uneven surfaces with a blade or grinder.

- Secure each pipe before cutting... Use a small workbench (common definition) with two planks to serve as a vise. (
 4 Lay out the pipes to size for quick assembly of the stand. Make sure the four lower pipes are straight. Since there are six 3-foot (91 cm) sections, select the four pipes with the straightest ends. Set them aside for a layer laid along the bottom.
 - Alternatively, use four additional 'T' connections as stands... When the paint stand is finished, it will be quite heavy and stable.
- 5 Collect pipes. Bring an assistant with you during assembly. One person can assemble the structure, but together it can be done much faster, easier and safer. Make sure you have enough space for your stand. Secure each pipe completely by inserting it into the joint seam. (It is very difficult to attach 2.25 '' pipe to the jointing seam with bare hands, so apply enough pressure to ensure a snug fit.)
- Start assembling on the sides.

- Next, assemble the two upper middle T-piece pipes and the bottom pipe.
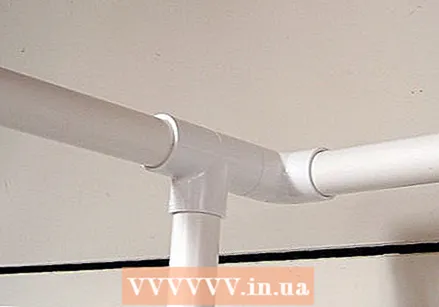
- Lastly, attach all horizontal pipes to the two side panels... When working with the first fully assembled side, lay it flat to insert the horizontal pipes that are the top and back of the stand. When all the horizontal pipes are installed, gently turn the stand over so that the weight is distributed over the connecting pipes.

- Start assembling on the sides.
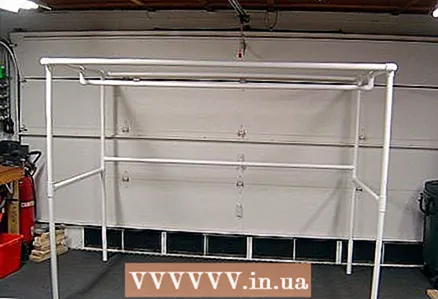 6 Correct assembly. The final assembly of this stand should be spacious enough for short people. (Tall people will bend over mute). At this stage, the stand can still be moved. Position it so that there is easy access from all sides. Test each corner for stability by pressing down on the edges.
  7 Cover the stand with plastic. Lay the plastic over the chassis so that the 25ft (7.62m) length covers the largest, 8ft (2.44m) wide and 6ft (1.83m) sidewall. The remaining plastic can be used by cutting out strips for the lower parts. Leave some plastic for the front of the stand and fold the rest (6 "/ 15.24 cm would be a good size). Wrap the remaining plastic over the back of the stand. Leave room to add what you like. This is where you need to quickly glue the plastic to the stand. The weight of the plastic should be such that you can easily move the stand.
 - Apply duct tape when cutting the plastic wrap, for sealing the sides of the stand. If your booth is in a windy area, make sure the plastic fits snugly against the body.Use the grips to hold the plastic while you measure, cut, and tape it off.
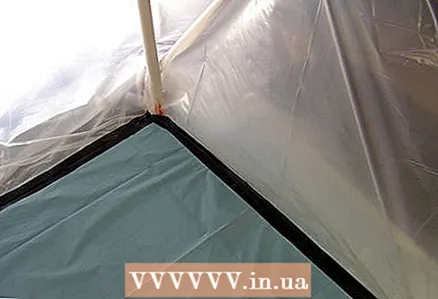 8 Cover the stand with a cloth. The four feet (1.22m) fabric must completely cover the stand, right down to each leg. Make sure the fabric is flat, without wrinkles or other unevenness. Lift each leg of the stand in turn to slide the fabric into it. If the fabric does not fit the size, the legs will be visible; make sure the size is correct. Each leg should be perpendicular to the ground (90 degrees).
 - Attach the plastic to the corners of the stand... On one side, start applying the plastic to the overhanging fabric with duct tape.
 9 Installation of a box with a fan. Using a small ladder, cardboard boxes, or other items, place the hood high enough to the middle pipe of your stand. Place the ladder next to the stand. If there is not much room, then place the ladder about an inch from the back of the stand's middle pipe. This way, you can easily cover the back of the stand with plastic. If you have room, placing the stairs further from the stand will create a 'chimney' effect.
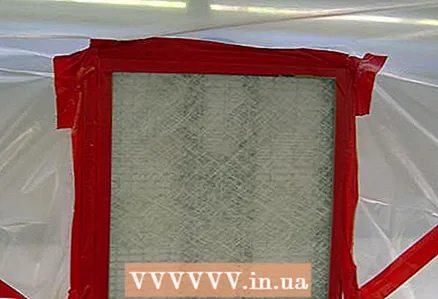
  10 Using scotch tape, glue the oven filter. The suction power of the hood at high speed is sufficient to hold the filter in place.
 - You can attach it either directly to the hood or tape to the plastic near the hood.
- You can attach it either directly to the hood or tape to the plastic near the hood.
 11 Use your new booth. Cut out hangers to hang objects before painting. Prepare a place to hang the painted objects if you plan to paint multiple objects at the same time. Also, you should have a spray bottle filled with water close to the booth. This will help prevent paint from spilling onto the walls.
  12 Hold on to your stand. Cleaning up spray and paint dust is not an easy task, but cleaning it up on a regular basis will make your task easier. Clean the spray on the pipe with the correct solvent for the paint you were using. Test the effect of the paint thinner on the pipe scraps you have left before using it on your booth. Clean up excess dust before disassembling your storage stand. It is much easier to remove fresh paint than dried paint. Discard plastic and mat when storing the stand. Plastic wrap will spill paint, and most paint mats are disposable. But they will be able to hold onto the paint until they become ineffective.
 - When storing your stand, it is important to disconnect the pipes and mark these parts so that you can safely reassemble it later. Disassemble it as compactly as possible so that it takes up little space. Leave the assembly on the sides, but detach the horizontal pipes as well as the lower middle pipe.
Tips
- Working with pipes is simple, if you are assembling a temporary structure, just insert into the connectors and hold them under their own weight. This greatly facilitates the storage of the structure. If you need something more permanent, use a specialized pipe glue. This glue connects the surface of the pipes to keep them together.
- This structure can be constructed as four flat tube frames, which are then held together with a heavy, nylon cable. With this method, pipes can be glued, but the entire assembly can be easily disassembled. Be sure to remove ventilation when disassembling the stand. Assemble the stand with new nylon ties as needed.
- There are three medium PVC pipes for this design, each 8 feet long. They can be easily modified to design a stand of any length. At 8 feet wide, heavy items require a T-connector and another tube with additional support. To do this, cut the top middle tube in half to add a T-piece at the bottom of the tube. If you want to make a stand that is 6 feet wide or less, or you will only paint light items, then you will not need any additional support.
- When changing the width of your stand, including the middle support tube, calculate the length of the two sides by halving the selected width, then subtracting 7/8 inches from each half to accommodate the width added by the middle T-piece.
- Make sure the stand is set up in a well-lit area. The thick plastic sheeting should allow enough light to pass through but not light enough to help create quality paint jobs. If you don't have sufficient lighting (fluorescent lamps are the best), use portable lighting to minimize shadow creation.
- Air passing through the plastic wrap can cause static charges that can be transferred to the part to be painted. In many painting applications, such as automotive, dust gets on the paint, so if there is a lot of dust in your room, it will reflect on the paint. To help counteract this effect, do not place anything near the plastic wrap.
- Create your own range hood stand.
- This booth is actually the "poor man's" booth. He is a tool, and if he performs all his tasks, then he has significance. You will take the time to make this stand neat and practical, but it will only be useful if it is used as intended.
- Here is a short list of possible pipe cuts for 8 'wide paint stands using nine 10' pipe sections:
Pipe # Pipe cutting ┌──────────────────────────────────────────── ───────────────┐ 1 │██████████████████████ 8'████████ ███████████████║░░░░░░░░░░░░│ └─────────────────── ───────────────────────────────────────┘ ┌──────── ───────────────────────────────────────────────── ──┐ 2 │██████████████████████8'█████████████████████ ██║ (4) 2.5 "░░░░░│ └────────────────────────────────── ─────────────────────────┘ ┌────────────────────── ────────────────────────────────────┐ 3 │██████████ ████████████8'██████████████████████║ (4) 2.5 "░░░░░│ └ ───────────────────────────────────────────────── ───────────┘ ┌───────────────────────────────────── ──────────────────────┐ 4 │██████3 ', 11 7/8 "███████║███ ███3 ', 11 7/8 "███████║░░░░░░░░░░░░│ └───────────────── ──────────────────────────────────────────┘ ┌───── ───────────────────────────────────────────────── ─────┐ 5 │███████████4'███████████║████████3'███████ ║████████3'███████│ └───────────────────────────── ──────────────────────────────┘ ┌────────────────── ─────── ──────────────────────────────────┐ 6 │███████████4 '███████████║████████3'███████║████████3'███████│ └ ───────────────────────────────────────────────── ───────────┘ ┌───────────────────────────────────── ──────────────────────┐ 7 │████26 3/8 "██║███20" ████║███ █████3'███████║████████3'███████│ └──────────────── ───────────────────────────────────────────┘ ┌──── ───────────────────────────────────────────────── ──────┐ 8 │████263/8 "██║███20" ████║████2 ', 7 3/4 "███║████2', 7 3/4" ███║░ │ └─────────────────────────────────────────────── ────────────┘ ┌────────────────────────────────── ────────────────────────┐ 9 │██████████████████5 ', 11 3 / 4 "████████║░░░░░░░░░░░░░░░░░░░░░░░│ └───────────── ──────────────────────────────────────────────┘
Legend:
║ = a cut
░ = spare / scrap pieces
█ = PVC pipe used (roughly equal to 2 ")
Note: 2 1/2 "cuts are divided into 2 groups of 4 (even though 2" carried over from 8 "cuts alone is sufficient). This is because making cuts with only 2 inches of pipe that is clamped in a vise is very inconvenient..
- Replace your filter regularly. Eventually the oven filter will fill with aerosol. Each time you change the filter, tear off the adhesive tape that holds it, or use a razor blade. If using a razor, be careful not to damage the coating. It's a good idea to change the filter with colored adhesive tape so you know which tape to remove or cut without touching the tape you don't want to touch.
Warnings
- Always wear a respirator and safety glasses. If you smell paint through the respirator, check if it is properly attached or replace the cartridge on the filter.
- Make sure there is adequate ventilation where you are building your booth and always paint with the hood on.
- Be careful when there is an open flame nearby, such as a heater. Do not smoke near the stand.
- Have a fire extinguisher ready.
- When staining for long periods of time, take breaks.
- Call your local fire department to verify that your garage stand is legal.
- Flammable paint fumes can be ignited by several sources in your garage. Local fire codes or regulations may prohibit this activity in your garage. Check these rules first.
- The cooker hood is flammable, therefore only water-based products can be used. Due to the high volatility of the paint, it can flash suddenly and this can cause a fire or short circuit. Any short circuit can cause a spark that can be fatal.
- Aerosol and paint is sprayed around the entire perimeter if there is wind flow in your room. Use an additional fan (or multiple fans) to get fresh air to the open side of your booth.
- Paint spray can stain your clothes if not removed quickly. Wear old clothes or some special clothing that will completely protect your body.
- Your exhaust fan will catch some excess dust as you paint. Be prepared to wipe down the fan blades after using the stand.
- Air filters are highly flammable. Catalyzed paint (such as two-pack car paint) heats up and can ignite. After painting is complete, remove used filters and immerse them in water to reduce the risk of fire.
- Read all instructions for your equipment carefully. Carefully study the Technical Data Sheet (TDS) and Safety Data Sheet (MSDS) for the paint you plan to use. Often these instructions include helpful tips to help you paint successfully.
What do you need
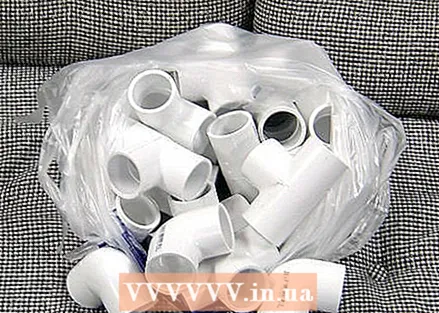


- Nine 10 '(3m) sections for 1.25 "(30mm) pipes
- Thirteen 1.25 "(30mm) T-connectors
- Six 1.25 "(30mm) pipes connected at a 90 degree angle
- One 10 '(3m) x 25' (7.6m) clear plastic bag, 4 mils or less (clear or translucent plastic to allow light to pass through)
- One 4 '(1.2m) x 15' (4.6m) dust cover (preferably non-fingerprint)
- Tool to cut PVC pipes (hacksaw or pipe cutter)
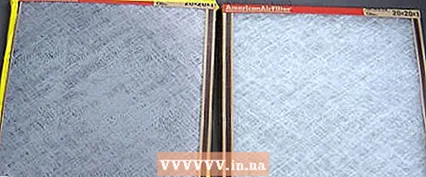
- One (or more) packaging of oven filters. Depending on how much you will paint in your new booth, you will most likely need to buy 1-2 packs of 4 filters each 20 (50cm) x 20 (50cm), which is a universal size for a hood. But the size must be chosen from which one you will use. You can use a better filter, definitely made for paint stands, but it will cost more. A good filter, it will be better to catch excess dust. Oven filters cost about 35 rubles (4 pcs in a package). But they are not so reliable, you still have to clean them.
- One roll of duct tape. You will need at least one new roll of duct tape to seal the plastic, fan, and filter.
- One or more inexpensive range hoods to help pull aerosol through the oven filters and out of the stand. Their cost is approximately 350 rubles per piece. In 8 inch (2.4m) wide stands. One will work all the time, but two or more will be much more efficient. In 4 "(1.2m), one hood is sufficient. Your filter must match the dimensions of your hood. Regular brush motor fans will not ignite or explode with paint vapor concentrations in a garage with an open door. Alternatively, buy a more expensive fan, or a fan that is definitely suitable for painting. If you plan to restrict ventilation or use extremely volatile paints.
- Your hood should be installed high enough to absorb the excess. If your stand is 6 "(1.8m) high, the 20" (50cm) hood should be about 4 "(1.2m) off the ground. 4 '(1.2m) ladders may come in handy, but you can also use cardboard boxes on a small budget.
- Metal hangers must be ready to use
- Optional: clamps (those that visually represent a curved 'X' and squeeze open) to clamp the pipe corners
- Workbench, vise or other device to hold the pipe while cutting
- Access to a garage for one or more cars or a courtyard in good weather
- Safety equipment:
- A respirator to filter out chemicals in the paint you are using
- Glasses, when using self-etching paint (any paint with acid)
- Old clothes that you don't mind getting stained with paint


