Author:
Sara Rhodes
Date Of Creation:
9 February 2021
Update Date:
1 July 2024

Content
- Steps
- Method 1 of 5: Part 1: Create a Google Analytics Account
- Method 2 of 5: Part 2: Embed Tracking Code
- Method 3 of 5: Part 3: Viewing Traffic
- Method 4 of 5: Part 4: Setting Goals
- Method 5 of 5: Part 5: Connect Additional Google Analytics Features
You've got a great new business website up and running and all that remains is to rake in the money, right? But before that, it doesn't hurt to make sure your page is getting enough traffic. This is where Google Analytics will help you. By embedding the Google Analytics code into your site, you can track all traffic that goes through it. This way you can be sure that your visitors are getting exactly what they need. Start at Step 1.
Steps
Method 1 of 5: Part 1: Create a Google Analytics Account
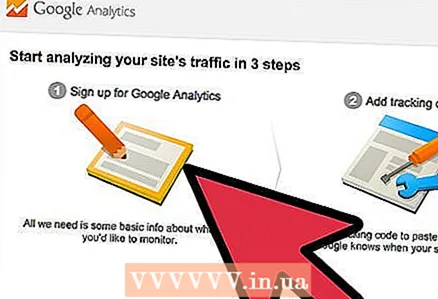
 1 Visit the Google Analytics website. Click on the "Access Analytics" button in the upper right corner of the site. You will be taken to a new page where you will see a short description of how Google Analytics works. Click on the "Sign up" button to create a Google Analytics account
 - You will need to sign in with your Google account if you haven't already.
- You can create a new Google account specifically to track your Google Analytics data if you want to separate it from your personal account.
 2 Choose a tracking method. Google recently showed off a beta version of Universal Analytics, which you can choose over Classic Analytics. The beta version of Universal Analytics is not yet fully completed, but will provide more options and flexibility in the future.
 - Many users confirm that the Universal Analytics beta does indeed perform better with tracking information, although in the end the choice is yours.
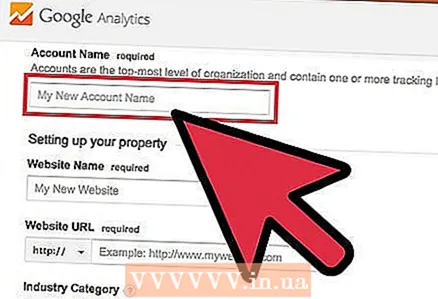 3 Enter information into your account. To create a Google Analytics account, you will need to provide Google with certain information. This will help determine how the data is processed and returned to you.
 - Enter your account name.
- Enter your site name and address in the "Setting up your property" section.
- Choose the most suitable field of activity for your site, also select the time zone according to which you will receive reports.
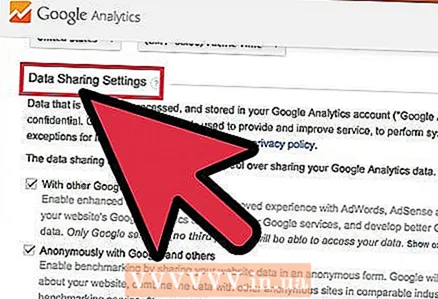 4 Define the conditions for granting access to the data. In total, there are three options for providing access to data, which you can either enable or disable. They will make your Google Analytics data available to other Google applications, such as AdSense, anonymously in the case of Google for statistical reasons. Also, specialists will work on optimizing and debugging your Google Analytics account.
Method 2 of 5: Part 2: Embed Tracking Code
 1 Click on the "Get Tracking ID" button. You will be taken to a page with a snippet of code that you will need to put in the code of your site.
 - If you return to the Google Analytics site after creating your account, you can access this snippet by logging in to your account by clicking on the "Admin" button and selecting your site. Click on the "Tracking Info / Tracking Code" button to get a snippet.
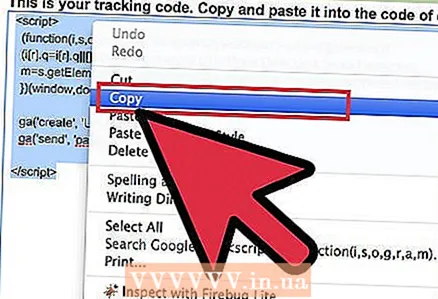 2 Copy it to your clipboard. Make sure to copy everything between the script> / script> tags, including the tags themselves.
 - Try not to change the code itself, otherwise the tracking will not work.
 3 Open the source code for your site. If you do not have access to it, then contact a web programmer. You will need to edit the source code to embed the tracking.
 - If you have a | WordPress site, install the "Google Analytics for WordPress" plugin and paste the code into the "Settings" menu field of the plugin.
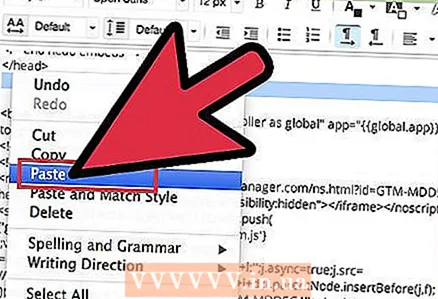 4 Paste in the code snippet. Find the / head> tag in your code. Insert the snippet right before the / head> tag.
 - Insert snippet on all pages you want to track. This means that the code must be present on all pages of your site, not just on the start page.
 5 Wait for the start of tracking. After updating the code, tracking will begin after 24 hours. You can verify that the code was inserted correctly by logging into your Google Analytics account by clicking on the "Admin" button, selecting the "Tracking Code" tab and looking at the "Tracking Status" section. You should see Tracking Installed.
Method 3 of 5: Part 3: Viewing Traffic
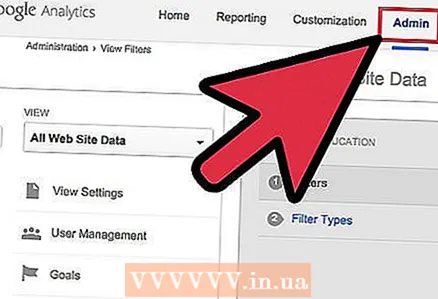
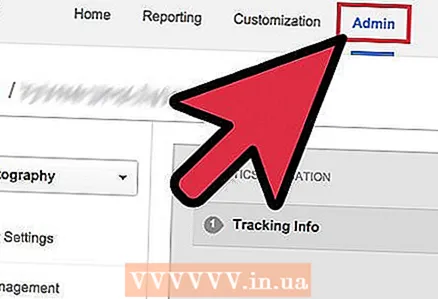 1 Open the "Admin" section of the Google Analytics website. This will open the account start page. You will see a list of all your sites that are being tracked by Google Analytics.
 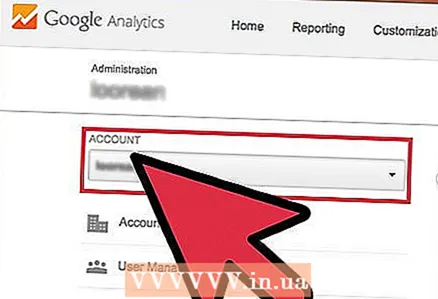 2 Click on the "All Accounts" menu. Then select "Show Visits" to quickly see the number of visitors to each of your sites, as well as the difference compared to last month in percentage terms. This will allow you to understand at a glance which of your pages needs more traffic.
 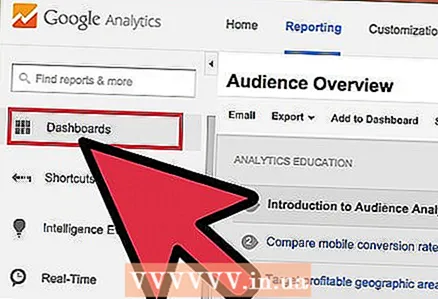 3 Open the Dashboard. You can view summaries for each site using the Dashboards menu on the left side of the site. Dashboards allow you to see detailed information about your site's traffic.
  4 Change your dashboards. Each "Dashboard" comes with basic settings initially. You can change them to better suit your needs. Click on the “+ Add Widget” button in the “Dashboard” menu to add a new widget to the dashboard. You can also remove any widgets that are already active.
  5 Create new bulletins. You can create dashboards to track more specific site readings. You can create up to 20 bulletins.To create a new one click on the "Dashboard" menu, then select "+ New Dashboard".
 - All major widgets are included in the starting dumps.
- "Blank Canvas" contains no widgets.
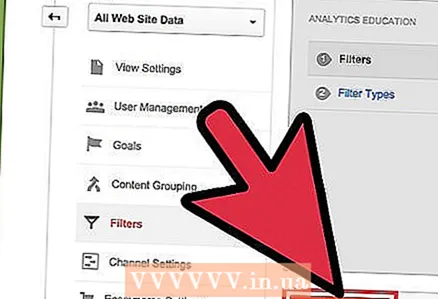 6 Use filters to filter out visible traffic. If your employees are generating too much traffic, you can filter it out with filters. You can also use filters to display traffic that matches only a specific subdirectory or hide traffic in a given subdirectory.
Method 4 of 5: Part 4: Setting Goals
 1 Return to the "Admin" section of the site. Select the account from under which you will set goals. Look in the "Views" tab. When you add sites to your account, you will see a list of accounts for this area.
 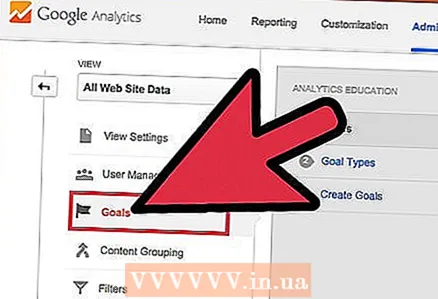 2 Click on the "Goals" button on the left side of the menu. Select "Create a Goal" to start defining a new goal, then give it a name.
 - To start tracking the target immediately, make sure the “Active” checkbox is selected.
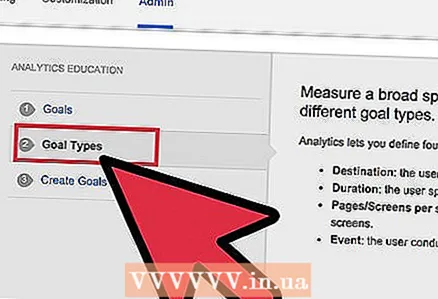 3 Select the type of goal you want to create. You will have access to a variety of templates depending on the industry you chose for your site when you created the tracking code.
 - Select "Destination" as a target if you want to see how many visits were made to a particular address.
- Select "Pages per Visit" or "Screens per Visit" to determine how many pages your users visit. Determine the "Condition" and the number of pages visited. These visitors are sometimes referred to as "Readers".
- Select "Duration" to define visitors who spend a long time on the page. Fill in the time in minutes and seconds. Then enter the target value. Such visitors are called "Engaged Users."
- Select an Event target for Call to Action, such as buying a ticket or sending a confirmation request. You will need to go back and complete this goal as soon as you activate the Analytics Goal Tracking feature.
- Select Sales or another ecommerce goal to track the number of people buying what they have planned.
 4 Save your new goal. Select "Save" when you have defined all the details of your goal. You can create up to twenty goals.
  5 Read the "Goal Flow Report" This report gives you information on how visitors are achieving your goal. It is located under Standard Reporting> Conversions / Outcomes> Goals.
 - You can see where visitors enter the funnel towards the goal, where they exit if they leave too early, where traffic returns to the beginning of the cycle, and much more.
Method 5 of 5: Part 5: Connect Additional Google Analytics Features
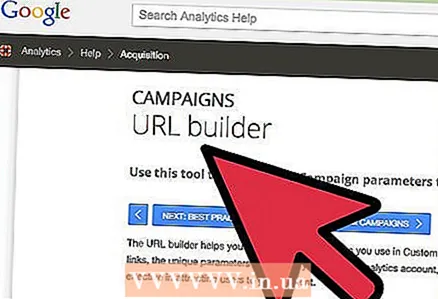 1 Track email, social media and marketing campaigns with Google Analytics. Create a custom URL that will track traffic for each new campaign.
 - Use the Campaigns URL Builder link to create your own site URL and define the "source", "medium", "term", and "content" values for it. Use this URL with any links. Google will track user information.
- Go to the Campaigns tab. Select "Traffic Sources" and go to the "Sources" tab to analyze specific campaigns for their success.
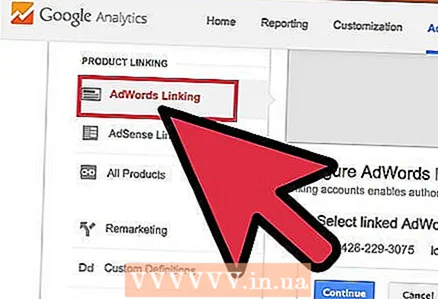 2 Set up linked accounts using Google AdWords. If your account type is Pay Per Click (PPC), link it to Google Analytics and you can track conversion rates and get reports on each PPC ad.
 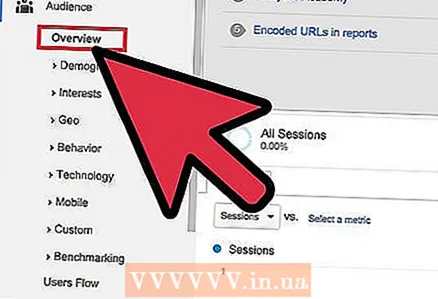 3 Use "Event Tracking". Just as with custom campaign URLs, create your own event links to track "source" and ticket conversions.
 - Add specific details about your event to the second half of the address in the following order: "event", "category", "action", and "label". Look for more information on setting up URLs in the dedicated Event Tracking Guide. See the information about the movements of your events in the "Reports" section.


