
Content
- Steps
- Method 1 of 5: How to prepare a beauty blender
- Method 2 of 5: How to apply makeup with a beauty blender
- Method 3 of 5: How to blend makeup with a beauty blender
- Method 4 of 5: How to Correct Makeup Mistakes with a Beauty Blender
- Method 5 of 5: Custom Beauty Blenders
- Tips
- What do you need
If you apply foundation with a brush or fingers, streaks may remain on the skin. The Beauty Blender was designed by makeup artist Rea Ann Silva to evenly cover the skin with a cosmetic.This pink sponge can be used to apply foundation, creamy blush, tinted moisturizer, and other products if you want to spread evenly over your skin. You can also use a beauty blender to apply moisturizer, sunscreen, and even self-tanner. The main thing is to learn how to properly prepare the sponge for use and use it correctly.
Steps
Method 1 of 5: How to prepare a beauty blender
 1 Moisten the sponge with water. The biggest mistake in using this sponge is applying the makeup with a dry beauty blender. First, you need to wet the sponge over the sink to soak it in the water. The sponge will expand and won't absorb too much makeup.
 - The water can be warm or cold. Moistening the sponge with cold water will give a refreshing effect when applying makeup.
- If you can't get the sponge wet in the sink, you can pour bottled water over it, or even sprinkle it on it with your favorite makeup fixer.
 2 Squeeze out the sponge to remove excess water. The beauty blender should be damp, but no water should drip from it. Before use, gently squeeze the beauty blender to remove excess water.
 - Beauty blenders are quite fragile, so don't twist the sponge too much. So you can accidentally break it.
- You can wrap the sponge in a clean towel or a sheet of paper towel. This will remove excess water.
 3 Moisten the sponge as needed. If you put on a lot of makeup, the sponge will dry out. To make your makeup last longer and be flawless, keep a bottle of water, make-up fixer or thermal water in a spray or aerosol handy and moisturize your beauty blender in time.
 - There is also a beauty blender spray that allows you to moisturize the sponge when it dries up with use.
Method 2 of 5: How to apply makeup with a beauty blender
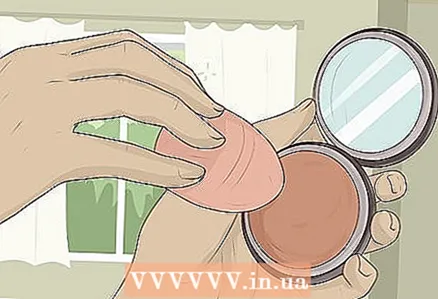 1 Dip the sponge into the cosmetic. With a beauty blender, you can apply foundation, concealer, blush, highlighter, powder and any other face cosmetics. Do not press too hard on the sponge, or it will absorb too much of the product.
 - To apply foundation, tinted moisturizer, BB cream, or concealer, squeeze a little onto your hand and dip a sponge in it. Do not squeeze the product onto a beauty blender.
- If the cosmetic product is compact (for example, blush or highlighter), you can use a beauty blender directly over the product.
- If the product is friable (for example, powder), pour a little of the product into the cap and run the beauty blender over it.
- If the product needs to cover a large area of skin (for example, foundation or blush), draw on the product with the wide tip of the sponge.
- If you need little funds (for example, a concealer under the eyes or a highlighter on the cheekbones), type it with a pointed tip.
 2 Start pressing the beauty blender against your skin. With the sponge on the sponge, gently press the wide end of the sponge to the skin. Do not rub the skin, but gently hammer in the product so that it evenly covers the skin.
 - Drive in the makeup until the coating is even. You may need to work on the same area several times to completely blend the borders.
- Do not press down on the sponge too hard. Do everything with gentle movements, the sponge will take care of the rest.

Yuka arora
Makeup Artist Yuka Arora is a self-taught makeup artist specializing in abstract eye makeup. She has been experimenting with makeup for over 5 years and in just 5 months has gained over 5,600 followers on Instagram. Her colorful abstract looks have been featured on Jeffree Star Cosmetics, Kat Von D Beauty, Sephora Collection and other brands. Yuka arora
VisagisteExpert advice: “After applying powder, bronzer and blush, take a sponge and run it all over the face, especially in areas prone to dryness.This will allow you to evenly distribute the powder, that is, the effect of using a sponge is similar to a fixative spray, only the skin does not shine! "
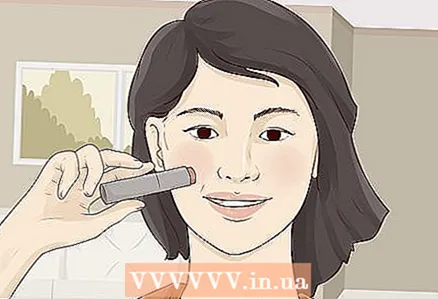
 3 Use a sharp tip to apply makeup to small areas of the skin. To apply concealer or foundation under the eyes, around the nose, lips, or other small areas, use the sharp end of a sponge to hammer in the product. Press down a little harder so the makeup covers the entire area.
  4 Wash your beauty blender after use. Since the sponge absorbs everything, bacteria can form in it. To keep your spog always clean, remember to wash it after each use. This way he will always be ready to go.
 - The Beauty Blender brand has liquid and solid soaps specially formulated for these sponges.
- If you are on a budget, you can wash the sponge with a regular, odorless, antibacterial dishwashing detergent. Antibacterial soap will work as well.
- Soak a sponge in warm water and rub some detergent into it. Foam the product and rinse the sponge under running water until the water is clear.
- If a stain does not wash off, soak the sponge in warm water and liquid soap overnight. If the stain still doesn't wash off, try treating it with a light oil (such as baby oil). Oil can break down makeup.
- Leave the beauty blender to dry.
Method 3 of 5: How to blend makeup with a beauty blender
 1 Put some dots on your face with makeup. It is difficult to collect some products with a beauty blender (for example, concealer in a compact package with a brush or blush in a round case). In this case, put a few points on the face with the product.
 - Apply a small amount of makeup first and add more if needed. The sponge blends well, so a small amount may be sufficient.
 2 Use a beauty blender to batter your makeup into your skin. Lightly press the sponge to the skin, blending the makeup. If you're worried about blending your makeup wider than necessary, use the pointed end of a sponge.
 - Since the sponge will absorb some of the product, do not touch the beauty blender to places where cosmetics should not be.
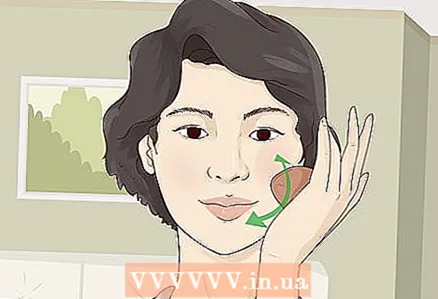 3 Roll the beauty blender over your skin to blend your makeup. Sometimes there are noticeable borders on the face from the application of funds. To remove these boundaries, roll the side of the beauty blender over your skin. This will smooth out all the borders and even out the color.
 - This is the finishing touch to your makeup, whatever you wear. This way all the cosmetics blend perfectly, and there will be no stains or streaks on the skin.
- Be sure to wash your beauty blender after shading so it is always ready for the next use.
Method 4 of 5: How to Correct Makeup Mistakes with a Beauty Blender
 1 Take a clean, dry sponge. The sponge needs to be wet to apply makeup, but if you need to fix something, it needs to be dry. Make sure the sponge is clean and completely dry before starting work.
 - It will be useful to have another beauty blender in stock. One can be soaked, and the other should always be kept dry in case you need to fix something.
 2 Treat an area with too much makeup. If you overdo it with bronzer or blush, remove the excess with a sponge to tone down the color. Since the sponge is dry, it will collect a lot of the product and make your makeup look more natural.
  3 Roll the beauty blender over your skin. If you've applied too much foundation, concealer, or powder, sponge up the excess makeup. Roll the beauty blender around areas where there is a lot of cosmetic.
 - In the same way, you can blend an uneven layer of foundation or lines around the edge of the face.
Method 5 of 5: Custom Beauty Blenders
 1 Try applying skin care products with a white beauty blender. Skin care products can be applied with a beauty blender to ensure they are fully absorbed. A white beauty blender (Pure Beauty Blender) is best suited for this purpose.It contains no dyes that can cause irritation.
 - The white beauty blender should be wetted before applying moisturizer, serum, sunscreen, and other products. Thanks to this, the sponge does not absorb too much of the useful product.
 2 Apply self-tanner with a black beauty blender. It is difficult to apply the self-tanning evenly with your hands or even with a special mitten. With the help of a sponge, this becomes possible. Use a black Body Blender - no stains will be visible on it.
 - The Black Beauty Blender is also suitable for applying dark bronzers and long-lasting foundations that are difficult to rinse off with a regular beauty blender.
 3 Apply to small areas of skin with the Micro Mini Beauty Blender. While a regular beauty blender has a sharp tip that can be conveniently applied into folds and small areas of skin, this may not be enough. There is a special tiny beauty blender that is only one quarter the size of a classic beauty blender. Apply concealer under the eyes, powder over concealer in the same area, or use for highlighter and contouring.
 - The Micro Mini Beauty Blender can also be used to apply creamy eyeshadow to the eyelids.
Tips
- It is worth having at least two beauty blenders. One can be used for foundation and concealer, and the other for colored makeup (creamy blush, bronzer).
- Do not store your beauty blender (s) in an airtight cosmetic bag - they can grow mold and bacteria. It is better to store sponges in a cosmetic bag with holes where air can enter.
- The beauty blender can be used daily, but it needs to be replaced approximately every three months. If you use the same sponge for too long, bacteria can build up on it or it can break.
- Do not take too much of the beauty blender, otherwise you will end up with most of the product absorbed into the sponge itself, without reaching your skin.
What do you need
- Beauty blenders
- Cosmetics: foundation, concealer, creamy blush, moisturizer, serums
- Water
- Mild soap or specially designed cleaner for beauty blenders
- A clean towel or sheet of paper towel


