Author:
Marcus Baldwin
Date Of Creation:
16 June 2021
Update Date:
1 July 2024

Content
- Steps
- Method 1 of 3: Method Full Stop Method
- Method 2 of 3: Clicker Training
- Method 3 of 3: Alternative Teaching Methods
- Tips
- Warnings
- What do you need
On walks with the dog exactly you should guide the dog, not she you. In addition to certain inconveniences for the owner, a dog constantly pulling on the leash can put both his own safety and the safety of those around him at risk. For example, it can break out of the harness, and the owner will no longer be able to protect it from dangerous areas such as roads. For this reason, almost all dog owners are advised to train their pets for controlled behavior on a leash.
Steps
Method 1 of 3: Method Full Stop Method
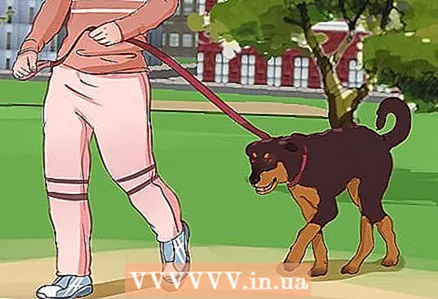
 1 Use a suitable collar. The dog must have a comfortable collar that fits her size.It should not be too tight so as not to choke the dog, but the collar should sit tight enough on the pet's neck so that it does not slide up and down.
 - Under the collar worn on the dog, your palm should crawl.
- Many people prefer to use harnesses for dogs over leashes. The harness allows you to transfer the main load from the dog's neck to its back. With it, you can train your dog to walk alongside without relying on the suffocating feeling that it receives from the collar when pulling the leash.
 2 Get a suitable leash. Tape leashes are absolutely not suitable for training a dog to walk properly on a leash. They contradict the very purpose of learning. Use a classic leash made from leather, fabric or metal chain.
  3 If the dog is pulling on the leash, stop and stand still. When the dog pulls on the leash, stop and stand still ("turn into a tree"). No matter how hard the dog is trying to pull you, don't let him move in the direction he wants to go. This is because if you follow a dog that is pulling on a leash, he will very quickly understand that this behavior is an extremely effective way to get where he wants to go.
 - Sometimes it is useful to attach the leash to your own belt with a carabiner. This does not allow the dog to come out strongly in front of the owner. In addition, standing on your feet is much easier when the pressure of the leash being pulled by the dog is placed on the hips instead of on the arm.
 4 Wait for the dog's response. Stand until the dog releases the tension on the leash. She can step back, sit down, change the direction of movement. Once the leash is loose, start moving again.
 - You can additionally encourage the dog to loosen the leash by calling it to you.
 5 Repeat these steps throughout the walk. This method takes a lot of patience! With it, you let the dog know that trying to pull you on the leash is doing nothing. Just be consistent and timely in your actions.
 - There is also another variation of this training method, when you should turn around and walk in the other direction if the dog begins to pull the leash.
Method 2 of 3: Clicker Training
 1 Start with basic training with clicker. For this training method to work, you need to train your dog to respond to a clicker. Every time she obediently obeys commands, click the clicker and give her a treat.
 - Be consistent in your clicker application so that your dog has an associative relationship between clicking and receiving a treat.
 2 Take your dog for walks. Stay in front of the dog at all times when walking. This will help your pet get used to following you, rather than the other way around.
 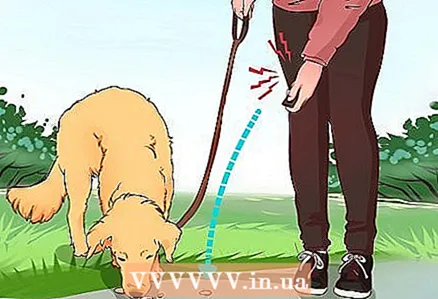 3 Click the clicker and drop the treat. As soon as the dog catches up with you, click the clicker and drop the treat on the ground before it has time to protrude. If the dog does not immediately respond to the clicker, give it a voice command to stop. When she reacts, click the clicker and drop the treat.
 - If the dog does not stop at your command, do not feed it. This will prevent an association between bad behavior and the treat or clicker sound from developing.
 4 Repeat the same steps. Continue to train your pet for walks using the above method. This method teaches your dog to watch you closely. Moreover, he teaches her to keep on a leash directly next to you or behind you.
Method 3 of 3: Alternative Teaching Methods
 1 Get a bridle collar for dogs. This collar has additional straps that go around the dog's face, so that when the dog pulls on the leash, its head is forced to turn back towards the owner. The use of a leash with this type of collar automatically redirects the dog's attention to the owner if he pulls on the leash.
  2 Use a strap leash. Try a choke leash or choke collar with an experienced training instructor. These devices tighten around the dog's neck if it pulls on the leash, creating a choking effect. With such a leash or collar, the dog will have an associative relationship between the tension of the leash and the strangulation.
 - Despite the effectiveness of strangulation agents during training, many consider them dangerous and unnecessary. It is recommended that such remedies are used only under the supervision of a behavioral expert.
- Suffocating agents work by creating negative associations. Many dog trainers believe that animals respond better to positive stimuli than negative stimuli, so keep this in mind when considering using these treatments.
- This type of leash and collar is for training purposes only. Never leave a choke collar or stranglehold on your dog outside of class, and do not use these as a substitute for regular collars and leashes.
- The use of asphyxiation is controversial, try to consider all the pros and cons before deciding to try this method.
 3 Try using a harness with a leash in the front. This type of harness consists of two loops, one of which goes around the neck, and the other around the chest of the dog.
 - The peculiarity of the harness is that the leash is attached to the harness in front of the dog's chest, giving you more control over the animal. When the dog pulls on the leash, he is forced to turn back towards you, which allows him to naturally suppress his interest in pulling on the leash.
- Importantly, attaching the leash to the front at chest level avoids any excessive pressure on the dog's neck and throat that could injure the trachea.
 4 Provide your dog with sufficient physical activity. Make your dog run until tired before you put him on a leash and go for a walk. A tired dog is much easier to control and will be more likely to respond to your commands while walking.
 - Try fetching your dog in the yard for 10 minutes before walking on a leash.
 5 Use positive incentives. End your class with happy, successful moments. Do not complete them when the dog does something wrong. Success will push the dog to make further progress. Do not let your dog get upset at the end of your practice with him.
Tips
- Praise is important at all stages of training.
- Practice first at home (in your apartment or in your private yard), if the dog pulls the leash, say "Fu" to him. And when you find it ready, take it out into the big world.
- If you have not already done so, teach the dog the "Beside" command (so that it walks next to you on command). With it, it will be easier for you to explain to the dog that pulling the leash leads to suffocation, but following next to the owner does not.
- Use a lower tone of voice when judging your dog's bad behavior.
Warnings
- Do not leave your dog unattended in a choking collar. The dog can easily get caught on something and suffocate, even if the collar is loose enough.
- Do not overload your dog with training. Limit your first lessons to 30 minutes or less. Do not "punish" your dog by swearing, leashing, or hitting. This uncontrollable behavior on your part only demonstrates to the dog that you don't value control and can make him tug on the leash even more.
- It is best not to use choke collars and choke collars without prior instruction (from a trainer, behavioral analyst, or veterinarian) on the proper use of these training aids.
What do you need
- Harness and leash
- Delicacy


