Author:
Marcus Baldwin
Date Of Creation:
17 June 2021
Update Date:
1 July 2024
Content
- Steps
- Part 1 of 4: Checking to a Third Party
- Part 2 of 4: Signing the check
- Part 3 of 4: Special Cases
- Part 4 of 4: Signature of the recipient
- Tips
- What do you need
A third party check is a check that is written to an individual or entity as payment. Not all financial institutions accept checks. We'll show you how to write checks.
Steps
Part 1 of 4: Checking to a Third Party
 1 Make sure the person you are writing the check to accepts it.
- Ask if he will accept the check.
 2 Call your bank to see if they accept these checks and if a third party can cash them later. Call the hotline or directly to the bank office used by the third party to whom you are writing the check.
  3 Ask if there are any special procedures that are required for the bank to be able to accept the check. In some cases, banks set their own rules governing such procedures. Some banks require both parties to have accounts with the same bank in order to guarantee the transfer of money.
Part 2 of 4: Signing the check
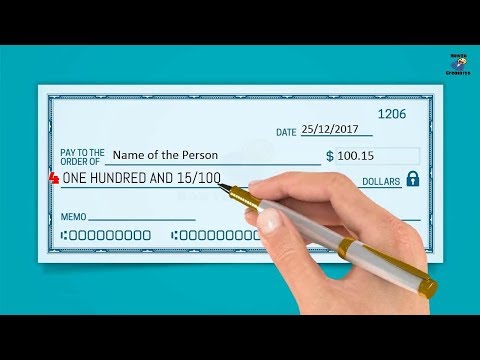
 1 Write out a check. Find the 3 lines at the top of the check. The check has two sides for filling: front and back. On the front side on the left there is a spine of the check, in which enter the amount in numbers.
 - The check must be signed in order to be accepted at the bank.
 2 Sign the check on top, on the first line. Next, indicate the date corresponding to the date of receipt of funds on the check.Fill in the day and year with figures, month - in words. Then enter the last name, first name, patronymic in the dative case of the person who will receive the cash.
Part 3 of 4: Special Cases
 1 On the first line of the front of the check, indicate the name of the organization or individual entrepreneur who owns the check. On the second line, write your current account number.
  2 On the front side of the form, in the line "Name of the bank and its details", enter the name of the bank, its BIC and correspondent account. On the reverse side of the check, in the left column, select the desired purpose of the payment, indicating for which month this payment is made. In front of it, indicate the amount in numbers only.
  3 In the column "Recipient identification marks" enter the passport data. First, write the word "passport" with a small letter, then indicate its series and number, as well as by whom it was issued. The date is put in the same format as on the spine of the check. Indicate the place of issue by entering the name of the city. Give the check to the person you wrote it to.
Part 4 of 4: Signature of the recipient
 1 Ask the recipient to sign to receive the check, if appropriate. Don't forget to sign the check yourself. After filling out the form, put signatures on the front and back of the check, and if there is a seal - an imprint.
  2 Let the recipient of the check fill out the deposit form and receive the check.
Tips
- There will be no record of receipt of the check in the bank account. It is better to make a copy of the receipt to confirm its transfer.
What do you need
- Pen
- Bank phone
- Endorser


