Author:
William Ramirez
Date Of Creation:
22 September 2021
Update Date:
21 June 2024

Content
- Steps
- Method 1 of 4: Consolidate to fit in an Excel sheet
- Method 2 of 4: Define Categories for Consolidating Excel Data
- Method 3 of 4: Use Formulas to Consolidate Excel Data
- Method 4 of 4: Using the PivotTable Function
- Tips
Microsoft Office Excel comes with several features to customize tables and charts full of important data. The program also offers efficient ways to combine and summarize data from multiple files, also known as sheets. Common methods for consolidating data in Excel include consolidating by position, by category, by formula, or using Excel's Pivot Table function. Read on to learn how to consolidate data in Excel so that your information appears on the master sheet as a reference when you need to create reports.
Steps
Method 1 of 4: Consolidate to fit in an Excel sheet
 1 Make sure the data on each sheet appears as a list. Make sure you remove all empty columns and rows, and that each column is tagged with the appropriate information.
 - Add and arrange each column range on a separate sheet. However, do not add ranges on the master sheet that you plan to consolidate.
- Select each range and name them by selecting the Formulas tab and then the arrow next to Name a Range. Enter a name for the range in the Name field.
 2 Get ready to consolidate your Excel data. Click on the top left cell where you want to place the consolidated data from your master sheet.
 - Go to the Data tab from the main sheet and then select the Data Tools group. Select Consolidate.
- Access the Summary Function list from the Function field to create data consolidation settings.
 3 Enter the names of the ranges in the Summary Function. Click the Add button to start the data consolidation process.
  4 Refresh your data consolidation. Select the Links to Source Data field if you want to automatically update the source data. Uncheck this box if you prefer to manually update the consolidation data.
Method 2 of 4: Define Categories for Consolidating Excel Data
 1 Repeat the tasks of the first step above to customize the data as a list. On the master sheet, click on the top left cell where you want to place the consolidated data.
 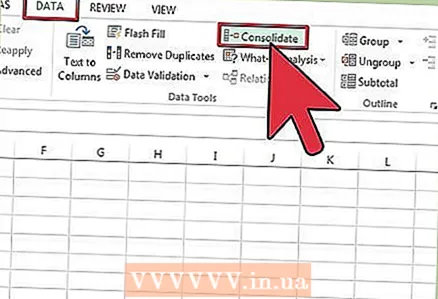 2 Go to the Data Tools group. Find the Data tab and then click Consolidate. Use the Summary function in the Function field to select the settings for data consolidation. Name each range and then click the Add button to complete the data consolidation process. Repeat the above consolidated data refresh procedure.
Method 3 of 4: Use Formulas to Consolidate Excel Data
 1 Start with a master sheet. Enter or copy the row and column headings that you want to use to consolidate your Excel data.
 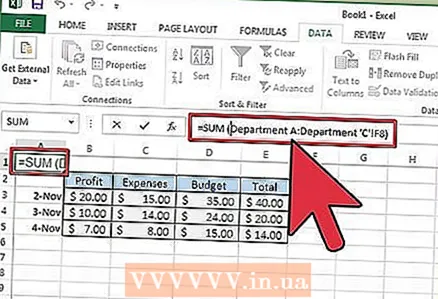 2 Highlight the cell where you want to consolidate your results. On each sheet, enter the formula that refers to the cells you want to combine. In the first cell where you want to include information, enter a formula, for example: = SUM (Department A! B2, Department B! D4, Department C! F8). To consolidate Excel data inclusive of all cells, enter a formula, for example: = SUM (Department A: Department C! F8)
Method 4 of 4: Using the PivotTable Function
 1 Create a PivotTable report. This feature allows you to consolidate Excel data from multiple ranges with the ability to reorganize categories as needed.
 - Launch the PivotTable and PivotChart wizards by pressing Alt + D + P on your keyboard. Select Multiple Consolidation Ranges, then Next.
- Select the "I Will Create the Page Fields" command and click Next.
- Go to Collapse Dialog to hide the dialog on the sheet. On the sheet, select a range of cells, Expand Dialog, then Add. Below the field page option, enter 0 and select Next.
- Select a location on the sheet to generate the PivotTable report and click Finish.
Tips
- With the PivotTable option, you can also use wizards to consolidate Excel sheet data using fields: Single Page, Multiple Pages, or No Pages.


