Content
- Steps
- Method 1 of 4: Learning general drawing techniques
- Method 2 of 4: Drawing people and portraits
- Method 3 of 4: Painting Landscapes
- Method 4 of 4: Other basic drawing approaches
- Tips
It may seem that learning how to paint is difficult enough, especially when viewing masterpieces by famous artists. However, it is important to remember that even great artists were originally new to drawing. Start with a hands-on study of basic drawing techniques and then move on to more advanced tasks such as depicting people, landscapes, animals, and so on. If you practice constantly, you will be amazed at how quickly your drawing skills will develop!
Steps
Method 1 of 4: Learning general drawing techniques
 1 Start by practicing drawing straight and curved lines. If you are just learning how to draw, begin to carefully draw straight lines on the sheet with a simple pencil. Try to hold your hand at different angles to find out which hand position gives you the best control over the pencil and at the same time is the most comfortable for you. Once you are confident with straight lines, try bending your hand at the wrist when drawing lines - you should get curved lines. Next, try to draw a series of large loops and then small spirals below them. Such exercises will help you develop hand-eye coordination, and the worksheet will be exactly what you want to portray.
 - Practice drawing lines of varying length, thickness, and texture. Try wavy lines, zigzags, and tangled scribbles.
- Once you start drawing a wide variety of lines with confidence, try drawing geometric shapes. For example, you might try to fill a sheet with flat shapes such as circles, squares, and triangles.
- Try to practice until the lines you draw are precise and neat enough.
Advice: Try purchasing a set of simple pencils of varying hardness so that you can experiment with the pencils that best suit your drawing style. In most cases, professional pencil kits for drawing include pencils with a hardness from 9T (or 9H - the hardest) to 9M (or 9B - the softest). Harder pencils produce lighter and thinner lines, while softer pencils produce thicker and darker lines.
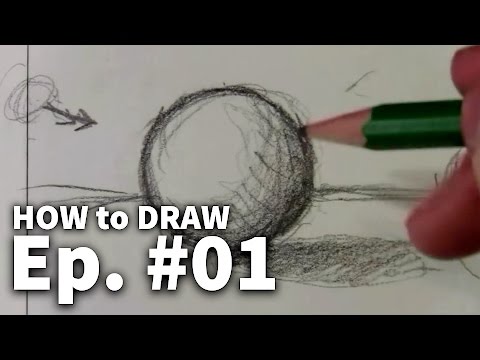
 2 Learn how to create a volume effect by applying shadows to the depicted shapes. Draw a simple shape like a circle, which you will use to turn into a ball. Imagine a depicted light source illuminating your sheet. Using a pencil, lightly shade those areas of the shape that are farthest from the light source, leaving the areas closest to it intact. Continue applying shadows until you achieve a smooth gradient transition from the darkest areas to the lightest ones, which are closest to the imaginary light source.
 - For example, you can imagine that an object on your sheet of paper is illuminated by a lamp from the upper left corner. In this case, the upper left area of the subject should not have any shadows. Slight shading should appear slightly below and gradually intensify to a very dark shadow towards the lower right corner of the leaf.
- Try blending the shaded shadows with your finger, an eraser, or a napkin to smooth out the shaded area.
- For a more in-depth introduction to the shadow blending process, read the article "How to draw shadows". You can also learn more about layered hatching and dotted line drawing.
 3 Create a realistic effect by depicting the shadow cast by the subject. Imagine an imaginary light source again and draw the shadow cast by the depicted object - it should be located on the opposite side of the light source. The shadow of an object should follow its outline, but at the same time it can be longer or shorter (depending on the distance of the light source and the angle of illumination).
 - For example, if you are depicting a bowl of fruit standing on a table, keep in mind that the table will cast a shadow on the floor, the bowl on the table, and the fruits themselves will shade the contents of the bowl.
- Use your finger or eraser to blur the edges of the shadow and make it look more realistic.
- For more information, check out How to Draw a Shadow!
 4 If you find it difficult to correctly depict the proportions of objects, draw a secondary grid. If you are sketching a finished image, draw a grid of equidistant horizontal and vertical lines on the sheet. Then outline the original image in the same way. Next, sequentially begin by sketching each square area of the image into the corresponding squares on your sheet. The proportions of the finished drawing will fully correspond to the original!
 - For example, you can draw 3 vertical lines and 2 horizontal lines to create a grid of 4x3 squares.
- It's okay if the actual size of the squares in the original image does not match the size of the squares on the sheet of paper. You will automatically change the scale when you sketch the image onto the paper in the appropriate squares. In fact, this technique is very often used to resize a picture.
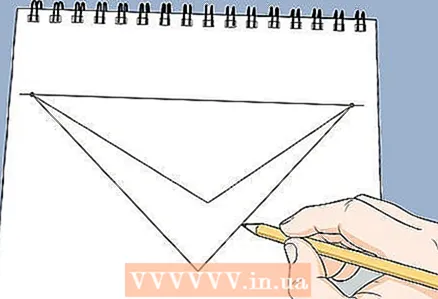
 5 Demonstrate the relative size of the objects being depicted using perspective. To practice correctly depicting perspective, draw a horizontal line on a piece of paper to represent the horizon. Put a small dot on the line. This will be the vanishing point of perspective. Then, draw two oblique lines that connect at this point, but diverge at the bottom of the paper.These lines can represent a road, stream, railroad track, or some other path. The widest part of the path at the bottom of the sheet will be closest to you, and at the vanishing point it will seem very distant.
 - Correct perspective implies that close objects appear larger than objects in the distance. Simple perspective uses just one perspective vanishing point, while more complex drawings can use two or even three vanishing points.
- Understanding perspective can also help you apply shadows correctly to make your image look more realistic.
- For more information on perspective, read the article How to Draw Perspective. You can also practice drawing rectangular prisms to learn the concept of perspective.
 6 Mentally break the depicted object into simple shapes. After mastering the image of basic shapes and shading techniques, you can start drawing much more complex objects, mentally breaking them into simple shapes. Take a look at the object you want to draw, for example, it can be a human figure, a car or a hand, and try to sketch out the basic shapes from which this object can be assembled.
 - You can practice using ready-made images, for example from magazines or newspapers, by drawing basic shapes directly on them. For example, take a photo of a car and outline the rectangular outlines of the windshield, round outlines of the wheels, and so on.
- After sketching out the basic shapes that make up your subject, start shading them to create volume.
- For a complete drawing, connect the basic shapes together with lines to get a single whole. The remaining extra sketch lines can be erased.

Kelly medford
Professional artist Kelly Medford is an American artist living in Rome, Italy. She studied classical painting, drawing and graphics in the USA and Italy. He works mainly in the open air on the streets of Rome, and also travels for private collectors. Since 2012, he has been conducting art tours around Rome Sketching Rome Tours, during which he teaches guests of the Eternal City to create travel sketches. Graduated from the Florentine Academy of Arts. Kelly medford
Professional artistUse a mirror to practice drawing objects... Kelly Medford, an outdoor artist, says: “One of the techniques for teaching drawing is based on the use of a mirror. Look in the mirror at the object you are painting and compare images... The image in the mirror is reflected and therefore allows the brain and eyes to get a fresh look at it.
 7 Try some contouring technique. Outline drawing is an exercise in learning to draw complex, realistic outlines of objects. Choose your object to draw and trace its outlines with your eyes to simultaneously transfer them to paper. Try not to take your eyes off the subject, instead of concentrating on the hand sketching. Don't worry if the drawing is not perfect, just try to convey the basic outline of what you are drawing on paper.
 - Try playing some kind of continuous line drawing game. To do this, try to continuously depict all the contours, without lifting the pencil from the sheet and without redoing what has already been drawn.
 8 Sketch first, and then paint the details so that the drawing is proportional. As you go from sketching to finished drawing, don't immediately worry about the smallest details. Start by drawing the basic shapes of the larger details, clean up the drawing as you go, and continue with the smaller details.If you concentrate too early on small details, one part of the drawing may be too large or too small, and the finished work will turn out to be unbalanced.
 - For example, when drawing a flower, you can start by sketching the outlines of the petals and stem. Once you've finished sketching, you can add details such as the receptacle, the flowing curves of the leaves and petals. Finally, it remains only to impose shadows and draw the remaining smallest details.
Method 2 of 4: Drawing people and portraits
 1 For the face, draw a large oval and a cross inside it. Draw a large, ovoid oval, tapering at the bottom and slightly wider at the top. Then draw subtle vertical and horizontal lines going through the oval around the middle.
 - These lines will help you balance the proportions of your face. Apply them with very light pressure on the pencil, as they will not have to remain in the finished drawing.
- For more information, read the article How to Draw a Face.
Advanced tip: If you want to draw a tilted head, tilt the oval in the sketch and tilt the cross inside it accordingly so that the vertical line of symmetry of the face still goes from the widest part of the head to the narrowest part.
 2 Use the guide lines to depict the facial features. Draw the eyes on a horizontal line, and place the nose about halfway between the bottom of the chin and the eyes. Draw the outlines of the eyebrows above the eyes, then draw the ears so that their lower edge is at the level of the lower point of the nose, and the upper edge is at the level of the eyebrows.
 - Imagine a horizontal line midway between the bottom of your nose and your chin, and then position your mouth just above it.
- From this point on, you can start drawing details such as eyelashes, pupils and hair, as well as start applying shadows and adding other details.
- Once you've finished your drawing, erase the vertical and horizontal lines of the sketch.
 3 Draw a circle on the inverted trapezoid to represent the outlines of the head. When you draw a person at some distance, your drawing will turn out to be more realistic if you first sketch out the outlines of the skull. To do this, draw a circle, and just below it draw a small horizontal line. Next, create a jawline by connecting a line and a circle on the sides with additional lines.
 - Note that women tend to have a narrower chin, while men have a wider chin.
- For a further proportional image of facial features, you can still use crossed auxiliary lines.
- Draw auxiliary lines with light pressure on the pencil, so that later they can be erased without a trace.
 4 For the torso of a person, draw a rounded rectangle for the body and an oval for the head. Directly below the oval of the head, draw an elongated rounded rectangle that will become the torso. For a thin person, make the rectangle very narrow, and for a full one, make it wide. Then draw a horizontal oval overlapping the bottom of the rectangle. This will be the hip area.
 - If the person's neck is to be visible in the drawing, draw a small, narrow rectangle connecting the head to the torso.
- If you are depicting a person standing calmly, then the rectangle of the torso should be perfectly vertical. If the person is leaning slightly, tilt the rectangle slightly accordingly, or portray a strong lean to convey the person's movement, for example when running.
 5 Use straight lines and circles to sketch out the limbs of the person. Use straight lines to depict each segment of a person's limbs, such as the shoulders, forearms, thighs, and ankles. Then draw small circles at the points of the joints, such as the shoulders, elbows, knees, and wrists.
 - Draw lines and circles with light pressure on the pencil, as they are only intended to help you visualize the shape of the human body. You will erase them after completing the drawing with details.
 6 Add clothing and other details to the drawing as soon as you complete the sketch of the person's body. Once the body has already been sketched, it's time to draw the details. If you haven't drawn the facial features yet, do so now, and also draw the hair, clothes, and arms.
 - Remember that the further away the person is from you, the less detail you need to include in the drawing. If you are portraying a large group of people, concentrate on their outline.
- For more guidance, read How to Draw Clothes, How to Draw Realistic Hair, How to Draw Shoes, and How to Draw Realistic Hands.
 7 Try drawing objects in motion to convey the very essence of their poses and actions. In doing so, you need to create a basic sketch that simultaneously reflects the shape of the object and at the same time creates a sense of the dynamics of its movement. Start with a very quick sketch of a few simple lines (create it in just 30-60 seconds) to convey the shape of the object you see and its movement. The lines should be light, sketchy and flowing. The idea is to get a dynamic and natural image, not a neat and precise drawing.
 - If you are drawing a human figure, try drawing a line for the central axis of the figure, going from the top of the head to the pivot foot. Sketch the rest of the body around this line, adding here the lines of the shoulders and hips to indicate their slope.
- Keep your hand and pencil in constant motion and don't worry about the details and accuracy of the drawing.
Method 3 of 4: Painting Landscapes
 1 Take as a basis a photograph or a real view in front of your eyes. Find a suitable nature photo, or just look out of the window and draw what you see. When depicting landscapes, it is useful to have certain guidelines in front of you in order to maintain the correct proportions, especially if you are just taking the first steps in drawing.
 Advice:If you can't find a landscape photo that you like and the view from the window is really bad, try grabbing a drawing pad and heading out into nature, such as a park or nature reserve nearby.
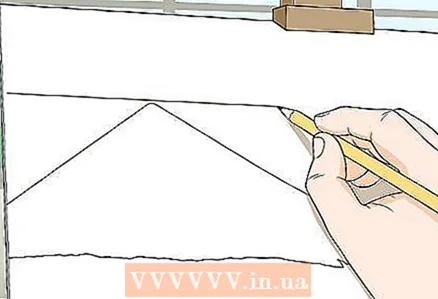
 2 Draw a horizontal line on the sheet to represent the horizon. The line separating the earth and the sky is called the horizon line. With light pressure on the pencil, draw this line where the horizon will be located in your drawing. Remember that if there are objects such as mountains, trees, buildings, and other tall elements on the horizon, the horizon may not be perfectly flat.
 - According to the rule of thirds, your drawing will be visually more interesting if you position the horizon line one third of the height of the sheet from the top or bottom edge.
- If you place the horizon higher in the figure, then the surface of the earth will be more represented on it, and if you lower it lower, then the sky will be more visible.
- Usually, when depicting landscapes, the horizontal orientation of the sheet is used.
 3 Choose the main focus of your landscape. For a landscape to be interesting, it must include a specific object on which the observer's gaze will stop. It could be a tree, a building, interesting boulders along a stream, a barn, a waterfall, a bench, a person, or something else that you imagine. Usually the focal object is the largest element of the picture, but it can also be any object that stands out for its color or contrast.
 - For example, a small piece of land with bright yellow flowers near a stream is likely to attract the gaze of viewers if the rest of the colors in the painting are calmer.
- The focal point of a landscape can be a large bush in the foreground or a towering mountain in the background.
- For a landscape image, try to find a photograph or a vantage point that already includes the focal subject. However, you may need to select only a fraction of the overall look to make your painting more interesting. For example, you can draw the place where an old tree grows, instead of depicting the entire park at once.
 4 Use perspective to maintain the correct proportions. As you draw, visualize the vanishing point of perspective. Any lines in your image should correspond to this point. This means that when depicting foreground objects, they should be larger, and background objects - smaller.
 - For example, if you are drawing trees, in the foreground their tops and trunks may extend to the edges of the paper. However, the trees in the background should gradually shrink towards the perspective vanishing point in accordance with the imaginary diagonal lines drawn from it.
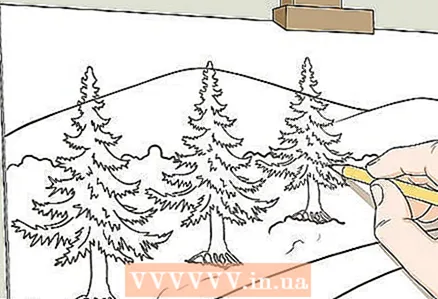
 5 Simplify the details of your drawing. When depicting a landscape, there is no need to draw every leaf on a tree, every blade of grass or every brick of a paved path. Instead, draw out the general outlines of objects and add details to only parts of them to convey texture or a sense of movement to the viewer.
 - For example, you can draw just a few light lines to indicate the needles on the tree.
- Drawing some details is fine and will depend on your drawing style. For example, if you are drawing a cobblestone path, perhaps in the foreground you would like to draw the details of individual stones, which will gradually disappear as you move away, until only a few distant circular outlines of stones remain somewhere in the distance.
- If you are painting in an extremely realistic style, you will probably try to show as much detail as possible, and that's okay too. However, this is a more advanced painting technique, and since you’re just starting out, it’s wise to start with only detailing the focus object and leaving the rest of the image simpler.
Method 4 of 4: Other basic drawing approaches
 1 Sketch a simple object from life. When you already have an idea of how exactly to control the drawn lines and create different shades of light and dark tones, try drawing one or more objects from nature. Start by choosing something relatively simple, like a bowl of fruit, a flower, or a vase. Use a lamp to create a powerful light source. Draw out the outlines of the objects you see, then apply shadows and add details.
 - Try to draw exactly what you see, not how you imagine objects. This is harder than it sounds! To do this, try to outline the outlines of the empty space between objects, and not just create the outlines of the objects themselves.
- This is the so-called drawing of stationary objects, which is widely used in drawing lessons to practice practical techniques.
 2 Draw your favorite animal to practice detailing. Find a photo of an animal that you really like and study its features even before you start drawing. Then start by sketching out the outline. When finished, add basic details such as the muzzle, wings or fins. Then gradually add the rest of the details and shadows until you are happy with the final result.
 - Drawing animals is difficult! Pay special attention to light and shadow if you want to make your creations realistic, or emphasize the most prominent features of animals if you are working in a cartoon or cartoon style of drawing.
- For more information, check out How to Draw Animals. If you want to draw a particular animal, try reading the articles How to Draw Dogs, How to Draw a Cat, How to Draw a Lion, How to Draw a Fish or How to Draw a Bird.
- 3 Put your cartoons and cartoon characters to the test if you have a playful enough drawing style. Cartoons are usually simpler than realistic drawings, but they also open wide doors for you to be more creative in your drawing. You can try to portray yourself as a superhero or draw a caricature of an animal planning some kind of adventure. You can even practice drawing existing cartoon characters, such as your favorite cartoon or comic book.
- First, concentrate on drawing the main character, then create the background, additional characters and objects with which the characters interact.
- Also pay attention to the characters' facial expressions and posture to convey different emotions and actions.
- You can also draw realistic-looking fantasy drawings using your own imagination. For example, if you have a clear idea of what a dragon should look like, try drawing it!
- For more guidance, check out How To Draw Cartoon Characters and How To Draw Cartoon Animals.
Tips
- Don't be discouraged if you don't get your own ideas right on paper right away. Drawing takes a lot of practice, so keep working!


