Author:
Bobbie Johnson
Date Of Creation:
7 April 2021
Update Date:
1 July 2024

Content
- Method 2 of 3: Eyebrow Shaping with Honey and Sugar
- Method 3 of 3: Eyebrow shaping with a professional waxing kit
- Tips
- Warnings
 2 Wash your face with warm water to open up hair follicles and make the procedure less painful. Then get ready to trim one of your brows. The brows should be adjusted one at a time so that you can focus carefully on what you are doing. Don't let anything get into your eyes! If you are afraid to do the procedure yourself, stop and ask someone else to help you.
 - Alternatively, you can tuck in an eyebrow pencil to create a brighter contour line.Before starting the main work, you need to make sure that the start and end points of the eyebrow, as well as the brow arch itself, are clearly delineated. The necessary contours can be marked with dots.
4 Remove the lid from the can of wax and melt it in the microwave. Heat the wax for only 10-15 seconds, and if there is less than half of the contents in the jar, then 5-10 seconds. The wax can boil easily, but this should not be allowed. Stir the wax until it becomes uniform in temperature (it should take on the consistency of warm honey). 5 Dip a wooden ice cream stick into the wax to apply it to the corrected area and depilate. Quickly but gently, while the wax is still warm, run the wand over the hairs to be removed between the brows and under the brows. Apply the wax in the direction of hair growth. Next, put a strip of fabric on top, press it down and smooth everything in the same direction of hair growth. Give it a few seconds to bond with the wax. Then pull the skin with your non-dominant hand and with the other hand pull the strip in the opposite direction to the hair growth. Do not worry! The wax only clings to the hairs, not the skin, so it won't hurt too much. - Try not to jerk the strip up and back as this can cause pain.
- Pull off the strip and press down on the skin with your fingers to create pressure and relieve the burning sensation.
- Wax removes only excess hairs between the eyebrows and under them, but not on top. Plucking the top contour can make the brow shape look unnatural.
6 Repeat the procedure on the second eyebrow. Do not hurry. The second eyebrow should be as symmetrical as possible in relation to the first. Otherwise, your eyebrows will be different in shape! When finished depilation, treat the injured skin with a soothing lotion. 7 Brush your eyebrows with an eyebrow brush. Then use the comb on the back of the brush to stand the hairs. Use scissors to shorten hairs that are too long (which protrude above the comb). Be careful not to accidentally cut your brow to zero. 8 Apply a vitamin E lotion or other moisturizer to your skin. This step should not be neglected, as such a remedy will help you relieve swelling and redness in a couple of minutes. Wait a few minutes and then wipe the lotion off your skin. 9 Line your brows lightly with powder or eyebrow pencil. No one has perfect eyebrows (even after waxing them up). Makeup will help you make them look more symmetrical. Method 2 of 3: Eyebrow Shaping with Honey and Sugar
- 1 Mark the shape of the eyebrows you need. To do this, you can use either a pencil or eyebrow powder. This will allow for the correction of the eyebrows without affecting those hairs that should remain in place. Use a small makeup brush to paint the desired outline of the eyebrow with powder, or simply draw in the eyebrow with a pencil.
 2 Prepare the required materials. You will need to take two tablespoons of brown sugar, one spoonful of honey, one spoonful of water, a butter knife or ice cream stick, and cloth strips to remove the depilatory compound from your skin.
  3 Combine brown sugar, honey, and water in a microwave safe container. You can also heat the mixture in a suitable container on the stove, if you don't have a microwave.
  4 Wait for the mixture to boil and turn brown. You need to accurately capture the right moment. If it is not enough to warm up the composition, it will turn out to be too soft and sticky. If you overheat it, it will turn into a hard candy. You may need to experiment a few times until you get the desired result. Usually, it takes 30-35 seconds to heat the mixture in the microwave.
 - Heating up the composition on the stove will take more time.
 5 Let the composition cool. This step is also important. You will not know if you have overheated the composition or not until it cools down.If the result is too thick, dilute the mixture with a little water.
 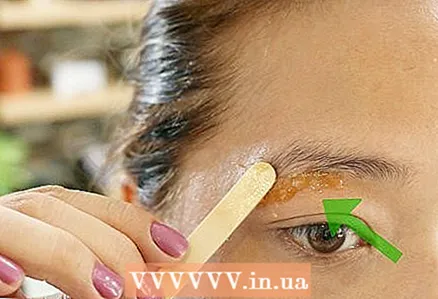 6 Apply the resulting sugaring composition to the areas between the eyebrows or under one of the eyebrows. For safety reasons, only work on one eyebrow at a time. If you are scared of doing the procedure yourself, stop and ask someone for help. Remember that you will have to work with very small areas of the skin.
 - Be careful not to accidentally stain the area that you have already corrected with the composition. Nevertheless, even this is okay, just wipe off the excess composition with baby oil.
 7 Place a strip of cloth over your eyebrow. Press it against the skin and smooth in the direction of hair growth. Wait a few seconds for the strip to adhere well. Then pull it off in the opposite direction to the direction of hair growth. Be aware that eyebrow sugaring does not create such painful sensations as sometimes using paraffin wax.
  8 Treat the injured area with vitamin E lotion or other moisturizer. This step should not be neglected, since such a remedy will allow you to relieve swelling and redness in a couple of minutes. Wait a few minutes and then wipe off the lotion.
  9 Repeat the above steps for the second eyebrow. Do not hurry. You need to make your eyebrows as symmetrical as possible. Otherwise, they may be different in shape! Use a powder or eyebrow pencil to tint areas with too thin hairs and remove any abnormally growing hairs that may still remain with tweezers.
Method 3 of 3: Eyebrow shaping with a professional waxing kit
 1 Check out the contents of the professional brow waxing kit for everything you need. Most of these kits contain an eyebrow cleanser, applicator, paraffin wax, wax melter, pellon or muslin strips. Among other things, it will be nice if you additionally take baby powder, tweezers, small scissors and baby oil, which perfectly removes wax that has fallen into the wrong place!
  2 Pull your hair back. Shorten the eyebrow hairs if necessary. But be aware that if they are shorter than 6 mm in length, this probably will not be enough for waxing.
  3 Use an eyebrow cleanser. Then wipe off any residual marks with a damp cloth. Next, put some baby powder in your palm, take a pinch from there with your other hand and sprinkle a little on both eyebrows. The powder will allow you to absorb excess moisture, which will ensure good adhesion of the wax to the strip.
 - 4 Line your brows with powder or eyebrow pencil. To simplify the waxing procedure, you should outline the necessary eyebrow contour. For this purpose, you can use a makeup brush and powder or just an eyebrow pencil. In this case, you should bring your eyebrows exactly as they should look.
 5 Heat the wax for the time indicated in the instructions for the kit. If the kit you are using does not include a wax melter, melt the wax in the microwave or in a small container on a regular stovetop.
  6 Apply melted wax to unwanted hairs near the first eyebrow. For safety reasons, only work on one eyebrow at a time so that you can concentrate on what you are doing. If you are afraid to do everything yourself, ask someone to help you. Using the applicator, apply the wax to the desired areas in the direction of hair growth. Make sure the wax has covered the entire desired depilation area. However, the wax layer does not need to be very thick.
  7 Cover your brow with one of the strips supplied with the set. Leave some free space at the edge of the strip so that you can easily pull it off later. Use your fingers to smooth the strip in the direction of hair growth. Then wait a few seconds for it to adhere better to the wax.
  8 Peel off the strip in one pull against the hair growth. Don't pull it up.Pull strictly against hair growth. If some hairs remain, attach the strip back and pull it off again. At this point, you should pull yourself together. If you are not used to the sensations that arise when plucking eyebrows with tweezers, the waxing procedure may seem somewhat painful to you.
 - To relieve redness after depilation, treat your brow with a soothing moisturizer. Aloe vera gel works well for this. Wipe away any excess after a few minutes.
- 9 Remove residual hairs with tweezers. If there are still some unwanted hairs left after the procedure, remove them with tweezers. And if there are wax residues on the eyebrows, wipe them off with baby oil. Repeat the above steps to correct the second eyebrow in the same way.
Tips
- If you are worried about the pain of the procedure, you can buy an anesthetic spray to "freeze" the area you need before the procedure.
- Depilation should be carried out only in the area between the eyebrows and under them (except in rare cases when excess hair grows directly on the forehead).
Warnings
- For safety reasons, perform the procedure in front of a large mirror instead of holding a small mirror in your hand.
- Repeated waxing in the same area can damage the skin. If after two tries, there are still extra hairs left, simply remove them with tweezers.
- Pulling the strips in the opposite direction to the direction of hair growth may hurt you, but this will ensure that most unwanted hairs are removed. Then use a pair of tweezers to pluck out whatever is left behind.


