Author:
Bobbie Johnson
Date Of Creation:
5 April 2021
Update Date:
1 July 2024

Content
1 Collect everything you need. Actually, you need: clay for crafts (aka polymer clay), a cookie cutter, a large needle or toothpick, and a metal key ring.- Key rings are very different.For those that are larger, you can stick clay, and for those that are smaller, you may need a chain and another ring. Choose what you have a soul for. By the way, it is quite possible to dispose of old key rings.
 2 Roll a small piece of polymer clay with a rolling pin or other suitable object to a thickness of about three millimeters. For the manufacture of key rings, the clay must be soft, and its thickness should be uniform.
 - If you want to create a rotating effect, you can roll more than one color together. You can even stick small figures on the clay! In general, do not deny your imagination in anything!
3 Use cookie cutters to shape the clay to the desired shape. Choose a suitable shape - a flower for March 8th, a heart for St. Valentine, etc. Sports lovers will love the key rings in the form of balls. - You can shape the keyring into your own shape by cutting it out with a sharp knife.
4 Make a hole about 0.5 cm from the top of the keyring using a sharp object such as a nail, toothpick, or sharp pen.- This hole will serve to connect the keychain itself to the key ring, so make the hole wisely.
- Actually, many types of clay for handicrafts fully allow for the possibility of "sticking" all kinds of decorations into it even before heat treatment. If you bought just such clay, then insert the key ring into the keychain at this stage - it will be easier for you later.
 5 Place the figurine on a baking sheet and bake according to the instructions printed on the clay package. Remove from oven and cool.
  6 Attach a small metal ring to the key chain, then attach the key ring to it. Try not to break anything!
 Method 2 of 3: Foam Sheet Keychain Method
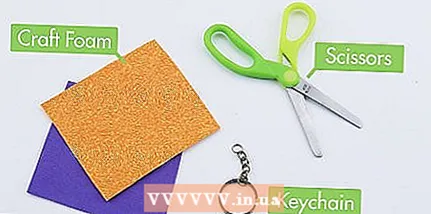 1 Collect everything you need. You need at least two colored pieces of foam sheet (adhesive and non-adhesive), scissors and a key ring.
 - You don't need a lot of foam! Even a couple of pieces of 5-6 centimeters in length and 2-3 in width is enough! It is quite possible to make a good keychain from materials left over from other crafts.
- 2 Cut out four small rectangles of sticky foam sheet, each about 6 cm (1 in) long. Actually, you need to cut out a square for a letter.
- You can use up to four different colors to make a keychain with four layers of color.
- It makes sense to make a keychain with your initials or a simple 4-5 letter word that is important to you. You don't want to walk around with a long keychain word on your bunch of keys, do you?
- 3 On each of the rectangles you cut out, write the corresponding letter. Actually, each of them should not be less than 2.5 centimeters in height.
- Better, of course, to write in block letters - this way there is less risk of leaving pen or pencil marks on the foam when it comes to cutting. However, no one forbids you to experiment and play with fonts!
- 4 Use sharp scissors to cut out the letters. Take your time, take your time. If you have such letters, in the center of which you also need to make holes, then cut such holes from the center. This will minimize the chance of messing up the letters.
- 5 Place the letters on the second piece of foam - the one that's not adhesive. Think about the position of the letters and the final size of the keychain.
- Take your time, make sure everything is exactly the way you want it.
- 6 Cut out the foam to the shape you want your keychain to take. Remember that even after doing this, all the letters cut and placed earlier should remain in place. Everything should look decent!
- The rectangular shape is good, but other shapes are fine too.
- 7 Peel off the paper from the back of the letters. Glue the letters onto the piece of foam that serves as the base, placing the letters with due care. Do not forget to press down on the letters a little so that they do not fall off.
- 8 Use a hole punch to punch a hole 0.5 cm from the top of the initials. You will insert a key ring into this hole, so think three times where to make it.
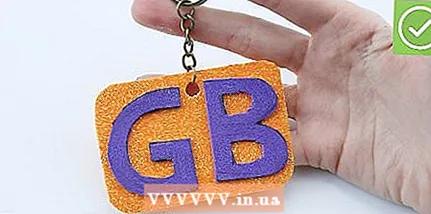 9 Attach a metal ring to the hole. Be careful not to spoil the almost finished keychain. So now you have a custom keychain!
Method 3 of 3: The Braided Strap Keychain Method
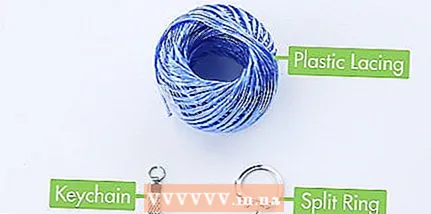 1 Collect everything you need. Actually, you need to find a key ring and a strap - you can use a plastic one. There is one subtlety: the strap should be 4 times longer than the finished keyring. Of course, it depends on you, but it is best to take something about a meter of strap - this will happen with a margin.
 - Cut two pieces of the strap of the same length. It will work out well if they are still of different colors - so the finished keychain will be more beautiful, and it will be easier for you to work on it.
- Some make such key rings from paracord, which may well help you out in case of some emergency, where you desperately need a cord!
- 2 Thread both laces through the key ring. Make sure the center of each lace is in the ring (unless you are braiding otherwise). Secure the ring to a flat surface with duct tape to make it easier for you to work. So, now your task has come down to weaving 4 ends of the laces.
- Attach the ring where you have enough room to manipulate the laces. A table that is not cluttered with anything will do just fine.
- 3 Weave the laces together. There are many ways to weave, but even the simplest of them gives quite a nice result. The main thing is that everything is tightly woven, so do not be afraid to redo it if you suddenly allow a slack somewhere. You yourself understand that it is better to solve the problem right away than to walk around with a keychain opening later.
- Look for articles about weaving methods, you will probably find it useful. In principle, a keychain can be made with any of them.
 4 Cut off the excess laces and secure them well. So, your keychain is ready!
Tips
- You can buy metal rings at any craft store.
- If you want to make the keychain more practical, attach a small flashlight.
- Colored key rings are hung not only on a bunch of keys, but also on a zipper.


