Author:
Helen Garcia
Date Of Creation:
19 April 2021
Update Date:
1 July 2024

Content
- Steps
- Method 1 of 3: Cleaning the Flute
- Method 2 of 3: storing your flute
- Method 3 of 3: Caring for your flute
- Tips
- Warnings
- What do you need
The flute is a valuable and expensive musical instrument that needs proper care and regular cleaning to keep it in good working order. It is imperative to clean the flute after each use. In addition, the instrument should always be assembled and disassembled with care and kept in a safe place.
Steps
Method 1 of 3: Cleaning the Flute
 1 Disassemble the flute carefully. To disassemble the flute, carefully remove the head and lower knee from it. This must be done with caution. When doing this, do not touch the valves and their pads, as they are easily damaged.
 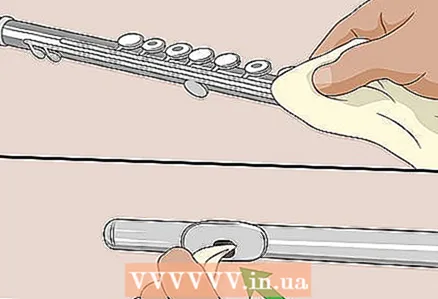 2 Clean the flute after each use. It is important to remove all moisture from the inside of the instrument before storing the flute. If the instrument is not cleaned, it will not only develop an unpleasant odor, but also begin to become covered with a patina. Therefore, it is important to clean the inside and outside of the flute after each use.
  3 Attach a cloth to the flute cleaning rod. Slide a corner of the napkin into the eyelet at the end of the cleaning rod. Pull the napkin through the eyelet so that half is on one side and the other half is on the other.
 - Use a cloth made from a soft, thin material such as microfiber or cotton.
 4 Wrap a napkin around the cleaning rod. Take a napkin and wrap it around the ramrod so that it is not visible. If the cleaning rod touches the flute during cleaning, it can scratch and damage the inner surface of the flute.
  5 Insert the prepared cleaning rod into every part of the flute to clean it. To remove moisture from the flute that accumulates inside when using the instrument, carefully insert a cleaning rod into each of its main parts. You need to clean the inside of the head, lower knee and the body of the flute itself. The cloth on the cleaning rod will absorb moisture and thereby remove it from the instrument.
 - When cleaning the body of the flute, be sure to insert the cleaning rod into it from both sides. This will ensure that the entire inner surface of this part is cleaned.
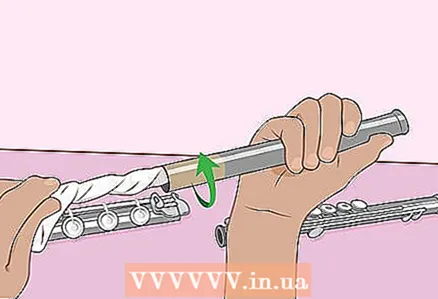 6 Rotate the cleaning rod when cleaning the inside of parts. The ramrod can be rotated around its axis so that it collects moisture from the instrument better with a napkin.
 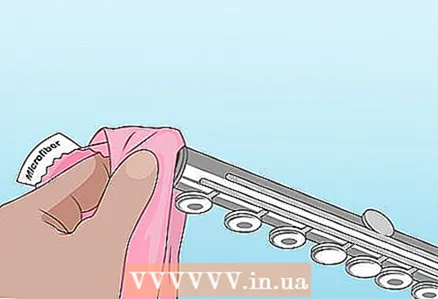 7 Wipe the outside of the flute with a tissue. Polish the flute gently with a microfiber cloth. When you play the instrument, fingerprints and fatty secretions of the skin remain on the surface of the instrument. Therefore, carefully wipe the flute valves and body.
 - Pay particular attention to the butt-pieces at the ends of the pieces that hold them together. Often it is on them that the main dirt accumulates. Use your fingers and a tissue to clean these areas both inside and out.
- Do not use wipes with metal polish. This can damage the flute, so this step should be avoided.
 8 Do not touch the valve pads when cleaning the flute. When cleaning the flute, be sure to hold it by the metal body and do not touch the valve pads. They are easy to break and damage the instrument. If you handle the flute too roughly during cleaning, there is also a risk of damaging the valves themselves.
 - If the flute pads or valves are damaged, have the instrument repaired by a professional service center.
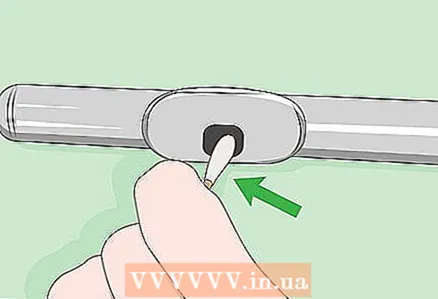 9 Use a Q-tip to clean hard-to-reach areas. You can use cotton swabs to remove dust and other debris that has accumulated between the valves of the flute. You can also clean the muzzle on the flute head with a cotton swab. Be very careful not to hit the valve pads.
Method 2 of 3: storing your flute
 1 Put all the flute parts in the case into place. Leaving the flute out of the case increases the risk of damage to the instrument. Do not store a wet flute cleaning cloth inside the case with the instrument. This moisture can cause a patina to form on the flute.
 - Do not put the napkin in the case, but in the case bag.
 2 Store your flute in a safe place. Put the flute in a case in a closet, under a bed, or in another unoccupied place in your house. The tool case must not be dropped or kicked. This can damage the flute.
  3 Do not store the flute where it will be exposed to extreme temperatures. Extreme high and low temperatures can adversely affect the flute mechanism, as well as the condition of its pads and the cork inside the head. Heat can cause the plug to expand and damage the tool head, while cold can cause plug shrinkage and breakage of the instrument, as well as set-up problems. Be sure to store the flute away from heating appliances and windows with direct sunlight.
Method 3 of 3: Caring for your flute
 1 Wash your hands and face before playing the instrument. There are fatty secretions on the hands and lips, which are easily transferred to the flute while playing the instrument. To reduce the amount of pollutants the flute comes in contact with, be sure to wash your hands and wash your face before playing. This step will also reduce the amount of fingerprints left on the surface of the flute.
  2 Remove all jewelry from your hands before playing the flute. Jewelry, especially finger rings, can scratch and damage the outer surface of the flute when playing the instrument. To reduce the potential risk of such damage, remove your rings before playing the flute.
  3 Have your flute serviced at least once a year. A professional craftsman will clean the instrument with high quality and tidy up its pads, without spoiling anything. At the same time, he can completely disassemble the flute for cleaning, tuning and carrying out the necessary repairs. To maintain the tool in good condition, it must be serviced at least once a year.
Tips
- Those who are serious about the flute will need at least two wipes to clean the instrument. Handkerchiefs can be successfully used as napkins.
- If you have a wooden or piccolo flute, consult an experienced performer with that type of instrument or a repairman for additional advice on caring for your wooden (or miniature) instrument and using lubricant.
- To prevent the butt pieces of the flute from sticking to each other, be sure to wipe off all dirt from them with a napkin. Then treat them with powdered graphite (as a last resort, you can use a simple pencil), assemble the flute and gently rotate the butt pieces until they can be easily disassembled and assembled.
- If the valves start sticking on the flute, have it repaired by a professional technician.
Warnings
- Never clean the flute body with chlorine-containing products. This will destroy its cover. The entire surface of the instrument will lose its shine and shine.
- Woodwind instruments must not be wetted! If you let the flute get wet, its pads will swell and it will simply stop playing.
- When disassembling the flute, be careful not to bend the valves. Take extra care when removing the lower knee, as it has a rather complex and fragile valve mechanism that is easy to bend and expensive to repair.
What do you need
- Ramrod
- Cloth for cleaning the flute from the inside
- Cloth for wiping and polishing the flute outside


