
Content
Anime and manga are popular types of Japanese manga and animation and have a very distinctive art style. If you want to draw your favorite character or create a new face yourself, start by sketching the head and face to define the character's shape. After sketching the head, you will draw the basic lines and shapes on which to draw the details. Once you've added your eyes, nose, and mouth, you can erase outlines and sketches of the hairstyle. With a little patience and practice, you will be able to create anime faces in no time!
Steps
Part 1 of 3: Draw basic head shapes
Draw a circle on paper with a vertical line in the middle. Use a pencil to make it easy to erase the room when you make a mistake. Lightly draw a circle in the center of the page to make room for more details. Find the center of the circle and draw a vertical line down from the top of the circle to see where the midpoint of the face is.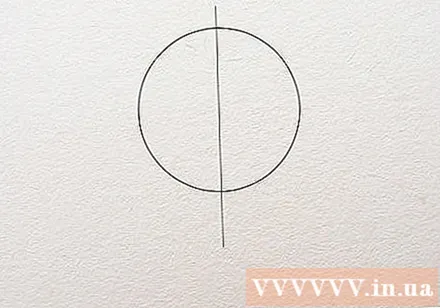
- Start off by drawing a large circle so that there is space to draw the facial contours. Otherwise, the lines will be very tangled and difficult to draw accurately.
Advice: If you find it difficult to draw a circle by hand, you can use a compass or draw the border with a circular object.
Draw a calibration line about one-third of the circle from the bottom up. Measure about 1/3 up from the bottom of the circle and mark the point with a pencil. Use the ruler with a horizontal line across the two sides of the circle to make the standard line for the character's eyes. Do not press hard while drawing this line for easy deletion later.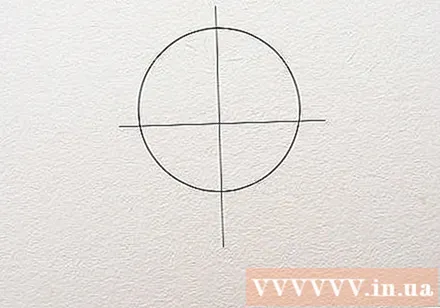
- You do not need to measure accurately. If you don't have a ruler, just use the end of the pencil roughly.
Draw a horizontal line in the lower part of the circle to make the standard line for the nose. Find the lowest point of the circle you just drew and place the ruler across it. Light a line at the bottom of the circle that crosses across the widest point. When the drawing is complete, the nose tip of the character will be on this line.
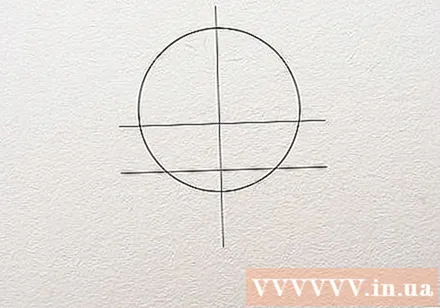
Draw a horizontal line to mark the position of the chin. Measure the distance from the center of the circle to the standard line to draw the nose you just drew. Measure from the bottom of the circle (or the standard line of the nose) down a distance equal to the distance you just measured and draw a small horizontal line on the vertical line in the middle. When finished, this line will be the top of the character's chin.- If you draw a female character, the distance from the bottom of the circle to the chin line is equal to 1/3 of the diameter of the circle, since female characters in anime and manga often have a more rounded face.
Outline the character's jaw. Start from the left or right of the circle at its widest point. Draw a line from the side of the circle slightly diagonal towards the vertical line in the middle. Continue drawing until the standard line for the nose is reached. As the diagonal crosses the standard line of the nose, you will continue to draw towards the standard line of the chin. Repeat the same on the other side of the circle to join the two jaw contours.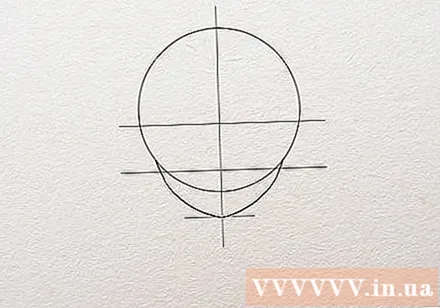
- Female characters usually have a rounder face and a pointed chin than male characters. Draw curves instead of diagonals if you're going to draw a female face.
- Adult characters often have longer and narrower faces than children. Draw more curved lines as you plan to depict a child's jaw.
Sketch the neck from the sides of the drawing head. The width of the neck will depend on the character's gender. If you're a male character, draw the sides of the neck closer to the jaw for a more muscular look. For the female character, the sides of the neck will be placed closer to the chin so that the neck will be slimmer. Draw 2 vertical lines down from the sides of the face to make the neck.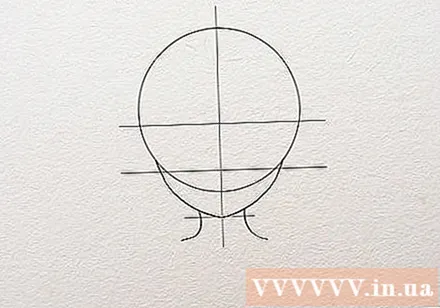
- Child characters will have a smaller neck because of less muscle or lack of clarity. When drawing a boy or girl, draw the sides of the neck closer to the chin.
- Hold the drawing far in front of your face to see if the character's neck is too long or too short, then delete or extend as much as you like.
Part 2 of 3: Drawing details on the face
Draw the ears on the sides of the head, between the standard lines of the eyes and nose. The start and end points of the ear will be equal to the 2 standard lines of the eye and nose that you drew earlier. Outline 2 curves of the C-shaped, connected to the 2 sides of the circle and jaw contour. You can leave it as it is if you want to keep it simple, or draw more curves inside the ears for more detail.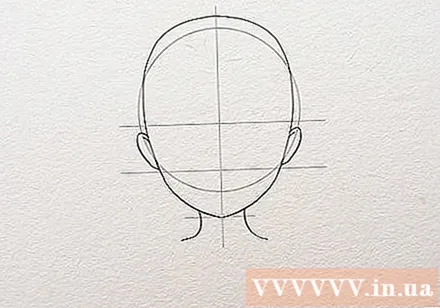
- You can look at your ears in the mirror or see the photo to see what their ears are shaped like.
- Ears come in many different shapes. Choose the shape that best suits the character.
Draw the tip of the nose at the intersection of the vertical and horizontal lines. The nose of an anime or manga character will not be drawn as clearly when viewed from the side. If you want the drawing to look simple, just draw a dot at the point where the standard line of the nose intersects the vertical line. If you like a little more complexity, draw two curved lines on either side of the vertical line in the middle to show the nostrils.
- You can also draw a straight line or curved line that extends up to the standard line of the eye if you want the character to have a clear nose.
Draw the eye below the calibration line you drew earlier. If you draw the male character, you will draw a horizontal stroke below the standard line and end near the side of the head. For the female character, draw a curve below the standard line, extending towards the side of the head. The lower border of the eye will be somewhere above the tip of the nose. Draw the other eye in the same way on the opposite side, in proportion.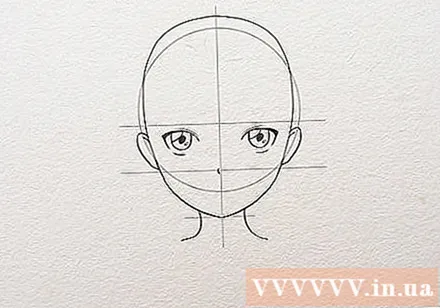
- Anime or manga characters have many different eye shapes, so please review your favorite characters to get an idea of drawing eyes for the character.
- Practice drawing eyes with different expressions if you want to show a character with special emotions. For example, an angry character will have slightly narrowed eyes, and a surprised character will open wide.
The extra eyebrow point is above the standard line of the eye. Start to draw the character's eyebrows above the corner of the eye, slightly higher than the standard line drawn earlier. Draw a slightly curved or oblique line, based on the shape of the upper rim of the eye. You can simply draw the brow with a simple line or drag a few more strokes upwards to create a rectangular brow. Draw the eyebrow above the other eye when you've finished drawing the first eyebrow.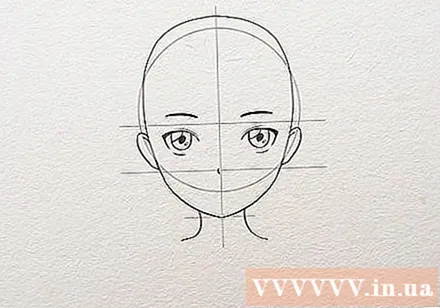
- The eyebrows of an anime or manga character can come in many different shapes, such as a triangle, or even a circle.
- Draw more slanted eyebrows if you want the character to have a more distinct expression. For example, the eyebrows pointing down toward the nose will make the character look angry, but if the eyebrows are pointed towards the ears, the character will appear sad or scared.
Draw the mouth between the nose and chin. Find the midpoint of the distance from nose to chin to see where the mouth is. If you want to create a simple mouth shape, just draw a slightly curved line to express a smile or pout. Draw a slightly shorter line below the first stroke to shape the lower lip.
- You can check out the mouth styles and expressions of anime characters online to learn how to specify different expressions.
- If you want to draw a character who is smiling with open mouth, you don't need to draw each tooth. Just draw a line between the upper and lower teeth to separate them.
Advice: The size of the mouth depends on the expression of the character you want to draw. If you want the character to look a bit goofy, draw a wider mouth. Draw a smaller mouth if you want to portray a serious or quiet character.
advertisement
Part 3 of 3: Erase excess lines and finish the painting
Erase the lines for the standardization of the drawing. Use the eraser attached to the end of the pencil or eraser to erase the standard lines that do not belong to the character's face or head. Be careful when erasing around the contours of the face just drawn so as not to lose the face details. Continue to erase the remaining calibration lines clean so that only the face remains.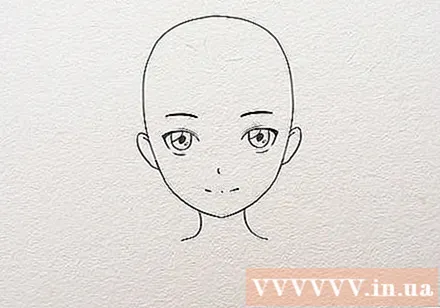
- Calibration lines drawn too boldly may not be erased.
- Use thinning tablets to erase areas with lots of detail, such as the eye or ear area.
To create one impressive hairstyle for character. Anime and manga characters come in a variety of hairstyles, and you can choose the one that best suits your character.Avoid drawing individual hairs separately; Instead, you should outline the basic shape of the hairstyle. Lightly draw with a pencil so you can erase and make changes if necessary. Once you've outlined the hairstyle, you can erase the areas with the hair covering your head.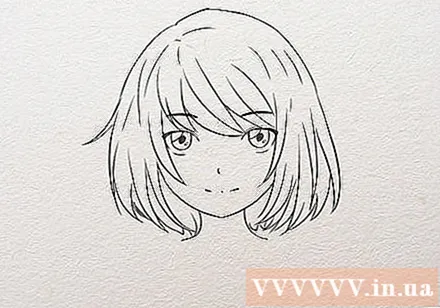
- Hair of an anime or manga character is usually split into clusters and has pointed tails. Take a look at the hairstyles of different characters to get ideas for the hair of the character you're drawing.
Advice: Try out the hairstyles on tracing paper placed on the drawing so you don't have to delete the character if you don't like the hairstyle you just drew.
Points add small details like freckles or wrinkles on the character's face. After finishing the hair and removing the excess lines, you can add details to create a unique look for the character. Add freckles on cheeks, moles, or wrinkles to make the characters look more interesting. Sketch out your favorite jewelry or accessories with a pencil so you can erase it if you don't like it after drawing.
- You don't have to draw more details for the character if you don't want to.
Use a polishing pencil to give your face depth. Hold the pencil on your side to polish lightly under the character's chin, lower lip, and hair. Remember to move the pencil one way for each shading area for uniformity. Press a little harder if you want the shadow to be darker.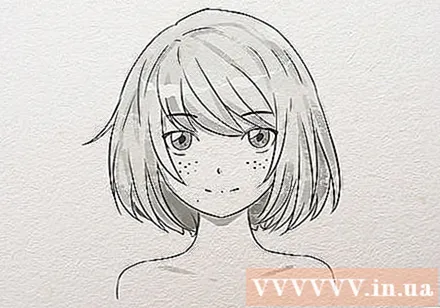
- Be careful not to shade too dark or the drawing will look heavy and difficult to remove.
Advice
- Watch anime cartoons or read manga comics to see how other characters are shaped and practice drawing so you can draw many different styles.
- You will improve if you keep exercising a little each day.
- Try drawing a normal face to practice anatomy and improve your drawing skills.
- Take your drawing pad and pencil with you so you can draw or sketch anywhere.
What you need
- Paper
- Pencil
- Ruler
- Eraser


