Author:
Robert Simon
Date Of Creation:
21 June 2021
Update Date:
14 September 2024

Content
While Excel is not exactly a calendar program, you can use it to create and manage your calendars. Instead of customizing your own calendar, it's much faster to use the various built-in calendar templates and customize them to your liking. You can also import event lists from a spreadsheet into the Outlook calendar.
Steps
Method 1 of 2: Use an Excel template
Start the Excel document. Click the "File" tab or the Office button and select "New" and a variety of templates will appear for you to choose from.
- On certain versions of Excel, such as Excel 2011 for Mac, you'll need to select "New from Template" in the File menu instead of "New".
- When you create a calendar from a template, you'll have a blank calendar to fill out the event with. If you want to move your Excel data list to your Outlook calendar, see the next section.
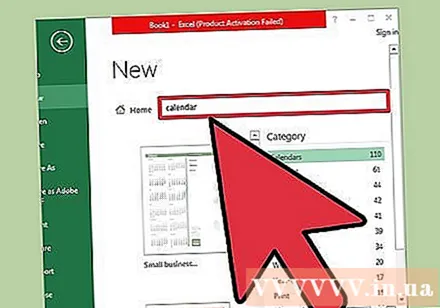
Find a calendar template. Depending on which version of Office you're using, there might be a "Calendars" section, or just enter "calendar" in the search field. Some versions of Excel will display the calendar templates pre-selected on the main page. If these templates match your criteria, you can always use them, otherwise you can find and select from the available calendar templates online.- You can search for more specific keywords depending on your needs. For example, if you need the academic calendar, you can search for the keyword "academic calendar".

Reset the date on the correct form. Once the template is loaded, a new blank calendar will appear. If the date is not correct, you can change it using the menu that appears when you choose the date.- The process will vary slightly depending on the model you use. Usually you can select the month or year displayed and then click the button ▼ that appears next to that time. The available options appear, and the calendar will adjust automatically.
- You can also set the week's start date by clicking on it and choosing a new date.

See tips. Many templates will have a frame with tips that guide you on how to change dates or adjust other settings for the calendar template. You will need to delete these frames if you do not want them to appear in the print schedule.
Adjust any appearance you want. You can adjust any of these by selecting and making changes in the Home tab. Like any object in Excel, you can change fonts, colors, sizes, and more.
Enter the event. Once the calendar is properly configured, you can start importing events and information. Select the cell where you want to add the event, and then enter the data. If you need to add more than one piece of content on the same day, you can get creative by spacing. advertisement
Method 2 of 2: Import the Excel list into Outlook Calendar
Create a new spreadsheet in Excel. You can import data from Excel into the Outlook calendar. This will make it easier to import data such as work schedules.
Add the appropriate title to the spreadsheet. It will be easier for you to import your lists into Outlook if the spreadsheet is formatted with proper headers. Enter the following headlines in the first line:
- Subject
- Start Date
- Start Time
- End Date
- End Time
- Description
- Location (Location)
Enter each calendar item on a new line. The "Subject" field is the name of the event that will appear on the calendar. You do not need to enter the entire subject above in every field, but at least you should have the "Start Date" and "Subject."
- You need to enter a date in standard MM / DD / YY or DD / MM / YY format for Outlook to understand.
- You can create a multi-day event by using the "Start Date" and "End Date" fields.
Open the "Save As" menu. After you add the event to the list, save a copy of the list in a format Outlook can read.
Choose "CSV (Comma delimited)" (Comma delimited) from the file type menu (file type). This is a popular format that can be imported into a variety of programs including Outlook.
Save the file. Name the playlist and save the file to CSV format. Click "Yes" when Excel asks if you want to continue.
Open your Outlook calendar. Outlook is part of the Office toolkit and usually comes pre-installed if you already have Excel. When Outlook opens, click the "Calendar" button in the lower left corner to view the calendar.
Click the "File" tab and choose "Open & Export". You will see many options for data processing in Outlook.
Choose "Import / Export". A new window for importing and exporting data in Outlook will appear.
Select "Import from another program or file" then click "Comma Separated Values". You will be prompted to select the file you want to load.
Click "Browse" and locate the CSV file you created in Excel. Usually the file is in the Documents folder if you haven't changed the default save location in Excel.
You need to make sure that "Calendar" is selected as the target folder. Since you are in Outlook's calendar view, "Calendar" will be selected.
Click "Finish" to import the file. After the program processes the list, the events are added to the Outlook calendar. You can find events in a location matching the time set by the list. If you include a description, this will appear when the event is selected. advertisement


