Author:
Louise Ward
Date Of Creation:
4 February 2021
Update Date:
28 June 2024
Content
There is a rush when you press the power button for the first time on a new computer. The soft blowing of the fan, the firming beeps, the brightness of the screen all signal the successful completion of one more machine assembly. This indescribable and desirable feeling is one of the motivations for the computer geek, and building their own machine is the perfect starting point. You can even save money by building your own computer.
Steps
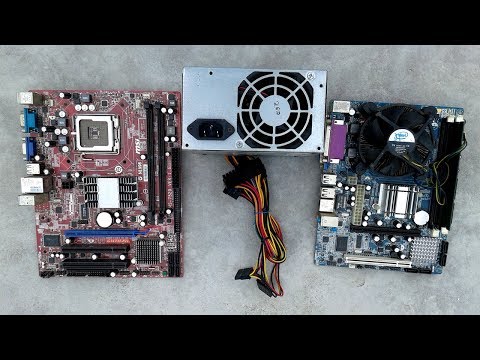
Part 1 of 8: Components Collection
Determine the functionality of the computer. If you build a machine for use in a home office for word processing or email, you will have different requirements from building a machine for high-quality gaming. The role of the computer will dictate the specifics you need. Whatever the ultimate function of a computer, every computer needs the basic components in common.
- Take note of your budget. If you use your computer mostly for office purposes or regular web surfing, you will need about 10 million VND. If you use it primarily for gaming purposes with a relatively high frame rate and proper setup, you'll need around 15 million (or more depending on how fast and powerful you want it to be). If you want a premium super-premium that's specifically for gaming and that's three times as powerful, you'll need at least $ 1,000. You should also remember to budget for your operating system, monitor, mouse, headset, microphone, webcam, speakers, and any other essential accessories.
Find the processor (CPU). This is the brain of your computer. Most processors are multicore, which means they are essentially multiple processors in one. Compare the specs and choose the latest processor, don't choose a processor that seems valid but outdated. This old type has been changed and become obsolete, and is no longer supported by the manufacturer or software companies. Choose the stream with the required speed to run the programs you want. You also need to be mindful of power consumption and ease of cooling. Poor cooling is very harmful to the processor. Avoid Pentium series as most of these processors are out of date.
Find a motherboard that matches the processor. If the processor is the brain, then the motherboard is the body. The motherboard is the thing that connects all the internal components of a computer. The processor you buy will determine the type of motherboard you need. Different processors have different “socket” sizes, and only work with motherboards that support that socket. Here your choice will depend on the processor you have, the amount of memory you want, the size of your chassis, and the number of drives you want to connect to your motherboard.- The motherboards come in many different designs, but the most common ones are ATX and MicroATX. ATX is a standard full-size motherboard. If you're building a typical tower computer, look for ATX motherboards. ΜATX boards are smaller than standard ATX boards, and better if you want a smaller case and don't need more than four expansion slots.
- Make sure that your motherboard supports all the components you want to install. If you plan to install a high-end graphics card, then the motherboard needs to support PCI Express interface. If you want to install a lot of RAM, the board will need to fit at least 4 sticks of RAM.
- You can sometimes buy the processor and board in a combination package, which will save you a lot of money. Just make sure you don't install a processor or motherboard model you don't want just to save a little money.
- Always research the correct board specifications on the manufacturer's website. If you are not sure whether the CPU and the "socket" size match, you need to check the specifications of the socket. If both the CPU and the socket show as LGA 1150, then that means matching. There are many different socket sizes available, but you don't have to worry as only a few of them are outdated.

Look for the memory (RAM) that is compatible with your motherboard. RAM (Random Access Memory) is where programs store the information they are using. If you don't have enough RAM, your programs will run much slower than they can afford. The RAM you buy is determined by the motherboard model you choose. The speed of the RAM you install must be supported by the motherboard. You can check the manufacturer's websites for both components to check.- RAM is always paired up. All RAM in the system should have the same speed, preferably the same model. For example, if you want 8GB of RAM, you can mount two paired 4GB sticks or four paired 2GB sticks.
- If you plan to use more than 4GB of RAM, you will need to install a 64-bit operating system. 32-bit operating systems do not recognize more than 4GB of RAM, even if more is installed.
Find a hard drive large enough to store all of your data. Your hard drive stores your operating system, installed programs, and all of your data. Storage has gotten cheaper over the years, and it's easy to get a few terabytes of storage cheap.
- Hard drives come in a variety of speeds, most commonly 5400, 7200, or 10000 rpm (RPM). There are also solid state drives (SSDs) that do not contain moving components, and allow for higher speeds. The downside is that they are quite expensive and have limited storage space compared to traditional drives for comparable prices. Solid state drives are best used for the operating system and critical programs. Place your games, music and movies on a separate HDD.That way you'll have a computer that can boot up quickly, run fast, and have plenty of storage space.
Buy a video card to play games and watch HD movies. A discrete graphics card is necessary for playing the latest games, but not a big deal for an office PC. Intel motherboards have a built-in graphics card, so you don't need a separate card if you're only going to use it for web surfing and email. If you watch a lot of HD videos or play a lot of games, you'll need a discrete video card.
- Make sure you choose a GPU from the latest line like Nvidia's Pascal line with a GPU named GTX followed by a 1000 or more, for example, the GTX 1080 is a very strong line. Despite the high cost, you get exceptionally high-end game setups.
Choose a case that meets both function and label. The chassis holds all of your computer components. Case size will be determined by the number of hard drives you install, as well as the motherboard size. A range of chassis models range from cheap and functional to flashy and expensive. Choose a chassis that allows for optimal airflow, and install additional fans if needed. If you plan to use more high-end components, you will have to handle more heat than slower components.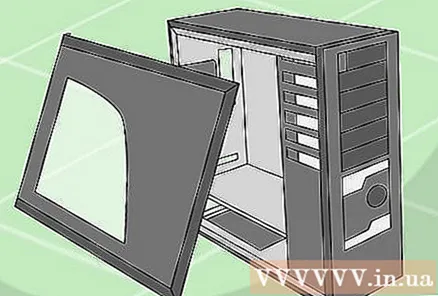
Make sure your power supply unit can handle the load. The power supply unit supplies power to all components in the computer. Some cases come with a power supply unit, but most will require a separate supply. The power supply unit should have enough capacity to power all the components, but not too large to waste power by supplying more than needed. Don't be miserly because choosing the wrong power supply can damage the components in the machine.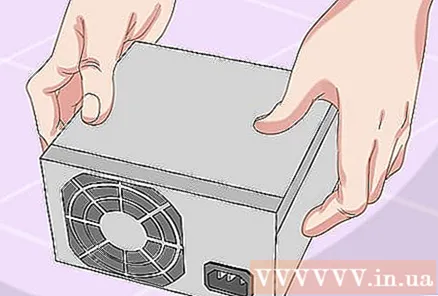
- Always choose a reliable manufacturer when purchasing the power supply unit. If you build it for gaming purposes, you will need a separate power supply to avoid damage to the component.
Research every part you plan to buy. Read online consumer reviews and magazines for more detailed information. Online forums like AnandTech are also extremely helpful when it comes to specific information. Remember this is one of the most important steps, because everything will depend on your hardware. There are many guides and reviews from consumer review magazines and websites online.
- A component should not be selected based solely on a review, but good reviews usually mean that the component is good.
- It should be noted that this is one of the most important steps, as everything will depend on the hardware, so don't rush in this section as it is not only important but also very interesting. You can also modify your parts list, which is important to create the one that best suits your needs.
Choose a retailer. Once you determine what to buy, you need to decide which retailer to buy from. Consider the following:
- Does the retailer have a credit? Choose a retailer that is trusted and widely used by many to avoid being scammed.
- Retailers to deliver goods to? Make sure the retailer ships to your country.
- Know the parts prices and delivery charges. Choose the (reputable) retailer who offers the best price for your components. Please remember that international and domestic delivery charges vary widely.
- Buy components from various retailers. You can buy from a variety of retailers to get the best price for each component. However, remember, you may have to pay more for shipping charges if some of the parts are shipped later and separately.
Part 2 of 8: Getting Started
Open the chassis. You will need to wear antistatic gloves or some kind of protection because the chassis has no ground metal and is sometimes very sharp.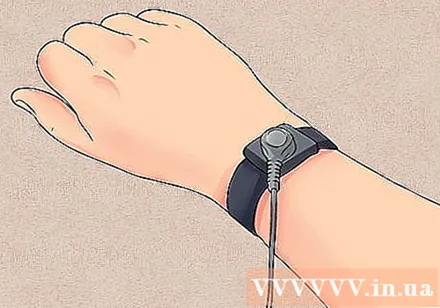
Install the power supply. Some cases come with a power supply, while others require you to purchase a separate power supply and install it yourself. Make sure that the power supply unit is installed in the correct orientation, and that nothing is obstructing the power supply fan.
- Make sure that your power supply is strong enough to accommodate all components. This is especially important for high-quality gaming machines, as discrete graphics cards can consume a lot of power.
Self-grounding. Use an anti-static wrist cable to prevent electrostatic discharge (ESD) from damaging electronic components of the machine. If you don't have an antistatic wrist strap, plug your grounded power adapter into an outlet (but don't turn it on), and then keep your hand on the power adapter whenever you touch it. to ESD sensitive components. advertisement
Part 3 of 8: Installing the Motherboard
Remove the motherboard from the packaging box. Put it on top of the box. DO NOT place it on top of the antistatic bag as the outside is conductive. You will install more components to the motherboard before you install it in the chassis, as it will be easier to manipulate the motherboard before installing it.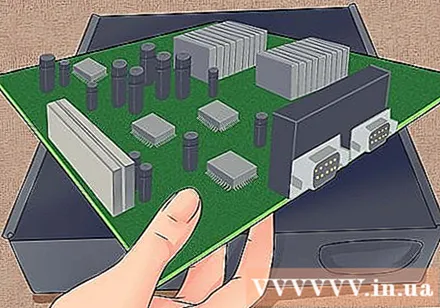
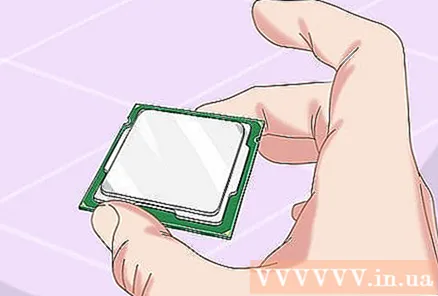
Remove the processor from the packaging box. Observe the missing pins on the processor and fit them into the sockets (sockets) on the motherboard. On many processors there will be a small yellow arrow in the corner that you can use to navigate the processor correctly.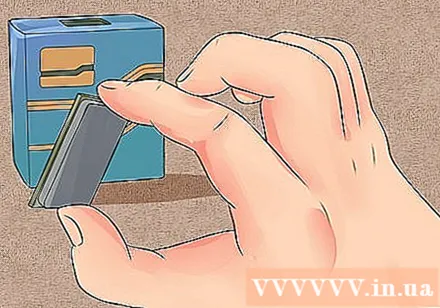
Attach the processor to the motherboard. Open the CPU socket and carefully insert the processor (no force required). If it doesn't slide in right away, or you feel the need to force it, then you are probably misaligned. Close the socket and make sure the CPU is securely attached. Some sockets have small handles while others have complex assemblies to open and close the socket.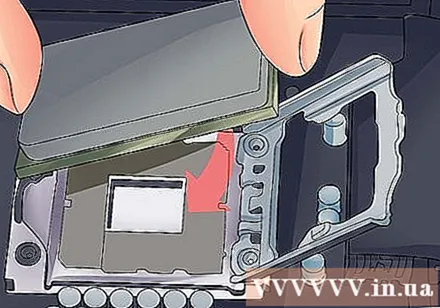
Apply good thermal grease to the CPU. Only apply a dot of thermal paste on the CPU. Adding too much thermal grease slows down heat transfer, making it harder to rapidly cool the CPU down.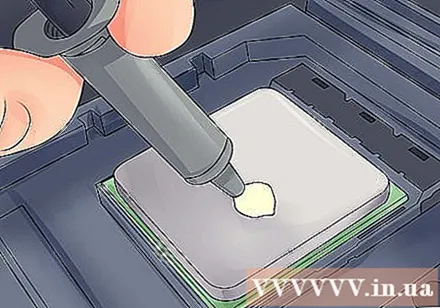
- Some processors that come with the heatsink will not require thermal paste because the heatsink has already been coated with thermal paste from the factory. Check underneath the radiator before applying glue to the processor.
Attach the radiator. Radiators vary widely, so read the instructions. Most of the built-in coolers will attach directly to the processor and fasten to the motherboard. Separately bought radiators will have brackets that need to be mounted underneath the motherboard. Refer to the documentation for your radiator for the correct installation instructions.
Install RAM. Put the RAM in the proper slot by opening the latch and pushing the RAM stick until the small levers snap it into place. Notice how the RAM and the slots fit together - align them correctly. When pressing down, press both ends of the RAM stick with equal force. If the RAM slots come in two colors, then this indicates the preferred slots in case you don't use up the available slots.
- Make sure you install the RAM in the correct slots. Check your motherboard documentation to make sure you have installed the RAM in the correct place.
Install the backplate (metal panel on the back of the chassis) I / O on the back of the chassis. Many modern case models don't come with built-in panels, but your motherboard may come with its own panel. Some older cases have built-in I / O panels, but the case may not have the right panel for your motherboard.
- Removing the pre-installed panel can take a little effort. They sometimes have screws that snap into place, but for the most part they are held only by friction. Push it out by pressing the support frame from the back of the chassis.
Remove the I / O component shields on the motherboard backplate. Put the new panel in place on the back of the chassis. Make sure installed in the correct orientation.
Insert the screw holders into place. Most cases come with a small pouch with screw holders. The screwdrivers lift the motherboard from the chassis, and allow screws to be attached to them.
- The case may have more holes than the motherboard supports. The number of shims required is determined by the number of covered holes on the motherboard. Place the motherboard in place to determine where to fasten the screw holders.
Secure the motherboard. With the screw holders installed, place the motherboard in the chassis and push it into the I / O panel. Any rear ports should fit into the holes in the I / O panel.Use the available screws to secure the motherboard to the screw base through the screw holes covered on the motherboard.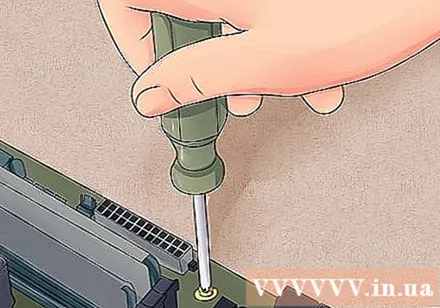
Plug in the chassis connectors. These connectors are located in the same place on the motherboard near the front of the chassis. The order in which they are connected depends on which one is easiest. Make sure that you connect the USB ports, the Power and Reset switches, the power and hard drive LEDs, and the audio cable (HDAudio or AC97). The documentation for your motherboard will tell you where to mount these connectors on the motherboard.
- Usually there is only one way for these connectors to be attached to the motherboard. Don't try to force anything to fit.
Part 4 of 8: Installing the Graphics Card
Remove the back cover of the PCI-E slot. Most modern graphics cards use the PCI-E standard. Some cards require you to remove both protectors, not just one. You may have to push the protective sheet to come out of the chassis.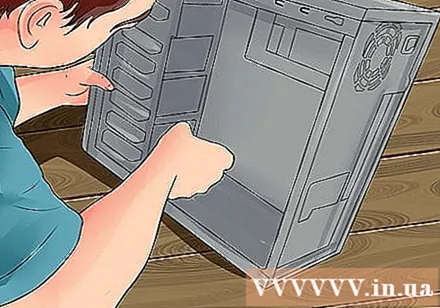
Insert the graphics card. You may have to bend the cover on the slot to be able to insert the graphics card. The shielding helps to keep the graphics card in place (this is even more important with large, high-end cards). Use gentle, even pressure until the card is fitted evenly, and the back panel aligns.
Fix the card. After inserting the card, use screws to secure the card to the back of the chassis. If you do not secure the card, you may damage it during subsequent operation.
Install other PCI cards. If you have any other PCI cards that require additional installation, such as a discrete sound card, the installation process is similar to the process of installing a video card. advertisement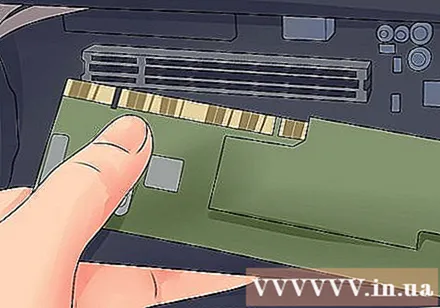
Part 5 of 8: Adding a Hard Drive
Remove the front panels of the drives you plan to install. Most cases have panels on the front to protect the drive bays. Remove the shields for the location where you want to install the optical drives. You do not need to remove any shields to mount the hard drive.
Insert the optical drive from the front of the chassis. Most cases come with a built-in bracket for the drive to be supported and evenly supported. After the drive is aligned with the front of the machine, fasten it with the screws on each side of the drive.
Install the hard drive. Push the hard drive into the appropriate 3.5 ”tray in the chassis. Some cases have movable brackets that you can install on the hard drive before pushing it in. After the hard drive has been installed into the bracket, secure it on both sides with screws.
Connect the SATA cable. All modern drives use a SATA cable to connect the drive to the motherboard. Connect the cable to the SATA port on the drive, then connect the other end to a SATA port on the motherboard. Hard drives use the same cables as optical drives.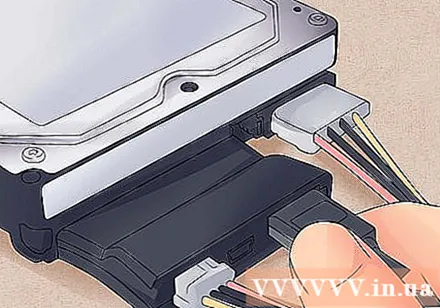
- For easier troubleshooting, connect your hard drive to the first SATA port on the motherboard, then connect the other drives to the next SATA ports. Avoid plugging the drives into random SATA ports.
- The SATA cable has two identical connectors. You can install the cable in both directions.
Part 6 of 8: Wiring the computer
Connect the power supply to the motherboard. Most modern motherboards come with a 24-pin connector and a 6 or 8-pin connector. Both models need to be connected to the motherboard to function. The power cables only fit into the slots they are intended for. Press the connector fully in, until the latch closes.
- The 24-pin connector is the largest connector on the power supply unit.
Connect power to video card. If you have a discrete video card, it may also need to be powered. Some cards require one connector, others require two. The connection port is usually located on the top of the video card.
Connect the power to the drives. All drives need to be connected to the power supply using SATA power connectors. These power connectors are the same for both optical and hard drives.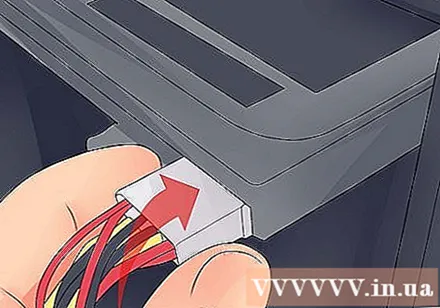
Adjust the wire position. One of the keys to good airflow is to keep the bundles out of the air. Trying to wire effectively inside the chassis can be a frustrating experience, especially if you're building a small chassis. Use bundles to tie cables together and place them in unused disk trays. Make sure the cables are not blocking any fans. advertisement
Part 7 of 8: Installing additional Fans
Connect the cooling fan. Most cases come with one or two sets of fans. These fans need to be attached to the motherboard in order to function.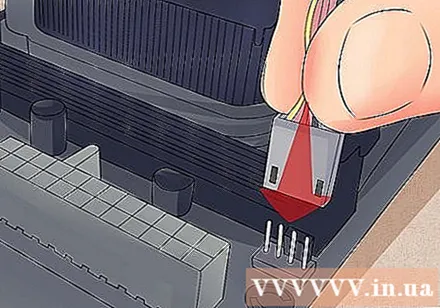
Install a new fan. If you use a lot of premium components, you will likely need extra cooling. The 120mm fans are usually quite quiet and significantly increase the air flow in the machine.
Optimized fan layout. Fans mounted on the front or top typically draw air in, while the sides and rear fans typically push the air out. This layout helps keep a fresh, cool air flow through your motherboard. You can see which direction the fan is blowing by studying the top of the fan housing. Most fans have small arrows imprinted on the bodies to indicate their blowing direction. advertisement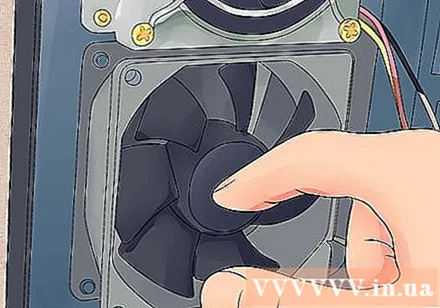
Part 8 of 8: Starting the machine
Seal the chassis. You should not run your computer but leave the case open. The chassis is designed to maximize airflow, and if the chassis is opened, the flow is no longer effective. Make sure everything is screwed tight. Most cases use pink-eared screws (screw-on screws) so that you don't need tools when opening and closing the case.
Computer connection. Connect your monitor to your computer, either through the graphics card or through a port located on the back of the motherboard. Connect the keyboard and mouse to the USB ports on the front or back of the computer.
- Avoid connecting any other devices until you finish installing the operating system.
Turn on the computer. You won't be able to do much because you haven't installed the operating system yet, but you can check to see if the fans are working or the computer has successfully completed the POST (Self-Test on Boot) not yet.
Run the program MemTest86 +. The program is free to download and can be run from a CD or USB drive without the need to install an operating system. This allows you to test your memory sticks before you start installing the operating system. Memory sticks have a higher failure rate than most other computer components, especially if they are inexpensive, so it's wise to check them first.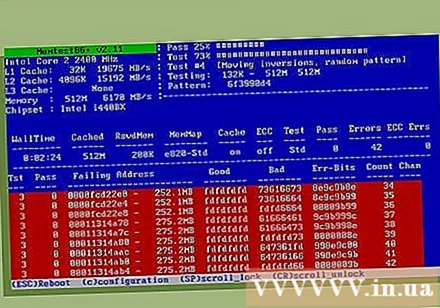
- You can set your computer to boot from a CD or USB drive first, instead of booting from the hard drive. Enter your BIOS settings when you first boot the computer, then browse to the Boot menu. Select the appropriate drive from which you want the machine to boot.
Install the operating system. Self-assembled computers can install Microsoft Windows or a Linux version. Windows costs more, but has the benefit of being compatible with virtually any program and hardware component. Linux is free and supported by a community of developers, but can't run many programs designed for Windows. Some proprietary hardware cannot function properly either.
Install the drivers. After installing the operating system, you will need to install the drivers. Most of the hardware you buy will come with a disc that contains the driver software for the device to work. New versions of Windows and Linux will automatically install most drivers when connecting to the Internet. advertisement
Advice
- Some power supplies come with a 115 / 230V converter. If you live in the US use the 115V setting, otherwise use 230V.
- Each power cable will only fit in the correct direction, but still need force to push the cable in. If you are using a newer power supply with an 8-pin EPS 12V connection and an 8-pin PCI Express connection, do not try to force the cable into place.
- Use bundles to carefully bundle cables together, and orient them so as not to block airflow. Avoid using IDE components such as hard drives or optical drives, if possible, as this standard ribbon cable blocks airflow.
- If you put the system together and it is not working, remove everything except the power supply, motherboard, RAM and cooler for the processor (and the video card if you don't have the built-in video card) . Make sure the machine is working by monitoring your BIOS boot screen. Turn off the machine, then plug in the hard drive again and verify that the machine works. Turn off the machine, then reinsert the CD-ROM drive and make sure the machine works.Turn off the machine, and keep plugging in each additional peripherals until everything is plugged in and working. The idea here is to install the minimum components to turn the machine on, then add one more at a time so you can see which part is causing the problem.
- Do not place hardware devices on the floor for days while you figure out what to do, as this can lead to electrostatic discharges that damage or damage computer components (only 10 volts are needed for damage some computer components). When not attached to the motherboard and chassis, all components need to be placed in anti-static bags. Alternatively, you can place them on non-conductive surfaces, such as wooden or glass tables.
- The screw threads on the chassis sometimes slip and cannot hold the screws properly anymore. Avoid letting this happen by choosing the correct screws. The screw must start to screw in easily, without any difficulty, possibly caused by the wrong type of screw. Tighten the screw, but not too tight: turn the ring about a quarter of the time until it is fully inserted, or screw the screwdriver instead of the whole hand. Aluminum is not as strong as steel, so it is especially susceptible to wear - just a little tighter than when it stops moving is enough. (Better aluminum cases will have thicker aluminum or even steel or reinforced frames in key areas.) The main side screws are used frequently and have to support the side to prevent the chassis from buckling into a parallelogram, so they are especially susceptible to damage. A quick, reliable way to fix them is to replace them with screws of a slightly larger size, not too long to penetrate other components: US # 6 x 3/8 "type screws or similar machine screws. , initially screw in and firmly (but not down too tight), this will usually be suitable for loose side joint joints using standard screws, which will generate new grooves on the sheet metal.
- If you purchased a copy of Microsoft Windows that came with the original manufacturer (OEM) equipment and you have a license sticker, you may need to attach the patch to the side of your computer for reference when processing. Windows installation asked.
- It can be helpful to ask a friend who is familiar with computer building to help. If not then at least consult with them about the components you plan to use.
Warning
- Do not try to force any component into the slot or socket. Newer hardware components can have small tolerances, but everything should still fit without using too much force. Memory modules are among the few components that require a bit of force to install. Before installing the memory modules, make sure they fit into the memory slots by comparing the notch.
- Be gentle when plugging in CPU and PATA (IDE) devices. If you bend a pin, use tweezers or narrow needle-shaped pliers to straighten it. If you break a pin, on the CPU or GPU socket, your hardware will no longer function properly. If you break one leg on an IDE connector, you still have a 7 out of 40 chance that you've broken a ground pin, which is a vacuum that's too important to the device's functionality.
- Do not try to force the cable connection. Luckily, the cables on the back of the computer will only fit into the connector for them. All cables, except the coax connection and a few laptop power connections, will only connect when they are in the same direction as their connector. For example, digital video interface (DVI) and graphic image (VGA) cables have a trapezoidal connector, rather than a rectangular type.
- If you are unsure about any of the building problems in your computer, do not try to "improvise" without any preparation. Ask someone who understands what you are doing to point you when you build the machine or hire an expert to do it for you. Another way is to seek advice from the accompanying user guides that come packaged with the different parts of the computer hardware you're assembling. Usually if the instructions are not included, or maybe the part you used to install the machine is a used product, you can refer to the section “System Support” on the manufacturer's website to try Obtain the necessary documentation.
- Use caution when working around the chassis' thin sharp metal edges. You will get scratched easily, especially with very small cases.
- Avoid electrostatic discharge when installing components. Wear an antistatic wrist strap or ground yourself by touching a metal part of the chassis before working with components. See related wikiHow articles on How to ground yourself and avoid damaging your computer by electrostatic discharge for more information.
- Double-check all connections before turning your computer on for the first time. Although in most cases it is possible to attach only one prefabricated connector in one direction, others are quite thin and light, and with a relatively small force they can be attached 180 degrees in the opposite direction. This is especially true of dual-channel random-access memory (DIMM) modules, because sometimes to the builder they appear to be mounted in the correct direction, but in fact they are incorrectly mounted. Installing such a memory module incorrectly into a DIMM slot results in a short circuit of the system memory, causing the printed circuit board of the RAM to become corrupted and unusable. This can be avoided by paying close attention to the so-called "alignment points" found on modern RAM DIMMs, making it clearer for the builder to know they have installed the memory correctly. or not.
- Maintain grounding when assembling computers. This can be done by plugging the machine's power supply unit into a residential electrical outlet with a cable with the recommended amperage power. This cable is usually a kettle-like wire that came with your computer from the start. Make sure the residential power outlet is turned off. This helps to ensure that the various electronic components in the computer you are connecting to are not "powered" (no current is flowing) when you install the machine. With the power outlet in the off position, a ground connection will be maintained. Only the other two terminals have current flowing through them and the circuit is cut off, so no power is sent to the devices above. This is a pre-designed safety measure in all circuit switches in residential power outlets.
- Do not touch the resistors and pins on the CPU or socket.


