Author:
Randy Alexander
Date Of Creation:
26 April 2021
Update Date:
1 July 2024
Content
This wikiHow teaches you how to pair a new remote with Amazon Firestick. You can easily pair your Amazon remote with Amazon Firestick by holding down the Home button on the remote. Or if the TV supports HDMI Consumer Electronics Control (HDMI-CEC), you can also connect an HDMI-CEC-compatible remote control by turning on the HDMI-CEC feature in the TV settings.
Steps
Method 1 of 2: Pair the new Firestick remote
Connect Firestick to the TV. You can connect Firestick to the TV via an empty HDMI port on the back of the TV.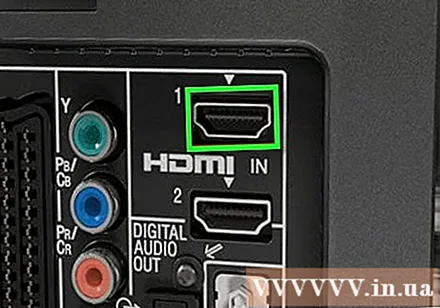
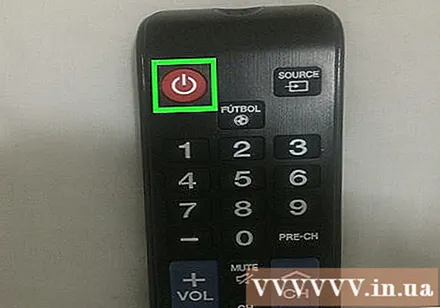
Turn on the TV. Press the power button on the front of the TV or on the remote to turn on the TV.
Select Amazon Firestick's HDMI source. Press the Source button on the TV remote until you select the HDMI port that Firestick connected. The Amazon Fire screen will appear.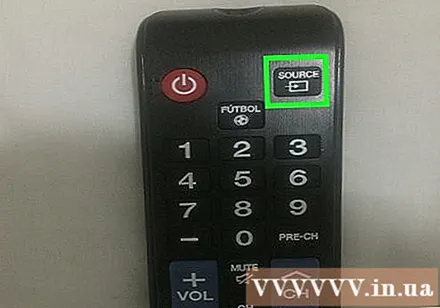
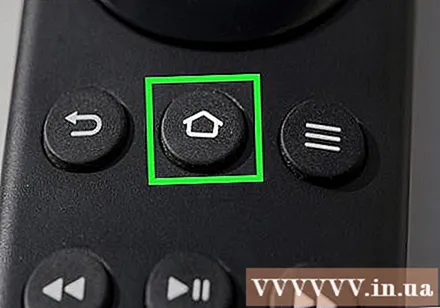
Hold down the Home button on the remote. The Home button has a house icon, located below the circular gasket at the top of the remote. Hold down the Home key for 10 seconds. When the remote controller connects to Firestick, the message "New Remote Connected" will appear on the screen.- If the first time fails, you can release the Home button and try again. Try approaching or backing away from Firestick.
Method 2 of 2: Use TV remote with HDMI-CEC

Connect Firestick to the TV. You can connect Firestick to the TV via an empty HDMI port on the back of the TV.
Turn on the TV. Press the power button on the front of the TV or on the remote to turn on the TV.
Select Amazon Firestick's HDMI source. Press the Source button on the TV remote until you select the HDMI port that Firestick connected. The Amazon Fire screen will appear.
Go to the System Settings section on the TV. How to open the system settings will vary depending on the TV model. On some TVs, you will press the "Menu" button on the remote. With some TVs, you may need to press the Home button and then select Settings or Options.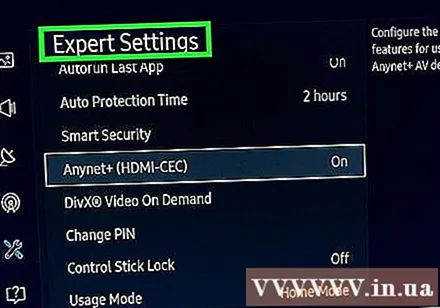
Find the HDMI-CEC setting. Again, this option will be different for each TV model. In some cases, this option may be located in Input Settings, System Settings or similar. Besides, each TV company has a different trade name for the HDMI-CEC feature. The following is a list of TV brands and trademarks of the HDMI-CEC standard linked.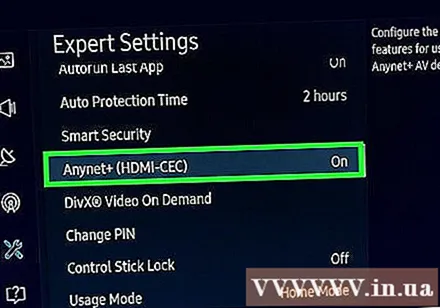
- AOC: E-link
- Hitachi: HDMI-CEC
- LG: SimpLink
- Mitsubishi: Net Command for HDMI
- Onkyo:Remote Interactive over HDMI (RIHD)
- Panasonic: HDAVI Control, EZ-Sync or VIERA Link
- Philips: Easy Link
- Pioneer: Kuro Link
- Runco International: RuncoLink
- Samsung: Anynet +
- Sharp: Aquos Link
- Sony: BRAVIA Sync, Control for HDMI
- Toshiba: CE-Link or Regza Link
- Vizio: CEC
Activate HDMI-CEC. After finding the corresponding setting in the TV's menu, turn on HDMI-CEC. Most TVs disable this feature by default. Once activated, you can use your TV remote to control multiple devices, including Amazon Firestick or even the PlayStation 4.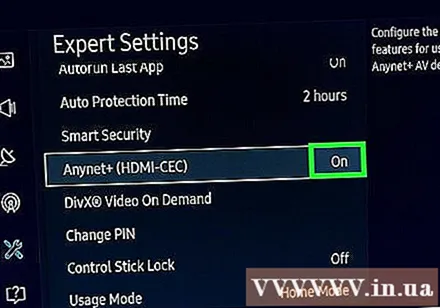
Advice
- See more online for how to connect the Amazon Fire Stick to WiFi.


