Author:
Laura McKinney
Date Of Creation:
5 August 2021
Update Date:
22 June 2024

Content
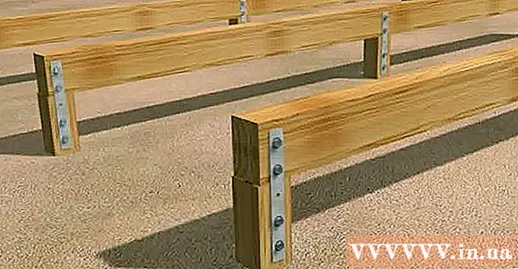
- Note that in some countries, you must have license before building foundations of structures on the ground. If you want to avoid this, you can erect the warehouse on the ground by replacing the beams (see below) for pressure-compacted wooden non-slip platforms that qualify for a ground contact of size 10 x15 cm, or use precast concrete fence posts.
- First, you need to join beam edge along the outer edge of each outer support beam; they must be the same length as the below beam.

- Then you need to mount these floor beams across the full length of the supporting beam; so that the length of the beams is equal to the distance Between two beam edges so that they fit together. In the blueprint, the floor beams are evenly spaced about 37 cm apart, except that the distance of the two outer beams together with the adjacent beam is 35 cm; that is, the standard size plywood will align with the outer edge of the outer beam, but only cover half the inner beam, and the side plank will cover the other half so that both can be properly supported.
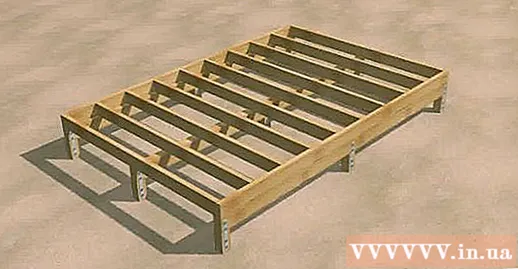
- To keep the floor beam from deflecting, place a piece wood shim between each pair of floor beams along the center supporting beam.

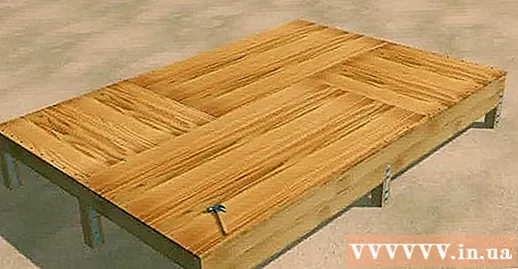
- The floor can be bolted with 7 cm screws.
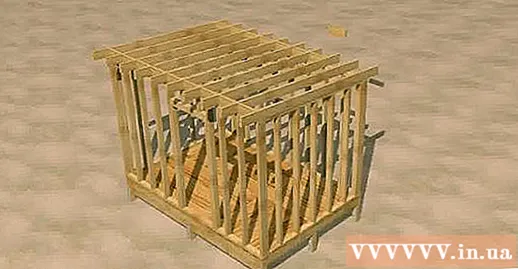
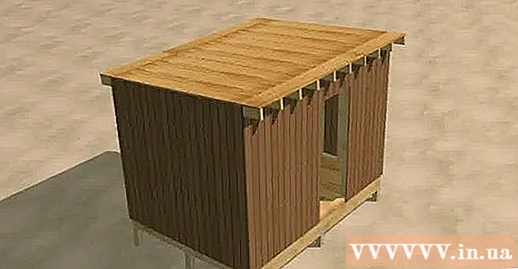
- Build the frame for the back wall. Create top and bottom beams (also called crossbars) of the same length as the installed floor length. To make the measurement simpler, you should create the same distance between the planting screws as the distance between the floor beams. Note that the back wall structure should be lower than the front wall so that the roof has a slope and drains rainwater away from the door area.

- Build the frame for the front wall. The structure of the front wall should be the same as the back wall except the taller dimensions and the door frame so you can install a door in the warehouse when finished.

- Framing the side walls. The bottom beam of each side wall should be the same length as the distance Between the bottom beams of the front and rear walls (so that the side walls match). The standard spacing between wall screws in the US is 40 cm (the distance between the centers, not the spacing between the edges); Since the spacing between the screws does not divide the overall length of the inner walls of the design, the two outer implants located quite close to the side will compensate for this deviation. Most importantly, the top beam will be angled so that the roof has a slope, which causes each screw to have a different height. If you do not know how to calculate the height required for each screw, you should first place the two outer planting screws at the correct distance, then trim the top beam across this distance, followed by cutting. separate each remaining planting screw based on the distance between the top and bottom beams at the correct position.

- Assembling four wall-frame structures.Wall structures are usually nailed to support the lower section from the bottom up. However, if this is not compatible with the design you have chosen, simply nail through the plywood and beam or screw in place by nailing the nail downwards at an angle. Note that you will likely need assistance from multiple people to help you keep the wall frames upright until they are put together.

Advice
- Let your warehouse clear
- You should paint to increase the life of the warehouse.
- Don't narrow the window
- If you plan to finish the inner part, you should add rivets at each corner for the nailed surface.
- An inclined ladder instead of the steps makes it easy to move wheeled equipment in and out of the warehouse.
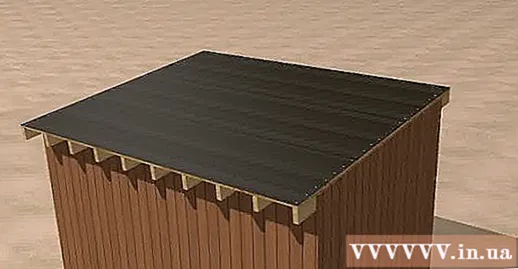
- You can install a corrugated glass roof that gets natural light.
- Click on the picture to see better. Some information is lost in thumbnail view.
- Choose a suitable location. There are two different types of warehouse builders; The first type of person usually chooses the location of the warehouse based on aesthetic factors, and the second type of person usually favors the available location. Unfortunately, this is not very effective when it comes to choosing where to build your warehouse.
What you need
- floor piers (see linked article in step 1)
- nail weight 16 for the frame
- nail weight 8 for plank
- support beams of 10 to 15 cm
- small beams sized 5 to 15 cm, rafters, and shim
- the floor board is 2 cm thick
- beam size 5 to 10 cm and screw implants
- 10 to 10 cm cross bar beams
- plywood roof 13 cm thick
- Coarse plywood (or sheathing) for walls
- oil paper for the roof
Warning
- Carefully lest the nail nailed to your finger!
- Measure and mark the boundaries of your property if you have never done so before.
- Check your property on campus to see if the warehouse is approved.
- Before starting construction, check with local laws at your local construction department to see if you need to apply for a permit.


