Author:
John Stephens
Date Of Creation:
1 January 2021
Update Date:
1 July 2024

Content

- If using the "tree" trick, you should instruct your child to form a circle with the brown shoelaces interlocking (the trunk) and the green part above the circle (the leaf part of the tree). .

- Again, if using the "tree" trick, instruct your child to wrap the shoelace around the "trunk" part of the previously created tree.
Pull the laces through the opening to create another lacing. You will use your free hand to pull the laces out. You should now see an opening between the first loop and the string just wrapped. Pull out the center of the shoelace that just wrapped through the hole.
- Another way to teach your child to do this is to have your child pull the center of the shoelace through the hole to create another lacing.

- You can also instruct your child to pull the rope ring and the top of the trunk to the sides, tightly.
Method 2 of 4: Apply the "rabbit ears" technique
Basic knots. Hold two laces and thread one through the other, then pull tight. The laces will now form a knot in the center of the shoe.
Make a circle "rabbit ears" with a shoelace. You should hold the laces between your thumb and the next two fingers. The loop should be small and have a long "tail".
Make a circle "bunny ear" with the other string. You should hold the laces between your thumb and the next two fingers. Make a long "tail" and a small circle.

Tie the basic knot with two circles "rabbit ears". Place the circles on top of each other, then put one behind the other and insert the hole again.
Pull the circle "rabbit ears" tightly. Your shoelace is now neatly tied. advertisement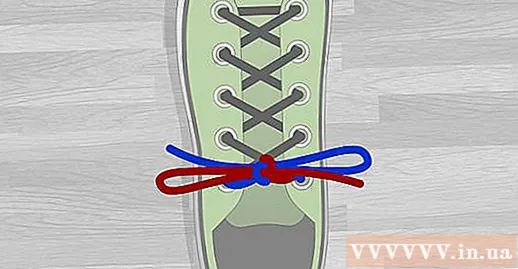
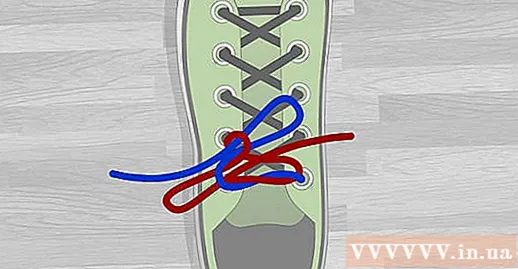
Method 3 of 4: Apply the "circle" technique
Tie a basic knot. Hold two laces and thread one through the other, then pull tight. The laces will now form a knot in the center of the shoe.
Tie another knot, but don't pull tight. Release the second knot. You should see a circle formed by a knot. Hold the circle and place it on top of the shoe.
Stick a shoelace into that circle. Make sure the wire is inserted through the round hole and pulled to the other side. You don't need to pull on the rope tightly, but make sure it doesn't slip out of the circle.
Thread the other string into the circle. This strap will also be pulled through the circle and located on the other side of the shoe.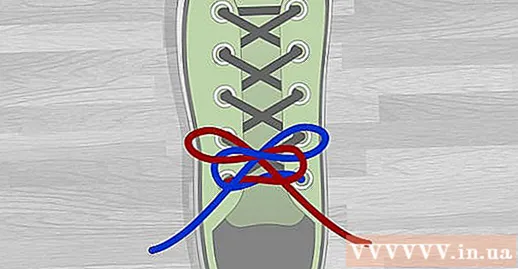
- You should now have two laces on either side of the knot in the middle of the shoe.
Tighten two loops of rope. Use your hand to pull two loops of rope to hold it tight. Your shoelace is now neatly tied. advertisement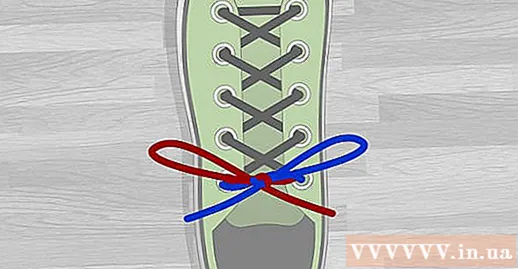
Method 4 of 4: Apply the "Magic Fingers" or "Ian's Knot" technique
Tie a basic knot. Hold two laces and thread one through the other, then pull tight. The laces will now form a knot in the center of the shoe.
Hold a shoelace tight. Use the thumb and index finger of your right hand to hold a shoelace. The fingers are on you.
- Make sure your little finger is also holding onto the laces.
- You will create a half rectangle (or lobster crayfish) with the thumb and index finger, while holding the shoelaces.
Keep shoelaces remaining. Use the thumb and index finger of the left hand to hold the other shoelace. Again, the fingers are on you.
- Don't forget the little finger. Make sure your little finger is also holding the laces. You will create a half rectangle (or lobster crayfish) with your thumb and index finger.
Bring your hands together so you can feel the pressure. Rotate your fingers so they are facing each other.
- You will see two rectangular halves or two lobster claws tied together.
- The shoelaces will now form an “X” shape.
Use your thumb and index finger to pull on the laces. Hold the laces between your fingers and pull tight. When tightening the laces, you will have two laces on each side of the shoe, and a neat knot in the middle. advertisement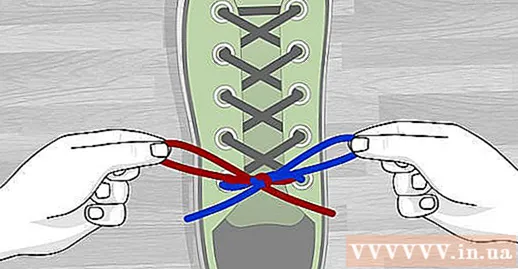
Advice
- If you are learning on your own or instructing a young child to tie their shoelaces, don't spend the whole day doing it. Instead, do it for 10 minutes a day for about a week.
- Remember that there is no right or wrong in tying shoelaces. You can tie your shoelaces in any way you like, as long as you are comfortable wearing your shoes and don't hurt walking.
- Remember, iron sharpening comes in a day, practice your shoelace style and you will soon do it easily and quickly.
- If you do it slowly, you will get better results.


