Author:
Charles Brown
Date Of Creation:
8 February 2021
Update Date:
1 July 2024

Content
- To step
- Method 1 of 2: Fold a T-shirt into a diaper
- Method 2 of 2: Make a nappy from a wrap blanket
- Tips
- Necessities
- Fold a T-shirt into a diaper
- Make a diaper from a wrap blanket
Before disposable diapers existed, parents made them from cotton themselves, and so can you! The cost of diapers can add up considerably, a major drain on the budget of new parents. You can make your own pre-folded diapers with inexpensive fabrics such as T-shirts and newborn wrap blankets to cut costs. You can also do this if you run out of diapers or in an emergency. These types of diapers must be changed regularly to prevent rashes. Making your own cloth diapers is very easy and does not require sewing.
To step
Method 1 of 2: Fold a T-shirt into a diaper
 Use a 100% cotton shirt. Cotton absorbs more than most synthetic fibers, making it a better material for making cloth diapers.
 - For best results, use a shirt with short sleeves or three-quarter sleeves. A three-quarter sleeve is more convenient to pin on larger babies and toddlers, but may be too much fabric for smaller babies.
- Choose the size of the shirt based on the size of your child. For an older baby or toddler, you will likely need a large or oversized shirt, but for a newborn, a small shirt is best.
 Lay the shirt flat. You can do this on the floor or on another large work surface. Arrange it so that the sleeves are at the top.
  Fold one side of the shirt over. The bottom of the shirt should be folded about 1/3, and the seam where the sleeve attaches to the body of the shirt should be just below the center of the neck. Keep the sleeve of the shirt facing out.
 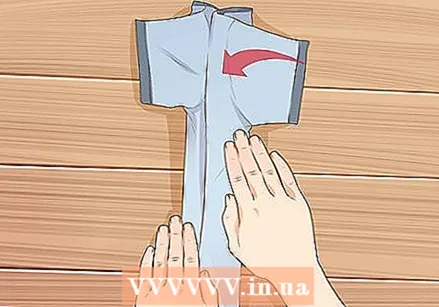 Fold the other side of the shirt over. This side should be the same as the fold on the first side so that the shirt will be folded in thirds. Keep the sleeve facing out. At this point, you should be in the shape of a lowercase "t" or a cross shape.
  Fold the top of the shirt down. Bring the part of the T-shirt that extends above the sleeves down over the sleeves. The top part of the lowercase "t" should be folded all the way over to create an uppercase "T".
 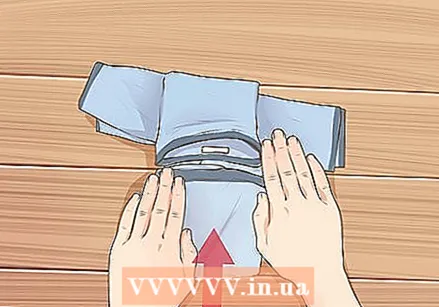 Fold the bottom of the shirt in half. Take the bottom part of the shirt and pull it up to the bottom of the sleeves. Essentially, you're making a fold that shortens the length of the shirt by half. You will still have a capital "T", but it will be a shorter "T".
  Wrap the diaper around your baby. Place the baby on the part of the shirt that starts just below the sleeves. Bring the bottom part of the diaper up and over the front of your baby, wrapping the sleeves around the back and out to the front. Secure the sleeves at the front with diaper pins or Velcro closures.
 - Put a diaper cover over the diaper. A waterproof diaper cover is necessary to prevent leaks. If you have one, use it to increase the diaper's absorbency. The fabric for these types of diapers is thin, so they get soaked pretty quickly and need to be changed regularly.
Method 2 of 2: Make a nappy from a wrap blanket
 Use a 100% cotton wrap blanket. Wrap blankets are inexpensive, and cotton is fairly absorbent. You can also use other rectangles of fabric made of terry cloth, flannel, or other absorbent materials.
 - Use a square wrap blanket.
- If you are using anything other than a wrap blanket, cut the fabric into a square measuring approximately three feet by three feet.
 Lay the blanket flat. Place the blanket on the floor or other large surface. Smooth out any wrinkles in the blanket.
  Fold the blanket in half. Take the two right corners of the blanket and bring them to the two left corners so that the blanket is folded in half.
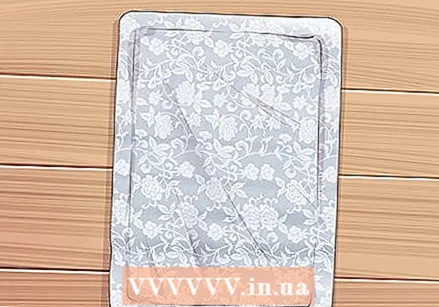
  Fold the blanket in half again. This time, take the two top corners and bring them to the two bottom corners to fold the blanket back in half. You should now have a square again.
 - Smooth out any wrinkles in the blanket after folding it.
 Make a triangle by folding one corner. Grab the top layer from the bottom left corner and pull it to the right. The corner should be to the right of the rest of the blanket and the blanket should form a triangle. The blanket should now look like a wide triangle with a square layer underneath on the left.
 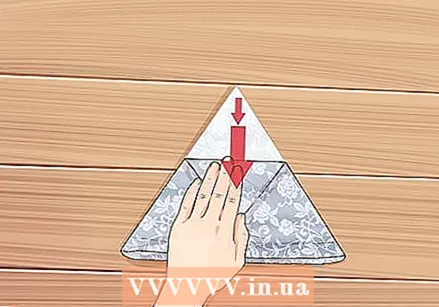 Turn it around. Grab the bottom right corner and top corner of the triangle and flip the entire blanket over so that the triangle is pointing down instead of up. Smooth the blanket again.
  Fold the square part of the blanket over. Grab the two edges on the left side of the blanket that make up the square. Fold this into a rectangle that is in the center of the triangle by folding it over two or three times. This is your diaper shape.
  Put on the diaper. You put the diaper on by placing your baby so that the wide edge of the triangle is aligned with the baby's waist. Fold the bottom of the diaper to the front of the baby. Fold both sides of the triangle in so that they reach the front of the diaper and pin them at the baby's waist.
 - Instead of using pins, you can sew buttons or attach Velcro closures to the diaper.
- Put a diaper cover over the blanket. Use a waterproof diaper cover over the handmade diaper to prevent leaks. Since the cotton blanket is quite thin, urine can quickly leak through it. Change the diaper regularly.
Tips
- Homemade diapers usually work best for smaller babies with less urine. They are not as absorbent as available nappies and are prone to leakage in older babies and toddlers. Movable toddlers are also more likely to slip out of diapers if you don't fasten them properly.
- Take a cloth diaper and fold it in thirds. Place the folded diaper in the center of the diaper. Continue to put on the diaper as directed. The folded diaper on the inside absorbs the urine and keeps the baby nice and dry.
- Buy diaper liners to keep your baby dry. Another advantage of this is that you can use them to cleanly dispose of baby poop.
- Wash the fabric at least three times before using it as a diaper. Use warm soapy water and tumble dry. This makes the fabric pre-shrunk and also sterile and safe for use.
Necessities
Fold a T-shirt into a diaper
- T-shirt
- Diaper pins or Velcro closures
Make a diaper from a wrap blanket
- Wrap blanket
- Diaper pins or Velcro closures


