Author:
Frank Hunt
Date Of Creation:
18 March 2021
Update Date:
1 July 2024

Content
Do you want to dress up your desktop a bit more nicely? Self-made icons will give your computer a much more "own" character. With the help of free image editing software like GIMP, you can instantly turn any image into a beautiful, scalable icon that you can use anywhere.
To step
Part 1 of 2: Preparing the image
 Download or create your base image. You can use any image file to create an icon, but the size must be at least 256px X 256px or larger. That way it can scale well between all the different icon sizes. It does not matter if the image contains parts that you do not want to see in the final icon. You're going to delete anything you don't want to keep anyway.
 - Keep in mind that icons are square, so your image should fit nicely into a square. If it is too long, the image will look compressed.
- If you're creating icons for Mac OS X, they can be 512px X 512px in size.
- You can create your own images from scratch, with your favorite drawing program, or use an existing photo, drawing, or other image.
 Install an image editing program. To make an icon you need a slightly more powerful program than Paint. You can use Photoshop for this, but free editors such as GIMP and Pixlr also work perfectly.
 - This guide uses GIMP as it is free and available for any operating system. In Photoshop and Pixlr you follow roughly the same procedure.
 Open your image in your editor. Open the downloaded or created image in GIMP. The image is displayed in a window in the center of the screen.
  Add an alpha channel. The alpha channel is a transparent layer. That way, the icon can have a transparent background if you remove certain parts of the image. To add an alpha channel, right click on the layer in the layers panel on the right side of the screen. Select "Add Alpha Channel".
  Add a quick mask. With Quick Mask, you can quickly cut out certain parts of the image that you don't want to keep. To add a quick mask, press ⇧ Shift+Q. A red layer appears over the image.
  Remove the mask from the part you want to keep. Select the Eraser tool from the tools panel on the left side of the screen. Use the tool to delete those parts of the red layer where you should keep seeing the image. For example: if you have a picture of a phone on a table and you want to use the phone as an icon, only erase the red layer of the phone.
 - Use the Options tab in the Tools window to change the size of the eraser. You can also zoom in to make sure you knew exactly what the intention is.
- By erasing the mask, you are only removing the mask, not anything from the underlying image.
 Turn off the mask. When you have finished erasing the parts of the mask you want to show, press ⇧ Shift+Q to remove the mask. The part of the image that you have erased will be selected.
  Remove the background. Press Ctrl+I. or click Selection → Invert. This will select everything in the image except the part you removed from the mask. Press Del to deselect the selection, keeping only the subject of your icon.
Part 2 of 2: Creating the icon
 Change the size of your canvas. Click Image → Canvas Size. In the window that appears, click the chain icon to separate the width and height. Resize the canvas to a size suitable for the subject, and set the width and height to the same numbers.
 - Use the Offset values to position the image in the center of your new canvas before pressing the Scale button.
- When you are done resizing the image, right click on the layer and select "Layer to Image Size". This changes the boundary of the layer to match that of the canvas.
 Adjust the colors. If you want, you can use GIMP's color tools to change the colors of the image. The easiest way to do this is to click Colors → Hue / Saturation, then play around with the settings until you find a color that looks the best.
  Create the different sizes of the icon. The final step in creating an icon is to make sure that the image supports all icon sizes. This is essential if you want to use the icon in different locations in the operating system and make sure it scales when the icon is resized.
 - Copy the layer. Click on the layer in the layers window and press Ctrl+C..
- Scale the original layer. Open the Scale tool by pressing ⇧ Shift+T., and change the image to 256px X 256px. Click Image → Fit Canvas to Layers. (Note: if you are creating an icon for OS X, start with 512 X 512)
- Create the first copy. Press Ctrl+V. to paste the layer. Click Layer → To New Layer. Open the Scale tool and resize it to 128 X 128.
- Create the second copy. Press Ctrl+V. to paste the layer. Click Layer → To New Layer. Open the Scale tool and resize it to 48 X 48.
- Create the third copy. Press Ctrl+V. to paste the layer. Click Layer → To New Layer. Open the Scale tool and resize it to 32 X 32.
- Create the fourth copy. Press Ctrl+V. to paste the layer. Click Layer → To New Layer. Open the Scale tool and resize it to 16 X 16.
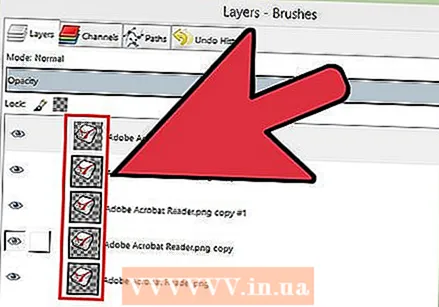 Examine your layers. You should have 5 layers, each with an image smaller than the previous one. If there is an image that is a bit blurry, open the Sharpen tool by clicking Filters → Enhance → Sharpen. Adjust the slider until the image is clearer.
  Save the image as an icon. Click File → Export. In the Export window, change the extension in the top field to ".ico" and choose a location to save the icon. A window will appear asking if you want to compress one of the layers. Check the boxes to compress the two largest layers, unless you are using Windows XP.
  Use the icon. If you saved the image as .ico, you can use it to replace any file or folder icon.
 - Check out wikiHow for articles on customizing the icons on your Windows computer.
- Check out wikiHow for articles on customizing icons on your Mac OS X computer. You need a free online converter to convert the ICO file to an ICNS file (the Mac's icon format).


