Author:
Frank Hunt
Date Of Creation:
15 March 2021
Update Date:
1 July 2024

Content
- To step
- Part 1 of 3: Housing the mealworms
- Part 2 of 3: Feeding mealworms the right way
- Part 3 of 3: Taking care of the mealworms through their life stages
- Tips
- Warnings
- Necessities
Mealworms are the early life stage of mealworms and are often used as food for pets such as reptiles, spiders, birds and even rodents. Apart from that, they also act as an important part of the natural ecosystem, consuming decaying matter and keeping the environment clean. If you want to keep and maintain healthy mealworms, it is important to understand their feeding habits and provide them with a safe and comfortable environment.
To step
Part 1 of 3: Housing the mealworms
 Store the mealworms in a glass, metal, plastic, or wax-lined container. They shouldn't be able to get a grip on the sides of the bin you keep them in, as they can likely climb out. Containers with flat and smooth sides and surfaces are best for keeping the mealworms in them.
 - Do not use containers made of things such as cardboard or containers that are covered with fabric. On such surfaces, the worms can easily cling to and climb up to get out.
- As long as the bin is at least eight inches deep and has smooth sides, you probably don't need to put a lid on it. If you still want a lid on it, you have to puncture small air holes. You can use a cheesecloth as an alternative that will also keep other insects out of the container.
 Fill the bottom of the bin. The material you fill the container with also serves as food for the mealworms, so you will probably need to add more to make up for what the worms eat. Products such as oatmeal, grains such as Cheerios, cornmeal, or ground dog food are good options for filling the bottom of the mealworm pan.
 - You can also use a combination of these different products. Use a food processor to grind up the larger pieces and make the substrate more consistent in texture and size. You can use this to fill the container up to about four centimeters high.
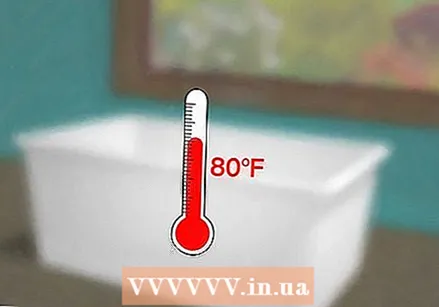 Put the container in a warm place. Room temperature is adequate, but about 25 ° C is more ideal if you plan to breed the mealworms and increase the numbers. You can safely keep the mealworms in a garage when the temperature and weather conditions are milder.
Part 2 of 3: Feeding mealworms the right way
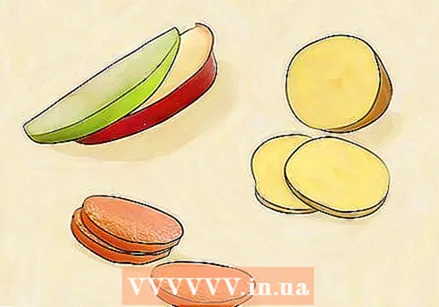
 Use moist food to water the worms. Slices or pieces of fruits and vegetables such as potatoes and apples are fine for this. Potatoes are an especially good choice because they take longer to mold and dry out.
 - Do not put water in the container. The mealworms can crawl into a water bowl and drown. Use the fruits and vegetables as a source of moisture and water.
- If necessary, replace the dried or moldy fruit and vegetable pieces with fresh ones.
 Change the food / filling every few weeks. You should refill the tray as the worms consume the food, but you don't need to change everything until after a few weeks. Keep an eye on it to make sure mold isn't growing and it doesn't smell bad.
 - You can use a strainer to gently remove the worms from the filling when you need to change everything or even when you need to get the worms out for any reason.
 Use fruits and vegetables that are less likely to get soggy. If you see that the moist food you provide is making the filling too wet or too moist, replace it with something else. If the container has a lid and you notice that there is condensation on it, the container has a little too much moisture. Try to let in a little more air.
Part 3 of 3: Taking care of the mealworms through their life stages
 Store mealworms at different life stages in separate containers. If you plan to keep the mealworms and grow them into pupae and eventually beetles, you will need to take the pupae out of the container. The beetles and worms will eat them if you leave them in the tank.
 - If you don't plan on keeping the mealworms in the following life stages, keep in mind that they usually remain in the larval (worm) stage for eight to 10 weeks. If you buy the worms when they are already fully grown, you probably have less time.
 Feed them the same food at every stage. Because beetles and larvae eat the same, you should keep feeding them the same and use the same filling, even after the transition between instars. Once the larvae have become pupa, they no longer eat at this stage.
 - If you see dolls in the bin, put them in another bin that you put paper towels in instead of filling. This gives the dolls a grip as they progress to their next life stage which lasts 6 to 24 days.
 Keep the temperature of the container above 15 ° C. A lower temperature can have a negative effect on the reproductive cycle. If you want to improve the life cycle and let the full grown beetles lay eggs to start the cycle over, make sure they have a warm environment to do so.
 - On the other hand, if you have a large number of larvae and want to use them as food for your pets, you can put the larvae in a container with holes in the refrigerator to make them last longer. Keep in mind that a temperature lower than 5 ° C can cause the worms to die.
Tips
- Do not put wild beetles with adult mealworms. Many beetle species are carnivores and can eat the mealworms.
- When worms die, get them out of the bin.
- It is best to keep the worms in a container with substrate and food after pupation, so that they can eat when they come out.
- Never water mealworms, but you can feed them apples on damp cotton wool.
Warnings
- Mealworms turn black when they are dead. Check them regularly to make sure they are healthy.
- Handle them carefully and hold them over the tray so you don't drop them on the floor.
Necessities
- Plastic, glass or metal container
- Tools to make holes
- Mealworms
- Vegetables and / or fruit
- Bran or oats, grains and / or dog food


