Author:
Charles Brown
Date Of Creation:
1 February 2021
Update Date:
1 July 2024

Content
- To step
- Method 1 of 5: Word 2013 for Windows
- Method 2 of 5: Word 2010 for Windows
- Method 3 of 5: Word 2007 for Windows
- Method 4 of 5: Word 2008 for Mac
- Method 5 of 5: Word 2003 for Windows or 2004 for Mac
- Tips
Are you trying to create the perfect newsletter for work, your family or your community? By learning about all the features of the Columns feature, you have the ability to create professional looking documents in minutes. You can use standard columns, or you can adapt them to your needs. Follow this guide to learn how.
To step
Method 1 of 5: Word 2013 for Windows
 Select where you want your columns to start. Click where you want the columns to begin on the page or select the text you want to organize.
  Click on the “Page Layout” tab. This tab allows you to adjust the basic settings of your document.
  In the page layout tab on the bar, click the “Columns” button. You can now choose from the list of preset options, or you can click on “More columns” to manually choose the settings for your columns.
 - If you choose a preset option, it will be applied to the whole document, or to the text you selected.
 Customize columns. In the columns selection menu you can choose from the preset number of columns, or enter the number you want. By default, these columns all have the same width. If you want to adjust each column individually, uncheck the box labeled “Equal Column Width” and then use the fields above to adjust the width of each column individually.
 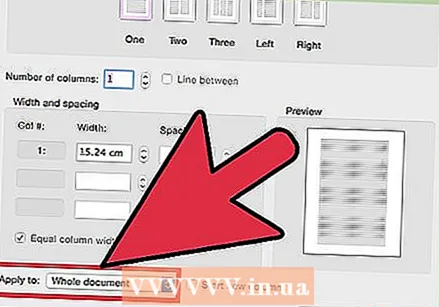 Apply your column settings. Choose from the drop-down menu next to the “Apply to” field to which you want to apply the columns. You can choose to apply the columns to your entire document, to the part of the text you selected (if you did), or to your document from where your mouse is.
 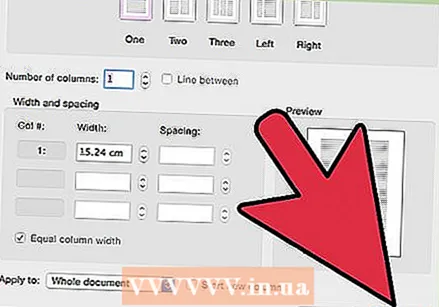 Click “OK”. Your column settings will be applied to your document. If you are not satisfied with the results, choose “more columns” again and adjust the dimensions.
Method 2 of 5: Word 2010 for Windows
 Select where you want the columns to start. Click where you want the columns to begin or select the text you want to format.
  Click on the “Page Layout” tab. This tab allows you to change the basic settings of your document.
  Select the "Columns" button in the "Page Settings" tab. You now have the option to quickly choose one, two or three columns, or a narrow column on the left, or a narrow column on the right. If you want to have more influence on your columns, click on the option "More columns".
 - If you have chosen a preset option, it will be applied to the whole document, or to the text you selected.
 Choose how many columns you want to add to the document. You can adjust the sizes of the columns by unchecking the box “Equal column width”, and then adjusting the size fields per column.
  Open the list next to "Apply to". You can choose to apply the columns to your entire document, the selected text (if you selected text), or where your cursor is located.
 - If you started clicking where you wanted the columns to start, select the option "From this point".
- If you started by selecting the text you wanted in columns, choose the option "Selected text".
Method 3 of 5: Word 2007 for Windows
 Go to the "Page Layout" tab on the toolbar ribbon.
 Click on the "Columns" button. This button can be found in the "Page Layout" tab. You can choose from preset columns, or adjust your columns by clicking on “More columns”. Here you can adjust the sizes for each column in your document.
  Choose the layout you want to use in your document. Microsoft Word will apply your adjustments.
Method 4 of 5: Word 2008 for Mac
 Open the "Image" menu. Select the option “Print Layout” so that your columns are displayed correctly.
  Select the text you want in columns. If you want the whole document in columns, click so that your cursor is somewhere in the text of the document.
  Click the "Columns" button on the taskbar. This will open a small menu where you can choose from a few preset layouts, or the dialog to adjust columns.
  Choose how many columns you want to add. If you have selected a piece of text, only that text will be placed in columns. If you have not selected any text, the whole document will be put into columns.
Method 5 of 5: Word 2003 for Windows or 2004 for Mac
 Click on the "View" menu. In Word 2003 for Windows, select "Print Layout". In Word 2004 for Mac you can choose "Page Layout". This will make it possible to see the columns well.
  Select the text in the document that you want in columns. (If you want the whole document in columns, click so that your cursor is in the text.)
  Click on the "Format" menu. Select "Columns." The columns dialog box will appear.
  Enter the number of columns you want. You can choose one of the "preset" buttons, or type a number after "Number of columns." You can adjust the sizes of your columns using the “Width and Distance” section.
  Click "OK" to apply your document settings.
Tips
- If you don't like the amount of white space between the columns, you can change it by adjusting the margins on the ruler, or by going back to the "Columns" dialog and adjusting it there.


