Author:
Charles Brown
Date Of Creation:
9 February 2021
Update Date:
1 July 2024

Content
- To step
- Method 1 of 3: Windows 7
- Method 2 of 3: Windows Vista
- Method 3 of 3: Windows XP
- Tips
- Necessities
With the Windows Sound Recorder program you can record, edit and play your voice. You can warp your voice to sound like the chipmunks or Darth Vader! With Sound Recorder you can link sentences, add music or add comments to a document. We'll show you how.
To step
Method 1 of 3: Windows 7
 Open Sound Recorder. Click on Start and enter in the text box: sound recorder. In the list of results, click sound recorder.
  Start recording. In the Sound Recorder window, click Start recording, the button with the red dot.
 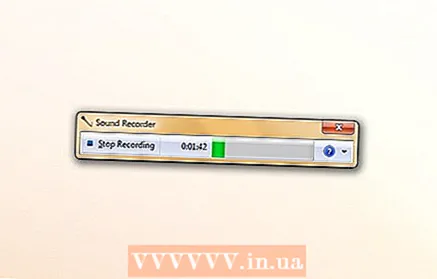 Sing a song or say what you want to record. You can see the green bar moving back and forth, you can see that something is being recorded.
  Stop recording. click on Stop recording to end recording. Now the option to save the file will appear automatically.
  Save the recording. Save the file to a location where you can easily find it later.
 - If you are not ready to save the file, click Cancel. Click in the dialog box Save as on Resume recording, continue recording audio, then click Stop recording.
Method 2 of 3: Windows Vista
- Open Sound Recorder. Click Start, then All Programs, Accessories, and then Sound Recorder.
 Start recording. In the Sound Recorder window, click Start recording, the button with the red dot.
 - Stop recording. click on Stop recording to end recording. Now the option to save the file will appear automatically.
- Save the recording. Save the file to a location where you can easily find it later. If you are not ready to save the file, click Cancel. Click in the dialog box Save as on Resume recording, continue recording audio, then click Stop recording.
- Open the recording with a player such as Windows media Player, iTunes, Realplayer or similar.
Method 3 of 3: Windows XP
- Open Sound Recorder. Click Start, then All Programs, Accessories, and then Sound Recorder.
 Start recording. In the Sound Recorder window, click Start recording, the button with the red dot.
 - Stop recording. click on Stop recording to end recording. When you're done, you can save the file via File> Save As.
- Listen to your recording. Click on the play button, the button with the black arrow, to play the file.
- Rewind or forward. The buttons with the double arrows are for rewind and fast forward, just like a CD player.
- Edit the recording. Experiment with the options, go to Effects.
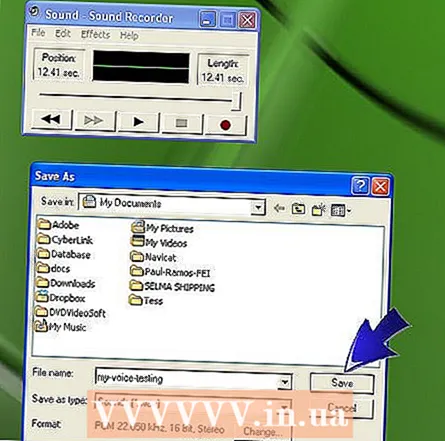 When you're done, you can save the file via File> Save As.
Tips
- You do need speakers to play audio on your computer
- You do need a microphone to record your voice
- To increase the maximum recording time of 60 seconds in Sound Recorder, click Insert file in the menu edit and then add the file you just saved saved. When you do this, the maximum recording time will be increased by 60 seconds. You can repeat this step for every extra minute you want to add. For example, for a recording time of 5 minutes, place the file of 60 seconds five times.
- An alternative way to extend the length of the recordings:
- Right click on Start.
- Double-click the programs folder.
- Double-click the Accessories folder.
- Double-click the Multimedia or Entertainment folder.
- Right-click Sound Recorder and then click Properties.
- Click on the shortcut tab.
- Press the END key, press the SPACEBAR and type the location of the recorded sound file in the Target box.
- For example, if the target is 'C: Windows sndrec32.exe' and the location of the file is C: , then the new line in the target box would be "C: Windows sndrec32.exe C: Blank.wav "
- The next time you start Sound Recorder, the Blank.wav file will open automatically.
Necessities
- An external microphone or built-in microphone.
- Speakers or headphones
- Windows computer with Sound Recorder


