Author:
John Pratt
Date Of Creation:
12 April 2021
Update Date:
1 July 2024
![Photoshop Tutorial: How to Photoshop a Person Into a Picture [In-Depth]](https://i.ytimg.com/vi/TbDL6b97kY0/hqdefault.jpg)
Content
- To step
- Part 1 of 2: Getting the person in the picture
- Part 2 of 2: Fit the person in the photo
- Tips
Sometimes you have a picture that is near-perfect, except there is one person missing that you really want on it. Instead of asking everyone to come back to the same location to recreate the photo with all the people you want, add the missing ones to your photo using a photo editing program like Adobe Photoshop. If you follow a few steps, you can add a person to a photo in no time.
To step
Part 1 of 2: Getting the person in the picture
 Choose your photos. When trying to add a person to a photo, you want to make sure you have a photo of the absent person that matches the photo you want to add him or her to. For example, if you want to add your best friend to a photo of a group of friends at the beach, don't try to use a photo of her in a Christmas sweater. It won't look good and people will see that you manipulated the photo.
 - If you can find a photo where your girlfriend is in a simple or straightforward background, that would be ideal. The busier the background, the more work you have to do if you erase it later.
- You want the photo of the person you're adding to be the same size or larger than the person you want to add them to. If you have to enlarge the person you're adding, the result will be pixelated and betray your hard work to make the person look like they belong in the photo.
- Also try to match the hue and exposure. If you are all on a beach, try to find the person to be added in a similar color situation in a photo. You can manipulate the colors, but it will be more difficult to get a convincing effect.
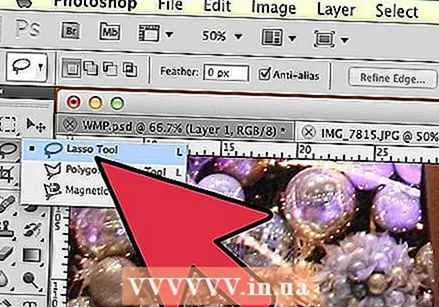 Select the person. You have to open the photo of the figure you are cutting out in Photoshop. Choose the lasso tool from your toolbar. This is the icon that looks like a lasso rope (the third icon from the top in the side toolbar). Start near your figure and hold down your left mouse button to select your figure. Once you've gone all the way around the person, the lines you've drawn will become dotted selection lines (moving lines around the edges you've drawn).
 - You don't have to be super precise, but just make sure you don't accidentally cut off any part of their body. The extra background you grab will be deleted later.
 Copy and paste the figure. Now that your picture is highlighted, you need to copy the picture so that you can paste it into the group photo. Press the button Edit' top left of the main menu. Click in the drop-down menu To copy. Now open the group photo. Once it is open, click on the photo. Then go back to the menu edit and choose To stick in the drop-down menu. This will paste your highlighted image from the original image into the group photo.
 - Instead of using the menu bar, you can also press the Ctrl (or Command on a Mac) button on your keyboard and the C button. This will also copy the image. To paste, just click Ctrl (or Command) and V.
 Adjust the size of the figure. Now that your figure is in your image, you need to resize it to match the people in the group. To do this, you use the tool Free transformation. Make sure the figure layer is selected, which you can do from it Layerswindow, which is usually on the right side of your workspace. Once the figure layer has been chosen, go to the menu edit and choose you Free transformation. A box will appear on the outside of your layer. Hold down the Shift key, click the mouse on the corner of the box and pull the box inward, making the figure smaller. Keep shrinking until the figure is about the same size as the people in the group photo.
 - Make sure to hold down the Shift key. This prevents you from changing the proportions of the figure in the photo.
- Instead of clicking the menu bar, you can also click Ctrl (or Command) and the T key to bring up the tool Free transformation to use.
 Delete the unnecessary background. To make the figure look like it belongs in the image, erase the original background of the figure. To do this, you need the eraser tool. To start, click on the figure layer from the layers window. At the bottom of the layers window is a button with a gray rectangle with a white circle in the middle representing the mask layer is called. Click this to isolate the image from the other layers. Now click on the eraser tool on the toolbar on the left, which is about halfway down the bar and has a rectangular eraser on it. Erasers are available from the top of the screen. Click the down arrow and change the size of the brush to something like 60 or 70 pixels by dragging the arrow or typing in the new size. Also change the hardness at the bottom of the menu to 0. Now you can erase most of the extra background around your figure.
 - Go close to the figure, but do not erase any part of it. The extra bits of background left around their body are erased with a smaller brush.
- If they are on a white or solid color background, you can use the magic wand to isolate and erase the background. Click on the magic wand, select the background color, then press the Delete key once everything is highlighted.
 Finish isolating the figure. Now that most of the background has been cleared, you will need to remove any excess background to isolate the figure. In the eraser options at the top, change the size of your brush to anything between 20 and 30 pixels. You also need to change the hardness to at least 50. Once your eraser is done, you can zoom in on the image by pressing the plus sign or changing the percentage at the bottom of your window. Get as close as possible so that the edges of the figure are clearly visible. Erase the rest of the background of the figure.
 - If you mess up the figure or accidentally delete part of it, you can just press Ctrl-Z or "Undo" below edit in the main menu.
Part 2 of 2: Fit the person in the photo
 Move the layer. Now that your figure is the same size as the rest of the group and isolated, you need to move the layer to where you want the person to be. Make sure the figure layer is selected to do this. Click on the move tool located at the top of the toolbar on the left side of the screen. As soon as you click on it, drag the figure with the left mouse button to the desired position.
  Change the exposure. Now that the figure is the same size as the others, you need to match its color to the others. With the figure layer selected, click the icon next to the mask button at the bottom of the layer screen. It has a two-colored circle on it. When you click on it, a menu window will appear. Click on the option Curves, causing a dialog box to appear. It has a square with a diagonal line down the center. Click on the line in the center, halfway above the center and halfway below the center. You can move the line with each of the dots that appear. Now you have to play with the levels in this option. you can move the lines up and down, manipulating light and contrast. Play with the layer until it matches that of the other figures in the group photo.
 - If there is only a little difference between the layers, you can just change the brightness and contrast from the menu Image in the main menu. You just need to slide the lines back and forth.
- A dialog box to request a Curveslayer on your figure. When it appears, press OK around the Curvesmask layer.
- You can also change the exposure of the original group photo. If you want to change it, click on the background layer and choose the same icon at the bottom of the screen and follow the same steps as for the figure layer until the two layers are similar enough.
 Match the colors. Now that the lighting of your figure is correct, you need to match the tones of the skin. To do this make sure your figure layer is selected. Tap the same two-colored circle at the bottom of the layer screen and choose Hue / saturation from the menu. From the screen you can change the hue, saturation and brightness. Tint will change the color of the light and dark areas to a different color. Saturation will change the concentration of the colors, making them brighter or duller. The brightness will change the overall lightness of the figure. You have to play with the buttons until the color of the figure matches the color of the group.
Tips
- You can use Photoshop CS, Elements, or any of the other versions of Photoshop. If you don't have Photoshop at your disposal, you can use free programs such as Gimp.


