Author:
Christy White
Date Of Creation:
9 May 2021
Update Date:
1 July 2024
Content
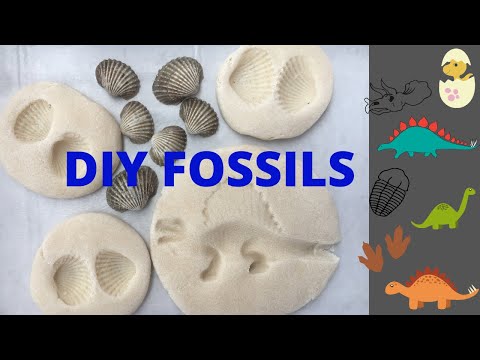
Long before humans walked the earth, prehistoric plants and animals left their traces on the earth. Fossils are the only evidence we have today of the existence of these fascinating life forms - ancient remains preserved in rock. Real fossils can take thousands and thousands of years to form. Fortunately, you can make your own fossils in just an afternoon with a few everyday ingredients! Go to Step 1 to get started.
To step
 Prepare the mixture. In this method, a mixture that hardens, such as cement, plaster or rubber cement, is used to create a fossil that resembles a stone with an imprint of the object of your choice. Your first step is to prepare the wet mixture, following the directions on the product packaging. Then pour the mixture into a suitable container - plastic bowls, Tupperware storage boxes, or half-cut milk cartons will likely be suitable for most fossils. If you want to make a larger fossil, you may need a larger container.
 - No only hardening mixture is better than the others. Clearly, cement is a very sustainable option, making it a smart choice if you want to put or hang your fossil outside. However, plaster is more suitable for indoor school projects.
- An alternative to the above methods is to use a mixture of flour and water that hardens naturally. Simply add 2 parts of flour to each part of water (for example, mix 4 cups of flour with 2 cups of water) and mix together. You should now get a slightly wet mixture that looks a bit like clay. Add more flour to make the mixture drier and more water to make the mixture wetter.
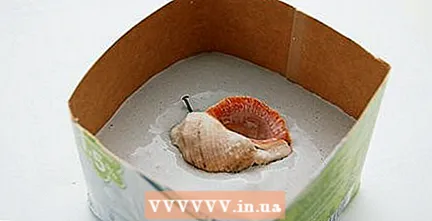
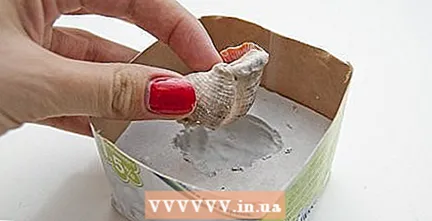
 Press the fossil into the mixture. Choose an item you would like to "fossilize." Place this item in the mixture and press it down until it is half submerged. Try to have part of your object sticking out above the mixture so that you can more easily pry it out later. If you want to hang the fossil after it dries, put a nail all the way through the mixture to make a hole for you to hang it on.
 - You can make a good fossil from almost any small object. You can achieve a good result with, for example, a chicken bone, a shell (as in the photo), an arrowhead, a beautiful leaf or with any other object you can think of.
 Let the mixture dry. Now you just have to wait. Be patient while the mixture hardens - your fossil will look its best if the "rock" is completely hard before attempting to pry the object out. If you wish, you can let the fossil dry in the sun to speed up the process.
 - The mixture you choose will somewhat determine the time it takes for the fossil to dry. Depending on the thickness of the mixture, plaster can be ready after a few hours, while cement takes a few days.
 Remove the fossil. When the "rock" is completely dry, try to carefully remove the entire fossil from the container - both the hardened mixture and the object. Be careful - it is very easy to accidentally break off pieces of your fossil with this step. If it is very difficult for you to remove the fossil, you may even have to destroy the tank itself.
 - If you used a nail to make a hole for the fossil to hang from, you can now carefully pry it out with the "claw" on the back of a hammer.
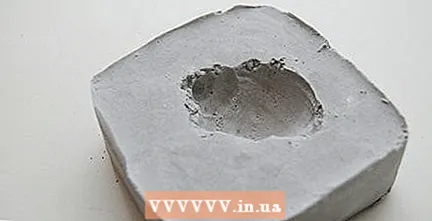 Gently pry the item from the bowl or pack. If you have a steady hand and a little bit of luck, you are now left with a hardened "mold" with an imprint of the object you left in it. Now you have your fossil!
 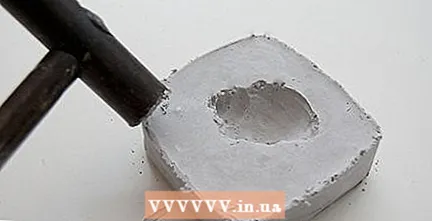 Edit your fossil to make it look old and authentic. Real fossils are not squeaky clean and precisely symmetrical - they are usually old, weathered objects carved from a solid piece of rock. If you want your fossil to look "rough" as well, you can edit it to create this effect. Use a hammer to break off small pieces from the edges. Rub mud in. Use sandpaper to mimic the effects of erosion. You can even paint your fossil in a tan, brown, or rust hue - use your imagination!
 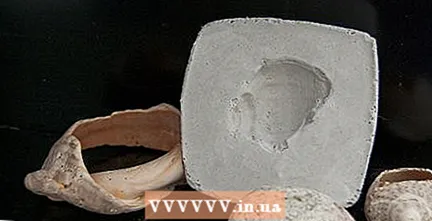 Hang or place your fossil in a visible place and be proud of it. When your fossil looks exactly like you want it to be, show it to others. Take it to school as a classroom decoration or hang it in your bedroom. You can also place your fossil together with some objects from nature to make it a kind of exhibition of a scene from nature.
 - Continue! Believe it or not, real archaeologists use a similar mold and cast method to preserve and display small fossils. However, this is not the only method they use. If you for real To create amazing, realistic fossils, explore the other methods used with real fossils, for example:
- To recreate fossils that are too big to just cast, scientists cover the fossil with clay and foam to make a mold. They then carefully fill this hollow mold with plaster, cement or another medium. In this way they make a three-dimensional model of the fossil itself, instead of an impression of it. If you want to make such a fossil, it is best to experiment with making a mold in this way. Just use potter's clay to make your mold.
- 3D printing has recently proven to be a valuable technique for copying fossils. While professional quality 3D printers are still virtually unaffordable for everyone except the richest among us, there are cheaper options. Some internet communities give you access to the possibilities of a 3D printer for a fixed price per month if you are a member. Some universities and colleges allow students to use a 3D printer relatively cheaply.
Tips
- Experiment by adding food coloring to the mixture to give it a different look.
- If this paper is part of a school project on fossils, have students create different types of fossils from different eras. Have them make designs from cardboard and other craft supplies you have on hand. Use pictures from books or the internet as a tool for them. Discuss fossils and the different types of animals and plants discovered as fossils.
Warnings
- Do not pour the excess plaster or cement mixture down your sink. Your drain will then clog. So throw it in the waste bin.
- Be careful when using the nail.
Necessities
- Plaster or cement powder.Follow the directions on the package to make the mixture.
- A container or bowl, preferably a disposable one in case you need to break it.
- Water
- An object you want to fossilize, such as fish bones, shells, and so on. You can also make a shape with craft materials from an image.


