Author:
Frank Hunt
Date Of Creation:
13 March 2021
Update Date:
1 July 2024

Content
- To step
- Method 1 of 2: Remove the splinter with tweezers
- Method 2 of 2: Using other disposal methods
- Tips
Splinters are "corpora aliena" or "foreign bodies" that somehow got under your skin. Most people have had a small splinter of wood at some point, but you can also get splinters of metal, glass, and some plastics under your skin. Most splinters can be removed yourself, but if the splinter is deep in the skin in a hard-to-reach area, you may need to have the splinter removed by a doctor. A splinter under a fingernail or toenail can be particularly painful and difficult to remove, but there are several methods you can try at home.
To step
Method 1 of 2: Remove the splinter with tweezers
 Decide if you need to see a doctor. A splinter that is deep under your nail or has already become infected may need to be removed by a doctor. You can tell that a splinter is infected if it still hurts after a few days and the area around the splinter is swollen or red in color.
 - If the splinter is causing severe and heavy bleeding, go to a nearby hospital emergency room to have it removed.
- Make an appointment with your doctor if the splinter is so deep under your nail that you cannot reach it yourself, or if the skin around the splinter is infected. Your doctor can remove your splinter and give you antibiotics.
- In most cases, the doctor who removes your splinter can give you a local anesthetic to desensitize the area and make the removal less painful.
- Know that a doctor may need to remove all or part of your nail to completely remove the splinter from your skin.
 Remove the splinter yourself. If you are going to remove the splinter yourself at home, you will most likely need tweezers because the splinter is probably too small to grasp with your fingers. If the splinter is so deep under your nail that no part of the splinter is sticking out of your skin, you may also need to use a needle to remove the splinter.
 - Sterilize any tools you plan to use to remove the splinter. You can sterilize tweezers and needles with rubbing alcohol or boiling water.
- Wash your hands before handling sterilized appliances.
- Wash the nail and the area of the splinter before attempting to remove it. This way you can help prevent infection. You can also use rubbing alcohol if the area is difficult to wash with soap and water.
- If you have long nails, you may want to cut a portion of the nail in question before attempting to remove the splinter. This way you can see the place better.
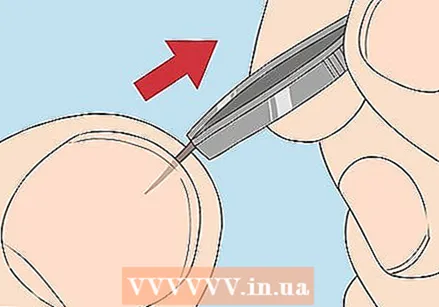
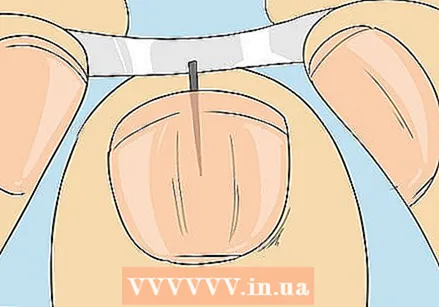
 Use tweezers to pull out the splinter. Find a place with enough light so that you can see the entire area where the splinter is located. Use the tweezers to grasp the part of the splinter protruding from your skin. When you have a firm grip on the splinter, pull it out of your skin in the same direction that it entered your skin.
 - Splinters can consist of more than one piece of wood, glass, or something else. They can also break down when you try to remove them from the skin. If you are unable to remove the entire splinter yourself, you may need to make an appointment with your doctor to have the remaining parts removed.
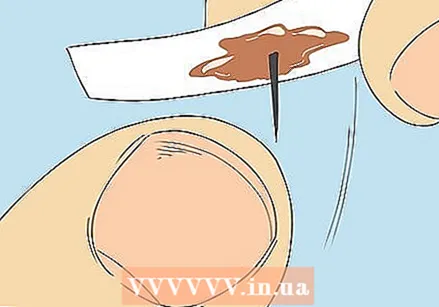
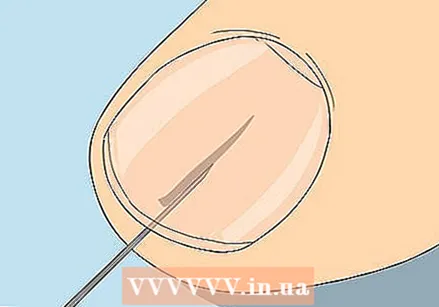 Remove splinters completely in the skin with the help of a needle. Some splinters under a nail can be so deep in the skin that no part of the splinter is sticking out of the skin. These types of splinters can be very difficult to remove on your own, but you can try using a needle to expose part of the splinter so that you can grasp it with tweezers.
 - You can use any kind of sewing needle for this job. Make sure to sterilize the needle before using it.
- Push the needle under your nail towards the end of the splinter. Use the needle to pry the end of the splinter from the skin.
- When you have been able to expose enough of the splinter, grasp this area with tweezers and pull the splinter out in the same direction as it entered your skin.
 Wash the area thoroughly. After removing all or part of the splinter, wash the area thoroughly with soap and water. After washing the area, you can apply a little antibiotic ointment to help prevent infection.
 - You can also apply a bandage or bandage to the area if it is bleeding or if it is an area that could become infected later.
Method 2 of 2: Using other disposal methods
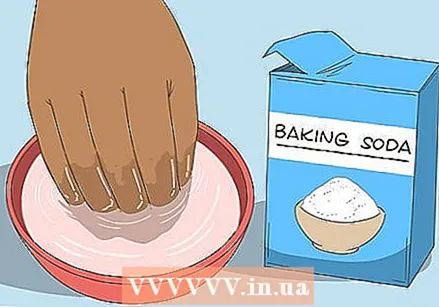 Soak the area in warm water and baking soda. Splinters that are deep under a nail or too small to grasp with tweezers may be sucked out from under your nail with warm water and baking soda.
 - Soak your finger in warm water mixed in with a tablespoon of baking soda. You may need to do this twice a day for it to work.
- You may need to perform this treatment for several days before the splinter is close enough to the skin to be removed with tweezers, or before it falls out on its own.
 Use masking tape to remove the splinter. Another means you could use to remove the splinter is tape. This method is quite simple. Place a piece of masking tape over the protruding part of the splinter and then quickly peel off the masking tape.
 - It doesn't matter what kind of tape you use, but clear tape will help you see the splinter better if necessary.
- You may need to cut off part of the nail to get better access to the splinter.
 Use depilatory wax. Very small and thin splinters may be difficult to grasp with tweezers. Another option to remove this type of splinters from under your nail is to use depilatory wax. Since the resin is thick and sticky, you should be able to mold it easily around the protruding part of the splinter.
 - You may need to cut off part of the nail in question to get better access to the splinter.
- Apply the heated resin to the area around the splinter. Make sure that all protruding parts of the splinter are covered with resin.
- Place the strip of fabric on top of the resin before it dries.
- Grasp the end of the fabric strip firmly and quickly peel it off the resin.
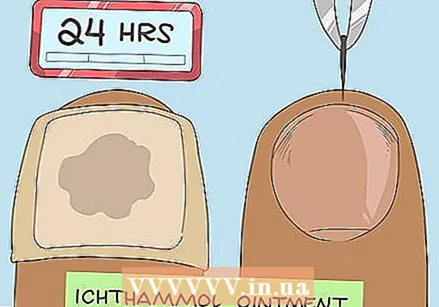 Try drawing salve to remove the splinter. This ichthammol-based ointment can be used to remove splinters from under your nail. You should be able to buy pull ointment at the drugstore, pharmacy or on the internet. The ointment softens the skin around the splinter so that the splinter naturally slides out of your skin.
 - You may need to cut part or all of the nail to get better access to the splinter.
- This is also a good method to use with children, as it usually hurts less and causes less discomfort.
- Apply a small amount of drawing ointment to the area where the splinter is located.
- Cover the area with a bandage or wrap around it and let it sit for 24 hours. Pull ointment can stain fabrics (clothing and bedding), so make sure the bandage or bandage covers the area well so that the ointment doesn't leak out.
- Take the patch or bandage off after 24 hours and examine the splinter.
- The purpose of the ointment is to allow the splinter to naturally slide out of your skin. However, if the splinter is still in your skin after 24 hours but you can access it better, you can use tweezers to remove the splinter.
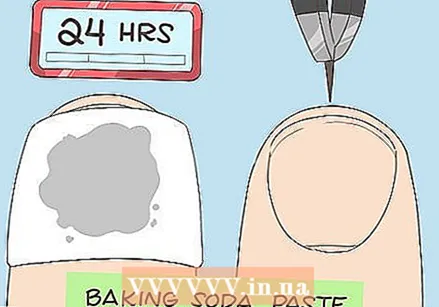 Make a baking soda paste. Making your own baking soda paste is an alternative method of using drawing ointment. It is best not to use this remedy until you have tried all the other methods and they did not work. The paste can also cause swelling, making the splinter more difficult to remove.
 - You may need to cut off part of the nail or the entire nail to get better access to the area with the splinter.
- Mix ¼ teaspoon of baking soda with water until it forms a thick paste.
- Apply the paste to the spot with the splinter. Then wrap a bandage around the area.
- After 24 hours, remove the bandage and examine the splinter.
- The paste may be enough to allow the splinter to naturally slide out of the skin. If 24 hours wasn't long enough, you can apply another dollop of paste and wait another 24 hours.
- If the splinter is sticking out far enough, you can now use tweezers to pull it out.
Tips
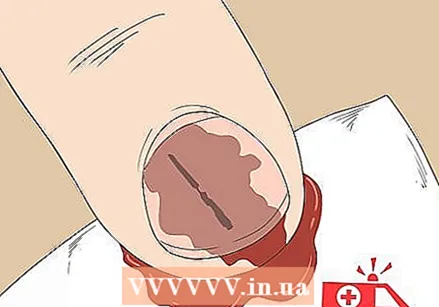
- There is a condition called "splinter hemorrhage." This can occur under fingernails and toenails. This condition has nothing to do with real splinters and is not caused by them. The name splinter hemorrhage refers to the splinter-shaped blood stains that can be seen through the nail.
- In general, splinters made from organic materials (such as wood, thorns, etc.) often become infected if they are not removed from the skin. Splinters made of inorganic materials (such as glass and metal) will not become infected if left under the skin.


