
Content
- To step
- Method 1 of 2: Create a basic vinyl stencil
- Method 2 of 2: Create a fabric template
- Tips
- Necessities
- Vinyl template
- Fabric template
Stencilling is a fun way to add a personal touch to everything from blank walls to plain T-shirts. One of the most commonly used template materials is vinyl because it is sturdy and reusable. To make your own vinyl stencil, you need to choose a design, print it and then cut it out with a craft knife. And if you want to decorate fabric specifically, make one out of freezer paper so you can easily attach the stencil to the fabric with an iron.
To step
Method 1 of 2: Create a basic vinyl stencil
 Print the template design on the vinyl if you have an inkjet printer. Place the vinyl in the inkjet printer tray, just as you would with regular paper. Then print the template from your computer or laptop.
 - If you are not sure what type of printer you have or what types of paper or material you can print with it, check the printer manual first.
- Never put vinyl in a laser printer. Due to the high temperature, the vinyl can melt or deform the template.
- Print your design on plain paper if you have a laser printer. Then trace it onto the vinyl with a permanent marker.
Tips for choosing a template design
If you are a novice, choose a design without too many complicated cut-outs or curved edges. Straight lines and simple shapes are easier to cut.
For a completely customized design you draw it yourself. Create your design directly on the vinyl or draw it on a piece of paper first and then transfer.
If you want an extra large print, then get it printed at a print shop or office supply store instead of trying to assemble it on your own printer.
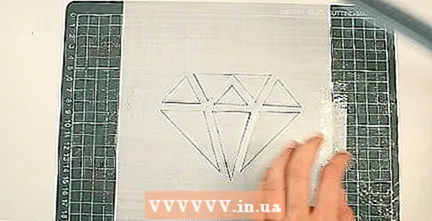
 Use a craft knife to cut out the template on a cutting mat. Gently drag the blade along all edges, including any inner parts to be removed. Remember all negative spaces will be painted.
 - To keep the template in place, you can tape it to the mat or ask someone to hold it for you while you cut it.
- Use a template cutter or vinyl cutter if you have one.
- Set aside the inner parts that you will need later to make your design. For example, if you're cutting out a donut, keep the piece you cut out on the inside. Otherwise, you will get a completed circle instead of a donut.
 Secure the template to the surface with adhesive tape. It will be difficult to keep the stencil in the same place while painting. If it shifts at all, it will ruin the final result, so put a little tape on the outside edges of the stencil.
 - Use the appropriate tape for all surfaces you paint. For example, if you are stencilling a painted wall, use painter's tape so that the paint that is already on it doesn't get damaged.
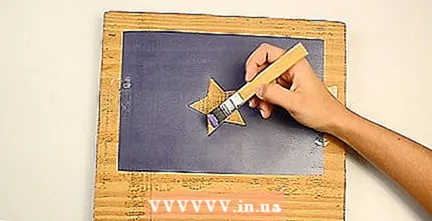 Paint two to three coats over the stencil, letting each coat dry in between. You get a smoother color with less visible brushstrokes if you apply thinner layers. Use a paintbrush or foam roller to cover any negative space in the stencil. Wait for the paint to dry before applying the next coat so that you don't smear the previous coat.
 - Be careful not to brush or roll too vigorously. This is to prevent the stencil from shifting or that paint gets under the edges.
- Choose the paint type based on the surface you are stenciling. For example, if you are decorating a wall, use interior paint; if you work on ceramics, choose acrylic paint.
- Spray paint is also a quick and easy stencilling option.
 Let the paint dry for at least 24 hours before removing the stencil. If you take the stencil off before the paint is completely dry, all your hard work will be smeared. Check the paint can or packaging to find the recommended drying time as it varies by brand and type.
 - When the paint is completely dry, it should not feel tacky. If it feels a bit tacky, let it sit a little longer.
Creative ways to use a template
Create an accent wall in your home with a bold pattern that covers the entire wall.
Decorate furniture, such as a side table or sideboard, with beautiful prints.
Make homemade cards with a small template.
Stencil one big design on the wall for a permanent piece of art on the wall.
Design your own gift box by upgrading plain wrapping paper with stencilled patterns.
Method 2 of 2: Create a fabric template
 Print your design on the freezer paper if you have an inkjet printer. Load the printer with freezer paper, just as you would with regular paper. Make sure to print the design on the matte side of the paper.
 - Do not try to print on freezer paper with a laser printer. It will melt the paper and damage the printer. If you have a laser printer, print the design on plain paper and trace it onto the freezer paper with a permanent marker.
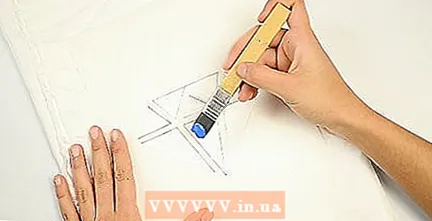
 Cut out the design with a hobby knife on a cutting mat. Hold the paper in place with one hand and use the other to carefully cut along the edge of the design with a craft knife. Keep in mind that the paint will settle on all cut pieces.
 - Also remove any parts you want to paint on the inside of the design.
- Gluing the paper to the mat or having a friend hold it in place will make cutting easier.
- If you have a vinyl or craft cutter, you can use it instead of cutting the paper by hand.
Dealing with the inner cutouts
Label them with a piece of tape if you have different inner pieces. Otherwise you will not know which cut-outs belong to which places of the template.
Use masking tape to hold the cutouts in place during stencilling. The iron does not melt tape, so stick a rolled-up piece under the cutout before ironing.
Consider leaving them on the template. You can leave a small piece of freezer paper on it that connects the inner piece to the rest of the template. However, keep in mind that this will be displayed when you paint it.
 Iron the stencil onto the fabric with the shiny side down. If you iron the stencil matte side down, the paper will stick to the iron instead of the shirt. Run the iron over the entire template, including the edges, to make sure it sits completely on the fabric.
 - Do not hold the iron in one place for more than five to ten seconds or the paper will melt. Move the iron over the template constantly.
- Check for openings or loose edges. The paint will end up below, so if you notice anything, apply those spots again.
 Place a sheet of freezer paper under the fabric. This will protect anything under the fabric, and is especially important if you're stenciling a T-shirt and don't want the paint to run on the other side. Make sure the entire area you're painting is on top of the paper.
 - Tape the paper to the underside of the fabric to prevent the paper from shifting as you paint.
- A thick piece of cardboard or sheets of newspaper are both good alternatives to freezer paper for the backing.
 Dab two to three coats of permanent fabric paint on the stencil. Permanent paint does not wash off in the wash. Do not paint with regular brushstrokes as this can push the paint under the stencil. Dabbing a few thin coats with a brush instead of doing one thick coat also prevents the stencil from becoming oversaturated and curled up.
 - The amount of coats you need will depend on the color of the shirt and the paint. For example, if you are using a light color or white paint on a dark shirt, you will probably need to apply more coats to cover the color of the shirt.
- Let each coat dry before painting the next.
- You can also purchase a stencil brush from a craft or online store instead of a regular brush.
 Let the paint dry for at least 24 hours. Look on the back of the paint bottle to find the drying time for that specific brand or type. A good rule of thumb if you're not sure is to let the paint sit all day.
 - You can speed up the drying process by blowing hot air on the paint with a hair dryer.
 Once the paint dries, remove the stencil from the fabric. Removing the stencil while the paint is still wet can cause the paint to run, leaving the design with fuzzy or blotchy edges. You should be able to pull the template off with your hands.
 - Use a craft knife to gently loosen any hard-to-peel edges.
- Put a thin cloth on top of the paint and iron it for 30 seconds if you want to protect the painted stencil. This will cause the paint to sit even more firmly in the fabric
Tips
- Choose a simple template design without a lot of complicated details. It will be easier to cut out.
- If you have a laser printer, print the design on a plain sheet of paper first. Then trace it onto vinyl or freezer paper.
- When using a utility knife, place a cutting mat under the template to prevent damage to the counter or table.
- Do not forget to cut the inner pieces from the template.
- Always let the paint dry completely before removing the stencil so you don't smudge the final design.
Necessities
Vinyl template
- Vinyl sheet
- Hobby knife
- Cutting mat
- Paint
- Brush or roller
- Adhesive tape
- Permanent marker (optional)
Fabric template
- Greaseproof paper
- Printer
- Hobby knife
- Cutting mat
- Iron
- Textile paint
- Brush
- Thin cloth (optional)
- Permanent marker (optional)


