Author:
Christy White
Date Of Creation:
10 May 2021
Update Date:
1 July 2024

Content
- To step
- Method 1 of 5: Take a screenshot of the entire screen
- Method 2 of 5: Take a Screenshot of a selection
- Method 3 of 5: Take a screenshot of a window
- Method 4 of 5: Save a screenshot to the clipboard
- Method 5 of 5: Take a screenshot in Preview
- Tips
Whether it's making an ingenious visual joke or clarifying a technical problem for the support department; taking a screenshot is a handy trick to learn on your computer. Fortunately, taking a screenshot in OS X is incredibly easy. Here are the commands to take different types of screenshots with your Macbook or other Mac computer.
To step
Method 1 of 5: Take a screenshot of the entire screen
 Hold the keys Command and Shift and press 3. You should now briefly hear the sound of a camera. This is one of the simplest screenshots: you take an image of the entire screen at that moment.
  Locate the screenshot (png file) on the desktop under the name "Screenshot [date / time].’
Method 2 of 5: Take a Screenshot of a selection
 Keep the Command and Shiftkeys and press 4. The cursor now changes to a small pointer with pixel coordinates at the bottom left.
  Now click and hold the mouse or trackpad and drag the cursor to select a rectangular area to use for the screenshot. Press ESC to start over without taking the photo at this stage.
 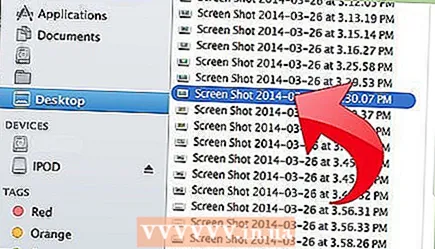 Release the mouse button to take the image. The file will now be saved to the desktop.
Method 3 of 5: Take a screenshot of a window
 Keep Command and Shift and press 4, and then the space bar. This will turn your cursor into a small camera icon and any window you hover over will now glow blue.
  Select the window you want to take a screenshot of. To find the correct window, you can click through the open applications with Command+Tab or with F3 to show all open windows one after the other. Press ESC to cancel without taking a screenshot.
  Click on the selected window. Find the file on your desktop.
Method 4 of 5: Save a screenshot to the clipboard
 Hold the key Control and execute one of the above commands. This will save the screenshot to the clipboard instead of the desktop.
  Paste the screenshot in a document, email or use it in an image editing program. You do this through Command holding down and on V. or by clicking "Paste" in the "Edit" menu.
Method 5 of 5: Take a screenshot in Preview
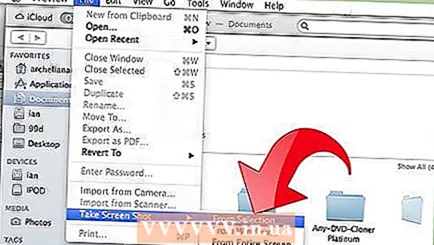
 Start Preview. This can be found in the Applications folder of Finder.
 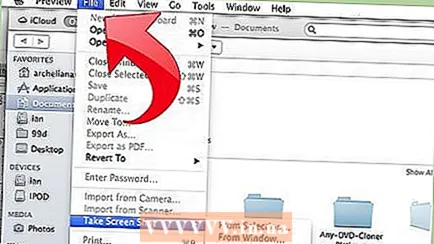 Open File and move the mouse to Take Screen Shot.
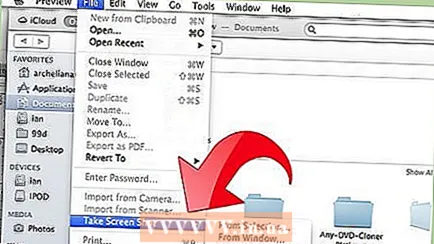 Select "From Selection", "From Window" or "From Entire Screen.’
 - "From Selection" turns your cursor into a pointer. Now click and drag until you have a rectangle indicating what you want to shoot.
- From Window turns the cursor into a camera icon. Select the window you want to include and click on it.
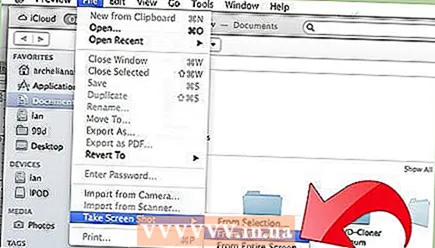
- Entire Screen starts a countdown. Arrange the screen as desired for the screenshot and wait for the timer to finish counting down.
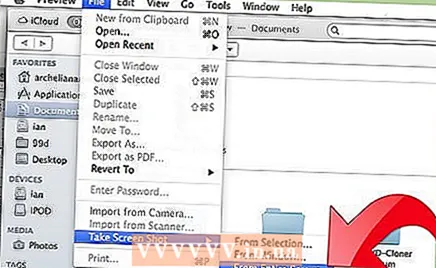
- "From Selection" turns your cursor into a pointer. Now click and drag until you have a rectangle indicating what you want to shoot.
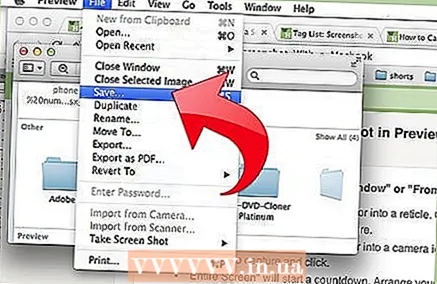 Save your new image. The screenshot will immediately open as a Preview window for the image. Open the file menu and select "Save." Give the image a name, select a save location and file type and click "Save."
Tips
- If you're taking a screenshot of the browser window, it's best to make sure you don't have any open tabs that you don't want others to see.

")

