Author:
Tamara Smith
Date Of Creation:
28 January 2021
Update Date:
1 July 2024
Content
- To step
- Method 1 of 2: Building a fixed pulley
- Method 2 of 2: Making a simple compound pulley
- Warnings
- Necessities
- A fixed pulley
- = A simple compound pulley
Pulleys are simple machines that make lifting heavy objects easier. They distribute weight to reduce the amount of force it takes to lift something. With a compound pulley, you can lift an object with half the force it takes to lift the same object with a single pulley. You can easily make both types of pulleys yourself using a few simple items you probably have at home!
To step
Method 1 of 2: Building a fixed pulley
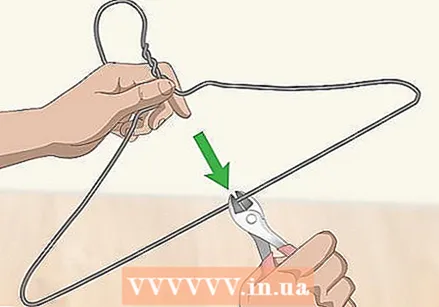 Cut the bottom bar of a metal coat hanger in half. Use scissors or wire cutters to cut the bottom bar of a metal coat hanger. Make sure to cut the rod directly in the center of the hanger so you can slide the coil over it easily. Leave the top of the hanger intact so you can hang it when using your pulley.
 - If you don't have a wire hanger, you can make the axle for your pulley by propping a broomstick between two tables or counters. Keep the stick from rolling away by putting something heavy on one end.
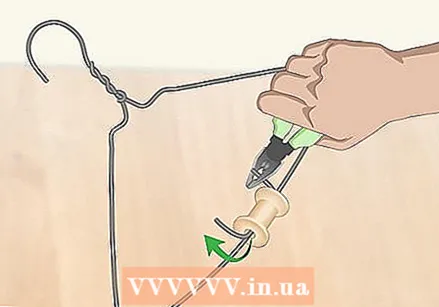 Slide a spool or bobbin over the cut rod of the hanger and bend it closed. Carefully pry open the cut rod and slide a spool of wire over it. The size of the coil doesn't matter as long as it fits on the hanger. Slide both parts of the hanger through the hole in the coil and use pliers to bend the ends into hooks to hold the coil in place.
 - You can buy a bobbin from a craft store, or you can reuse a bobbin that you have left over from used yarn or twine.
Tip: If you don't have spools, you can buy wheels made for pulley systems at the hardware store.
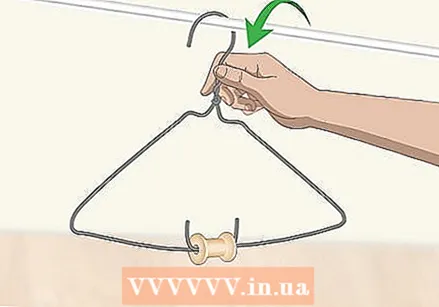 Hang the pulley system from a rod or hook. Find a free-hanging rod or hook in a cupboard, or make a construction between two tables. If necessary, put a weight on the bar to prevent it from turning or shifting. Use the hook on the coat hanger to hang it on a rod or hook in the wall.
 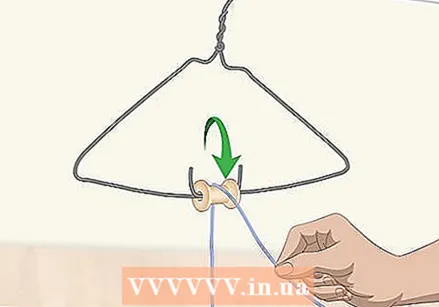 Wrap a wire over the top of the pulley. Cut a piece of wire or twine so that it is about twice the distance from the floor to the bottom of the coat hanger. Drape one side of the rope over the coil so that both sides are the same length.
 - If you plan to do a lot of experiments with pulleys, you can tie a small metal hook to one end of the rope to make it easier to hang weights.
- You can also use cord if you want your pulley to be a bit stronger.
 Tie weights on one side of the string. Use light weight items, such as a pair of pegs or a thin textbook. Tie the end of the string around your objects so that they don't fall when you lift them.Let the loose end of your string hang free on the other side of the bobbin. Place the weight on the floor to start your experiment.
 - Pulleys make your job easier by distributing the weight and forces on the different ends of the ropes.
- Make sure not to choose anything that is too heavy, as this will bend and deform the metal hanger.
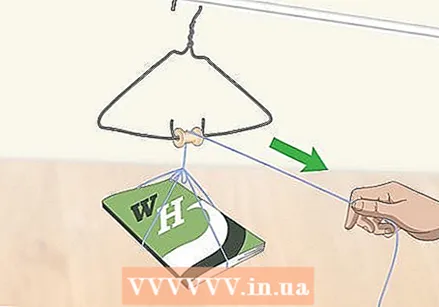 Pull down one side of the rope to lift the weight. Grab the loose end of the rope and pull it straight down. The spool rotates around the hanger and reduces friction, making it easier to lift the weight on the other side. Tie the loose end of the rope to a sturdy object if you want to hang your weights in the air. Keep trying the pulley with different weights to see how much you can lift with it.
Method 2 of 2: Making a simple compound pulley
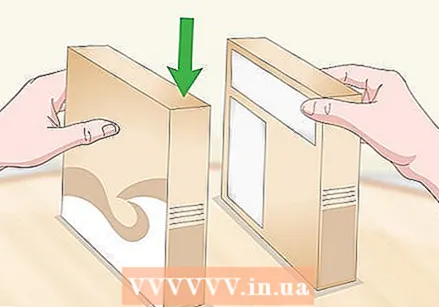 Place two cardboard boxes opposite each other on a raised surface. Use two boxes of the same size and thickness, such as cereal or packing boxes. Place the boxes on a flat surface, such as a table, so that they are about 12-15 cm apart. Make sure the boxes are parallel to each other.
 - Thicker boxes will be able to support more weight, while thinner boxes are more likely to tear while using the pulley.
 Slide a spool of thread over a pencil up to the center. Use an old wooden spool or one you bought at a craft store. Slide a pencil through the hole in the bobbin to make a shaft that the bobbin can rotate freely around.
 - You can also buy pulley wheels from a hardware store if you don't have spools.
 Poke two holes in the boxes 5-8 cm apart. Sharpen another pencil and gently poke the tip through the wall of one of the boxes. Also make a hole in the second box that lines up with the first hole you made. Make another set of holes 5-8 cm from the first holes.
  Tuck both pencils into the holes so that they are perpendicular to the sides of the box. Stick the eraser end of one of the pencils through the hole in a box and the pointed end into the hole opposite. Then put the pencil with the coil in the other holes. Make sure the boxes are spaced about 12-15 cm apart and the coil is hanging in the center of the pencil.
 - Make sure the pencils fit snugly into the sides of the boxes. If not, use modeling clay in the boxes to hold the pencils in place.
 Tie one end of a string to the pencil without the spool. Cut your rope so that it is twice the height of your boxes from the floor. Wrap the string around the pencil and tie a knot to secure it. Hang the loose end of the string over the spool of the other pencil.
 - You can also tie the string around the pencil before putting it in the box.
 Slide a paperclip onto the rope so that it lies between the two pencils. Thread the other end of the rope through the center loop of the paper clip. Slide the paperclip down the string until it hangs between the two pencils. Rest the paperclip on the table surface for now.
 - If you don't want the paperclip to move, you can tie a knot in the string to secure it.
 Hang a small weight on the paper clip. Bend the paperclip open to form a small hook and slide some small weights on it, such as rings or metal beads. Make sure the weight rests on the table top and is not suspended in the air.
 - Try the same weight you used on your simple pulley so you can compare the difference between the two.
- Heavier weights can tear the boxes or break the rope.
 Pull the rope over the spool to lift the load. The spool rotates around the pencil and makes the weight easier to lift. Since the other end of your rope is tied to the pencil, use half the force it takes to lift it with a single pulley.
 - Because the weight is distributed between the string and spool, you can move the weight twice as far, using half the force.
- You can add more spools and pencils to make lifting the weight easier.
Tip: Use a force gauge to see how much force it takes to lift the weight. Tie the end of the rope to the hook of the power gauge and pull. Look at the reading on the side of the scale to measure the force required to lift the force gauge.
Warnings
- Be careful when handling the cut ends of a metal coat hanger, as they can be sharp and hurt you.
Necessities
A fixed pulley
- Wire hanger
- Scissors or wire cutters
- Rope or cord
- Wooden spool
- Weights
- Tang
= A simple compound pulley
- 2 cardboard boxes
- 2 pencils
- Wire spool
- Wire or rope
- Paperclips
- Clothespins or other weights
- Clay (possibly)


