Author:
Frank Hunt
Date Of Creation:
12 March 2021
Update Date:
1 July 2024

Content
- To step
- Method 1 of 3: Prepare the deadlift
- Method 2 of 3: A deadlift with the barbell
- Method 3 of 3: The deadlift with a dumbbell
- Tips
- Warnings
- Necessities
The deadlift is an excellent compound exercise targeting the quadriceps, hamstrings, glutes, low back, trapezius (trapezius) and forearms - and you'll feel like a beast when doing this exercise. However, if you don't do the deadlift properly, serious injuries and damage to your joints, such as a hernia, are lurking. Take the following steps for the correct way to do a deadlift and become a modern Hercules.
To step
Method 1 of 3: Prepare the deadlift
 Get the barbell ready. Place the bar on the floor and hang weights on it that suit your body and fitness level. If you are doing the deadlift for the first time, start with a lighter weight. You can always add weight later. First, it's important to focus on the right technique before pushing the limits of what your muscles can handle.
 - A good start is, for example, a weight of 25 kg on the barbell, but this depends entirely on your strength and condition.
 Get into the correct position. Stand in front of the bar with your feet roughly shoulder-width apart. Make sure your toes are sticking out slightly and make sure the balls of each foot are under the bar. By allowing your feet to stand out slightly, you get more balance.
  Bend your knees. Bend your knees while keeping your back straight so that you lean back. It is important that you bend from the hips instead of the waist.
Method 2 of 3: A deadlift with the barbell
 Grab the bar. Grab the bar with both hands just over shoulder width, on the outside of your legs. Keep your arms straight and straight.
 - Although you can grip the bar in any way, the mixed grip is recommended. Grab the bar with one hand overhand and the other underhand. This makes the bar more stable in your hands because if you hold the bar with both hands in the same direction, there is a chance that it will roll out of your hands, especially if you are a beginner or your grip is not firm enough.
- For Olympic lifting, many athletes use the hook handle, which is even safer, but can be painful at first. This is the same as the overhand grip, except that the thumb is placed under the fingers instead of above the other fingers.
- The underhand grip alone is not recommended as it can lead to tearing of the bicep tendon, especially in people who cannot make a full elbow movement.
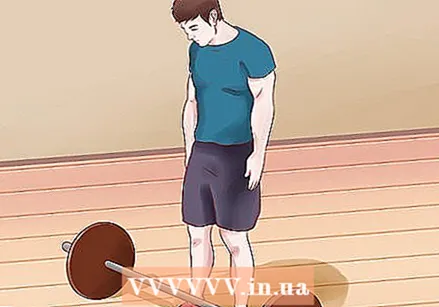
 Position your hips and legs. Lower the hips so that your thighs are parallel to the floor. Keep your lower legs as vertical as possible. The angle between your feet and lower legs should be close to 90 degrees. Note that in the example shown, the thighs are properly aligned, parallel to the floor, but the back is not straight enough.
  Straighten your back and look ahead. Always keep your back in a natural, arched shape. Do not arch your back and your tailbone out of position. Keep your head in line with your back to make sure it doesn't arch and look straight ahead.
  Lift the bar. Stand up straight by raising your hips and shoulders at the same time while keeping your back straight. Keep your abs tight all the time. Lift the weight straight up and hold it close to your body, as if pushing the floor away. Stand in one position, upright and with the shoulders back. Let the bar hang in front of your hips and try not to lift it any further.
 - Lift with your hamstrings. You have more strength and balance in your legs than in your arms. Doing this reduces the risk of injury.
 Lower the bar again. Keep your back straight and lower the bar back to the starting position. Push your buttocks back as if you were going to sit in a chair and keep your head upright. Do not arch your back or your tailbone in an unnatural position.
Method 3 of 3: The deadlift with a dumbbell
 Take a dumbbell in each hand and let it hang next to your body. The weights should be slightly in front of your feet. Make sure the weight of the dumbbells matches how much strength you have.
  Get into the correct position. Place your feet slightly wider than your shoulders, toes pointing forward (possibly at a slight angle outward for more balance).
  Get down on your knees and grab the dumbbells. Keep your back as natural and flat as possible. Make sure to push your shoulders away from your ears and keep your head aligned with your spine. If it feels better, you can lift your chin slightly. Focus your gaze forward, on infinity and don't let your eyes wander (otherwise your head will go with your eyes and your spine will soon follow). Make sure not to let your chest sag.
 - Make sure that your heels remain firmly on the floor and that your shoulders are hanging above your toes.
 Keep your core tight while standing upright. Your abs provide balance in your back as you lift the weights. Straighten your knees and then your hips before standing straight up. Your arms should be straight and the dumbbells hang at your sides against the hips.
 - Hips and shoulders should rise at the same time. Try to hold the dumbbells as close to your body as possible while standing up.
 Use your knees as a hinge to lower the dumbbells. Move the hips back and down as you lower your body. Try to keep your knees from sticking out too far beyond your toes. Keep your back straight and your tailbone in a natural position, not too curved.
 - Make sure your abs are tight as you bend your knees. Keep your shoulders back and down while doing this exercise.
Tips
- You can also try to imagine not trying to lift the weight, but trying to push your legs through the floor. This will force your legs to engage early in the movement and keep your hips from moving up before you lift the weight off the floor. If you raise your hips first, your back will arch and this can lead to injuries or damage to the back and joints.
- Imagine trying to touch the wall behind you with your butt and the wall in front of you with your chin. This helps to get into the correct position.
- It's best to do a deadlift with someone checking your posture.
- Use lime to keep your hands from slipping and accidentally dropping the weight on your toes.
- A special weightlifting belt (lifting belt) can help to support your back. It is possible to prevent injuries, but it can also prevent the development of important core muscles, which in turn leads to injuries when you increase the weight.
- The deadlift should be performed in a smooth movement, something that is not possible for people with less flexible hips and legs. If you find that the lift is uncomfortable, start and end your workout with some stretching exercises to make your body more flexible.
Warnings
- Always consult a doctor before starting a new training schedule.
- Failure to keep the back straight can lead to the intervertebral discs being put under pressure, which can cause them to shift, which can lead to a hernia. This can also put pressure on the nerve endings with damage as a result.
- At no point during this exercise should you exert pressure with your upper body; this exercise is not for that purpose. Your arms and shoulders are only there to hold the bar.
- Never just drop the weight. Always lower the barbell (s) in a controlled manner and slowly. Not only do you otherwise not benefit from this part of the movement (and make a lot of noise), but you also run the risk of the bar bouncing back against your shins (with all the consequences that entails).
Necessities
- Barbell bar and weights
- Dumbbells
- Lime (possibly)
- Training partner (possibly)
- Lifting belt (optional)


