Author:
Eugene Taylor
Date Of Creation:
7 August 2021
Update Date:
1 July 2024

Content
- To step
- Part 1 of 3: Providing a healthy environment
- Part 2 of 3: Maintaining the plant
- Part 3 of 3: Tackling common problems
Dendrobium orchids are beautiful flowers that are generally very sturdy, but do require careful attention. Provide a moderately warm, moist, and spacious environment for the flower to thrive. Water it weekly and provide plenty of sunlight.
To step
Part 1 of 3: Providing a healthy environment
 Plant the Dendrobium orchid in a small pot. Dendrobium orchids do not produce extensive root systems, allowing them to thrive in smaller spaces. Choose a pot that leaves no more than an inch of space between the roots of the plant and the bottom. Do not plant this flower in a large window box or directly in the ground, as it prefers the safety of a smaller space.
  Use potting soil without soil. The Dendrobium orchid does not thrive or grow in ordinary soil. Buy potting soil formulated specifically for orchids from a garden supply store or online. Or choose your own potting soil such as pine bark, coconut husks or moss.
 - Many ready-to-use orchid potting mixes contain garden charcoal.
 Keep the orchid in a cool to moderately warm environment. Dendrobium orchids do best in an environment that is between 18 ° C and 24 ° C. At night they can tolerate a temperature drop of 13 ° C to 16 ° C. It's best to keep them indoors where the temperature can be adjusted or controlled, especially in extreme seasons like summer and winter.
 - If you put the plant outside during moderately warm weather, keep it out of direct sunlight and bring it indoors when temperatures drop at night.
- Note that the temperatures on the windowsills or near windows can be warmer or colder than the rest of the home.
 Give the orchid room to allow air circulation around it. Good air circulation around these plants can prevent problems such as fungal and insect infestations. Place the orchid in a free space with nothing around it. Leave at least 5 inches of empty space around it to provide adequate air.
 - Keep a small fan near the plant to improve air circulation when it is dusty.
- When you water the plant, make sure that no stagnant water remains on the surface of the soil.
 Give the orchid natural light or use grow lights to simulate it. Orchids need a lot of light to thrive. Place them near a partial shade window so they don't get direct sunlight, which can be harmful. If there is no possibility of natural light, place the orchid under grow lights for 14 to 16 hours to simulate sunlight in this way.
 - When setting up the grow lights, use 1 warm white tube and 1 cool white tube placed under a reflector.
- You can buy grow lights at hardware stores or online.
- Plants should be placed about 20 cm away under the light.
Part 2 of 3: Maintaining the plant
 Water them weekly and let the top layer of soil dry between waterings. Dendrobium orchids can store water and are more tolerant of dry soil than overly wet soil. Water them every 1 to 2 weeks. Allow the surface of the soil to dry an inch deep before watering it again.
 - Some types of Dendrobium orchids have water storage pseudobulbs, meaning you can water them every 2 weeks.
- It is better to water the orchid in the morning so that the leaves are dry for the night.
 Use a diluted orchid nutrient once a week. Buy a balanced nutrient designed specifically for orchids to nourish the plant. Dilute it with water in a ratio of 4: 1 for regular fertilization. Apply the nutrient once a week, as directed.
 - You can also use the undiluted nutrient once a month to feed the plant.
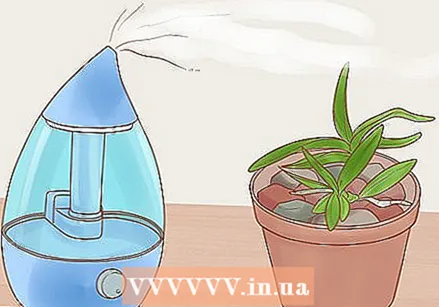
 Keep a humidity level of at least 50% for the orchid. The ideal humidity for the Dendrobium orchid is from 50% to 70%. Increase the humidity by using a humidifier near the plant. You can also place a shallow container filled with water near the plant to increase the humidity in the immediate area.
 - Do not place the plant in the container of water, as the water can rot the orchid's roots over time.
 Prune the orchid's flower heads to encourage regrowth. After the orchid has finished blooming, use sharp scissors to trim the flowering stem. Cut the stem diagonally, just above the top leaf of the shoot. This will create a new shoot in the next growing period.
 - If you don't prune the orchid after it blooms, it won't be able to bloom again.
Part 3 of 3: Tackling common problems
 Increase the humidity in the room if the leaves dry out. If you see dry or dead leaves on the plant, remove them by pulling gently. If an entire stem has dried out, use sharp scissors to remove it just above the base. Increase the humidity of the room with a humidifier to keep more leaves from drying out.
 - Brown leaf tips are also a sign of dryness.
 Move the orchid to a less sunny spot if you see yellow leaves. Yellow leaves are usually a sign of sunburn or heat shock in orchids. If you see this symptom, move the plant to a cooler place with less direct sunlight. To combat drought, water the plant or increase the humidity around it with a humidifier.
 - Yellow leaves can also be caused by overwatering. Check that the orchid's roots do not rot.
 Remove mealybugs from the orchid with rubbing alcohol. Mealybugs are one of the main pests that can affect orchids. As soon as you see these tiny insects, which are usually only 0.5 to 0.8 mm long, remove them immediately to minimize damage to the plant. Dip a cotton ball in rubbing alcohol and rub it over the surface of the plant to kill and remove the bugs.
 - Repeat this process after 1 or 2 days to remove any small yellowish spots on the plant, which are actually just hatched mealy bugs.
- Do not use other alcohols, such as ethanol or methanol, as these can damage the plant.


