Author:
Frank Hunt
Date Of Creation:
16 March 2021
Update Date:
1 July 2024

Content
- To step
- Method 1 of 4: Find the battery compartment
- Method 2 of 4: Using AA, AAA, C, and D batteries
- Method 3 of 4: Install a 9 V battery
- Method 4 of 4: Insert button batteries
- Warnings
Batteries power all kinds of devices, from toys and electronics to life-saving medical devices. Some devices, such as laptops, use batteries specifically designed for the particular model, so you may need to refer to the manual to find out how to replace them. However, other devices use more common batteries, including AA, AAA, C, D, 9 V and button batteries. Even if you've never changed batteries before, it's an easy task that you can quickly do yourself! This article is not about changing your car battery.
To step
Method 1 of 4: Find the battery compartment
 On the device, look for a small battery symbol or a plus and minus sign. The battery compartment of a device can be located almost anywhere. However, it is usually on the back or bottom, so check these places first. It may be marked with a small symbol in the shape of a battery, but also with a plus or minus sign, which indicates the polarity of the battery.
 - These markings may be on or next to the battery compartment cover.
 Find a box that you can slide open, if there is no symbol. If you don't see any markers, you may be able to find the box by finding one that you can slide open or flip open. Look for lines in the body of the appliance that do not match the other seams.
 - You may see a clamp or latch opening the box.
- The battery compartment can also be screwed shut with one or more small screws.
 Check the user manual if you are not sure where the box is. If you have the device's instruction manual, it should include a diagram showing where the batteries are. If you don't have the manual, you may be able to find it by searching the Internet for it.
 - If you are going to search the internet, be sure to include the make and model number in your search, if you have this information.
 Remove any screws holding the compartment closed. Typically, the battery compartment screws are Phillips-head screws, meaning they have a cross-shaped notch in the head. To remove the screws, use a Phillips screwdriver.
 - If the screw is tight, you may be able to remove it with a screw remover.
- In the case of a watch battery, you may need to use a special tool to remove the back of the watch.
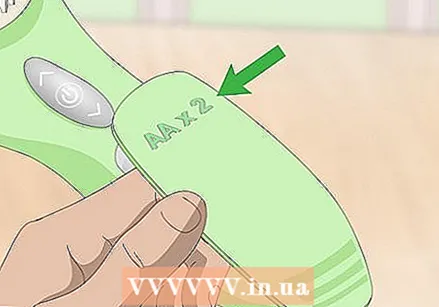 View the battery compartment cover to determine what size battery you need. Usually the size of the battery is printed on the battery compartment cover. If not, that information may have been noted inside the box. If no information is listed, you may need to estimate the size or try different batteries until you find one that fits.
 - AAA, AA, C, and D batteries are all 1.5 V batteries, but different sizes provide different capacity, or the amount of power that comes out of the battery at the same time. AAA is the smallest traditional 1.5 V battery and is typically used to power small electronics. D is the largest 1.5 V battery and typically powers larger devices such as flashlights.
- A 9 V battery looks like a small box with clips on it. It is often used to drive devices such as smoke detectors and walkie-talkies.
- Button batteries are small and round and are used to power small devices such as watches, hearing aids and computer parts.
Method 2 of 4: Using AA, AAA, C, and D batteries
 Look for a plus symbol on the battery. The polarity of the batteries allows them to supply power to a device. The plus sign, or +, indicates the positive pole. On AA, AAA, C and D batteries, the positive pole should be slightly raised.
 - The negative end of the battery should be flat and may, but not always, be marked with a minus sign, or -.
 Find the positive and negative symbols on your device. A + and - must be marked inside the battery compartment. This tells you how to insert the battery. The negative end may have a spring or a small metal lever.
 - If polarity is not marked on the device, you may need to refer to the manufacturer's instructions.
 Align the symbols on the battery with those on the device. It is very important to ensure that each battery is properly installed in the device. If your battery is upside down, it can cause the device to malfunction. It can even cause the battery to leak dangerous, corrosive chemicals.
 - The plus sign on the battery must match the plus sign in the device.
 Slide the battery into place negative side first. As you insert the negative side of the battery, you may be pushing in the spring or lever. By placing the negative side first, the battery will slide more easily into the compartment. Then you should be able to simply push the positive side into place.
 - The positive side of the battery should be able to be pushed into place with light pressure.
 Check that each battery is properly installed. If several batteries are to be placed next to each other, the polarity may have to be reversed. This creates a power circuit that amplifies the energy produced by the batteries. Make sure that each battery is installed in the direction indicated in the battery compartment or in the owner's manual.
 - Some devices that use multiple batteries may continue to operate if one battery is incorrectly installed. However, this can still damage the device and shorten the battery life.
Method 3 of 4: Install a 9 V battery
 Examine the clips on top of the 9 V battery. A 9 V battery is small and square, and has two clips on the top. One is a male connection and the other a female.
  Align the clips on the battery with the connection points inside the device. In the battery compartment of the device you will see two clips similar to the ones on the battery. The male connector on the battery must be aligned with the female in the battery compartment, and vice versa.
 - It's obvious if you try to misplace a 9V battery as the connectors will push together and the battery won't click into place.
 Hold the battery at an angle of 30 ° and slide it side first into the compartment. Once you align the clamps, tilt the battery slightly. Push the top of the battery in until the clips touch, then push the battery down so that the battery clicks into place.
 - These types of batteries can be a bit tricky to install. If it doesn't work the first time, try again with a little more pressure.
Method 4 of 4: Insert button batteries
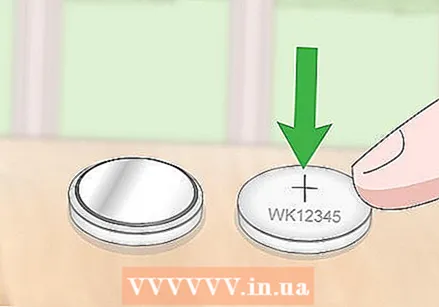 Examine the surface of the battery for a + symbol. Button batteries are small, flat and round. There are flat and fat variations, as well as batteries of different circumference. The size of the battery is usually etched into the top.
 - Usually only the positive side of the battery is marked. The negative side may not have any markings at all.
- The positive side is slightly raised on some button batteries.
 Check the device for a positive symbol. Your battery compartment may be marked with a positive symbol, especially if there is a cover or sliding mechanism where the battery should be placed. However, if you have had to remove a cover, there may not be a mark indicating how to insert the battery.
 - For devices with a cover, such as a hearing aid, it may be difficult to close the compartment if you put the battery in the wrong way.
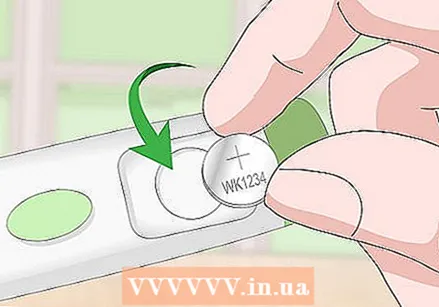 Unless specified otherwise, insert the battery with the positive side up. If you don't see any marks on the device, assume the top of the battery should be facing up.
 - For example, if you're installing a coin-cell battery in a computer's motherboard, there may be no mark to indicate how to insert the battery. The positive side should then face up.
- If you are unsure, consult the user manual of the device.
Warnings
- Always check that you have inserted the batteries correctly. Incorrect installation of batteries can cause battery leakage or breakage, resulting in hazardous exposure to corrosive chemicals.
- Never store batteries in your pockets or in a handbag as they can leak.


