Author:
Helen Garcia
Date Of Creation:
16 April 2021
Update Date:
1 July 2024

Content
- Steps
- Method 1 of 3: Single crochet beanie
- Method 2 of 3: Crochet Beanie
- Method 3 of 3: Bonnet
- Tips
- What do you need
For beginner needlewomen, knitting a baby hat can be a little difficult at first, but with a little practice and you can easily create many different patterns using just a few basic types of loops.
Steps
Method 1 of 3: Single crochet beanie
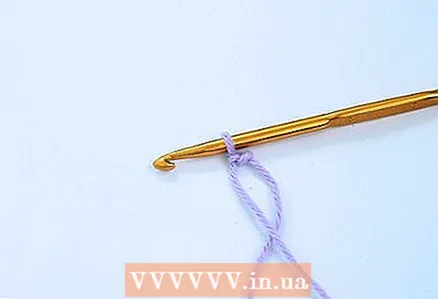 1 Attach the working thread to the hook. Make a slip knot on the crochet hook using one end of the yarn.
 - The free end of the yarn is cut off only at the end of the knitting of the product, it indicates to you where the beginning of knitting is and is more often called the "tail". The beginning of knitting always starts from the end of the thread. The part of the yarn coming from the ball is called the "working thread" and, as the name suggests, it is with this part of the yarn that you will create the hat.
 2 Make 2 stitches. From the eyelet on the hook, knit 2 air loops.
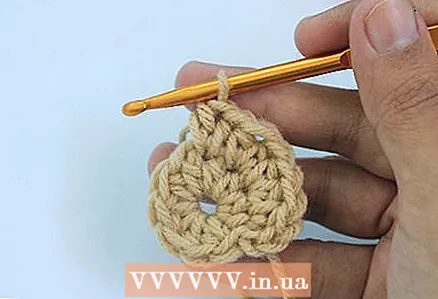
 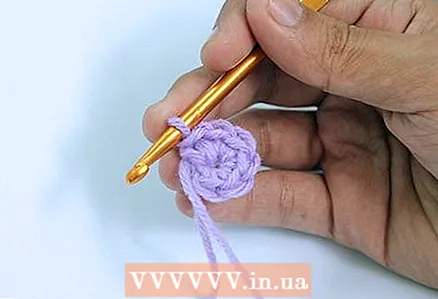 3 Form a ring. Work 6 single crochets into the second loop from the hook. Then close the row with the connecting post by inserting the hook into the base of the first post. You will have the first row.
 - Please note that the second loop from the hook is the very first chain loop.
 4 Work single crochet into each stitch of the previous row. In order to form the second row of the future hat, knit 2 single crochet stitches (st.b / n) in each of the 6 loops of the previous row, then connect the first and last stitches with a connecting post.
 - When you finish the row, you will have 12 tbsp. b / n.
- Mark the last column with a clasp marker or a piece of yarn in a contrasting color so you can clearly see the beginning and end of the row.
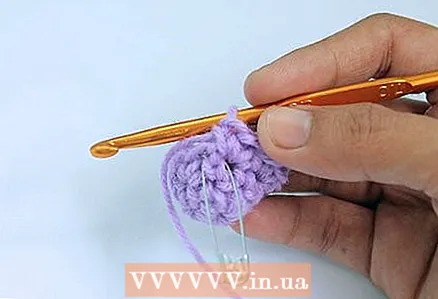
 5 Knit art. b / n in the third row. Make 1 stitch and knit 1 tbsp. b / n in the first loop of the previous row, and then 2 tbsp. b / n in the second. Continue alternating between 1 and 2 tbsp. b / n to the end of the row. Thus, you will knit 1 tbsp. b / n in each odd and 2 tbsp. b / n in each even loop.
 - At the end of the row, you get 18 tbsp. b / n.
- Move the marker to the last st. b / n of this row and connect the row with a connecting post.
 6 Continue adding in the fourth row. Make one chain stitch. In the fourth row, you need to knit one st. b / n in the first and second loops and 2 tbsp. b / n in the third loop of the previous row. Repeat knitting to the end of the row, then re-close the row with a connecting post.
 - In the fourth row, you should have 24 stitches.
- Transfer the marker to the last column of this row before continuing to knit.
 7 Continue adding stitches in row 5. You must have noticed that in each row, the distance between the increments increases by 1 loop, so in the fifth row the increase will be made in every fourth loop of the row. Do not forget to close the row with the connecting post again.
 - In the fifth row, you get 30 tbsp. b / n.
- Mark the end of the fifth row with a marker.
 8 Continue adding stitches for 4 more rows. In rows 6-9, increase the distance between the increments by 1 tbsp. b / n.
 - Row 6: One by one Art. b / n in the first 4 loops, then 2 tbsp. b / n in the fifth. Repeat to the end of the row.
- Row 7: 5 tbsp. b / n in the first 5 loops, then 2 tbsp. b / n in the fifth. Repeat to the end of the row.
- Row 8: Increase in every 7th loop of the previous row.
- Row 9: Increase in every 8 stitches. At the end of this row, you will have 54 stitches.
- Do not forget to mark the last column of the row with a marker and close the rows with a connecting post. Each new row starts with 1 chain stitch.
 9 Work 1 more row. Now you no longer need to make increases, just knit 1 tbsp. b / n in each loop of the previous row.
 - Each of the following rows should have 54 loops.
- Move the marker.
- Thus, you need to knit rows 10-26.
 10 Knit a connecting post. Finish knitting by closing the row with a connecting post. Your hat is ready.
  11 Secure the work. Cut the working thread, leaving a tail 5-6 cm. Pull the tail through the eyelet of the connecting post and tighten the knot properly.
 - Hide the remaining ponytail in the loops of the beanie.
Method 2 of 3: Crochet Beanie
 1 Hook the yarn. Make a slip knot at the end of the crochet hook with the free end of the yarn.
 - The free end of the yarn, or ponytail, is not used in knitting. To knit a hat, you will use the thread coming from the ball, this is called the "working thread".
 2 Make a chain of 4 stitches. Work 4 stitches from the eyelet on the hook
  3 Form a ring. Connect the first and last loops of the chain with a connecting post.
 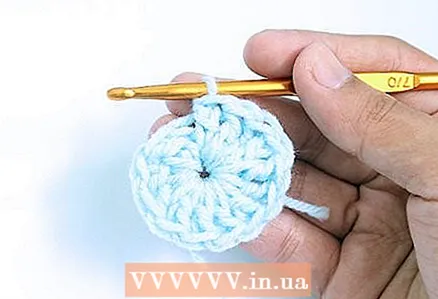 4 Work the double crochet into the center of the ring. Before you start knitting the hat itself, as well as each new row, you first need to make 2 lifting air loops. Then, in the center of the ring, knit 13 double crochets (st s / n) and complete the row by connecting the last crochet with the second air lift loop, using a connecting post (c.c), so the first row will be completed. The same procedure will be repeated at the end of each row.
 - Note that 2 lifts in this row do not count as a column.
 5 Double the number of single crochets. In the second row, you need to knit 2 sts / n in each column of the previous row, so you will make 1 increase in each of the 13 columns of the previous row. Complete a row of s.s.
 - At the end of the second row, you will have 26 loops.
- In some cases, while knitting in a circle, the work turns over, but to knit this hat model, you do not need to turn the work over, just continue knitting in the same direction.
 6 Alternate single and double s / n sts. As usual, start knitting a new row with 2 air lift stitches. In the third and subsequent rows, the number of increases will decrease. Knit 1 st s / n in the first stitch of the previous row and 2 st s / n in the second. Continue to knit the row in the same way, making an increase in every second buttonhole of the previous row.
 - At the end of the work, you will have 39 loops.
- In the third row, you will need to make increases in every second loop, in the fourth - in every third, in the fifth - in every fourth, etc.
 7 Continue to increase the number of stitches in the fourth row. Knit two sts s / n in every 3 sts of the previous row.
 - On the fourth row, you should have 52 stitches.
- Connect the first and last posts with s.c.
 8 Work rows 5 through 13 in the same way. Subsequent rows are knitted similarly to rows 2-5, with the only difference that you no longer need to make increases. Always start knitting a row with 2 air lift loops and finish with c.s. Knit 1 st s / n in each of the loops of the previous row.
 - In each of the rows from 5 to 13 there should be 52 st s / n.
 9 Now turn the work over. Make 2 lifting loops again and twist knitting. Next, knit a row similarly to the previous ones, knitting 1 st s / n in each of the columns of the previous row. Complete a row of s.s.
 - Rows 15 and 16 are knitted in the same way, but you no longer need to turn the work.
- In each of the rows from 14 to 16 there should still be 52 sts / n.
 10 Tie the last decorative row of the beanie. Make 1 lifting loop, and then knit 1 single crochet (st b / n) in each loop of the previous row.
 - Don't skip loops.
- Similarly, connect the beginning and end of the row with s.c.
- You can knit any other edging for your hat, on the Internet you can find many options for simple, and at the same time, beautiful edging.
 11 Secure the end. Cut the working thread, leaving a tail 5-6 cm. Pull this tail through the loop on the hook and tighten the loop properly by pulling the tail.
 - In order to further secure the work, thread the tail of the thread into the knitting needle and hide it between the already knitted posts.
- Fold the last 3 rows up. Your hat is ready.
Method 3 of 3: Bonnet
 1 Hook the thread. Make a slip knot at the end of the crochet hook with the free end of the yarn.
 - The free end of the yarn, or ponytail, is not used in knitting. To knit a hat, you will use the thread coming from the ball, this is called the "working thread".
 2 Work 2 stitches. From the loop on your crochet hook, knit 2 chain stitches.
  3 Work the double crochet into the second loop from the hook. Having connected two air loops, knit 9 half-columns with a crochet (half-s / n) in the second loop from the hook.At the end of the row, connect the first and last half-columns using a connecting post (s.c)
 - In order to tie a half-column with a crochet:

- Make a yarn over.
- Insert the hook into the eyelet.
- Grab a working thread.
- Pull the thread through the loop so that you have 3 loops on the hook.
- Grab the working thread again.
- Pull the thread through all 3 loops.
- The second loop from the hook is the first stitch you knit.
- The first two chain stitches in this and subsequent rows count as the first half column.
- In order to tie a half-column with a crochet:
 4 Double the number of stitches. In the second row, you will need to knit 2 half stitches. s / n in each loop of the previous row. Thus, you will make 1 increase in each loop. To do this: make 2 air lifting loops, then knit 1 half. s / n in the same loop, 2 half-st. s / n to the next one and continue to knit for 2 half. s / n in each loop of the previous row. When finished, connect the first and last posts of the row using a connecting post (s.c).
 - You should have 20 stitches in this row.
 5 In the third row, increase every other loop. Knit 2 lifting chain stitches again, and then knit 1 half st. s / n in the same loop. In the next loop, knit 1 half. s / n and 2 half-st. s / n to the next. Repeat to the end of the row. At the end, close the circle with s.s.
 - In the third row, you will need to make increases in every second loop, in the fourth - in every third, in the fifth - in every fourth, etc. Do not forget to knit 2 lifting air loops at the beginning of each row and close the circle with s.s.
- You should have 30 stitches in this row.
 6 Continue adding stitches in the fourth row. Make 2 lifting loops again and knit 1 half-st. s / n in the same loop. In the next 2 loops, knit 1 half. s / n. Continue knitting to the end of the row.
 - In this row, you get 40 loops.
 7 Reduce the number of loops. Knit 2 lifting loops again, and then, without knitting half-stitches. s / n in the first lifting loop, knit 1 half. s / n in each of the next 37 loops of the previous row.
 - Thus, you get 38 loops.
 8 Turn the work over and knit again. Make 2 lifting loops again and knit again 1 half. s / n in each of the 37 loops of the previous row. Do not forget to close the row of s.s.
 - On this row, you will again have 38 stitches.
 9 Work 7 more rows in the same way. Repeat the pattern in rows 7 through 13.
 - Each row should have 38 stitches.
 10 Knit a row with single crochet. Twist knit and tie 1 hoist loop. Then knit 1 | single crochet (st. B / n) in each loop of the previous row.
 - In the middle of the row, knit a decrease by tying two sts b / n together.
- You should have 37 stitches in this row.
 11 Knit a frill. The frill is knitted by alternating single crochet and crochet stitches (st s / n).
 - Turn the job.
- Knit 1 lifting loop, and then knit 1 item b / n in the same loop. Skip 2 stitches and knit 5 sts in the next loop, then skip 2 stitches again and knit 1 st b / n in the next loop. Repeat knitting to the end of the row.
 12 Secure the work. Cut the working thread, leaving a tail 5-6 cm. Pull the tail through the loop on the hook (the one that formed after you tied the cc) and tighten the knot by pulling the tail.
 - Insert the ponytail into the knitting needle and hide it between the crocheted stitches to further secure the work.
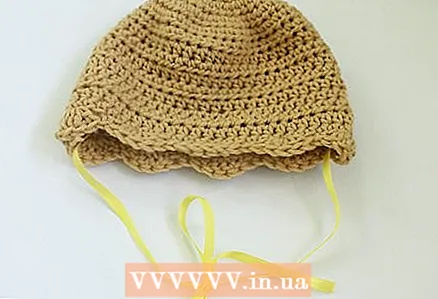 13 Attach the tape. In order to give your bonnet a finished look, you will need to attach ribbon ties on the sides of the bonnet.
 - Prepare 2 ribbons 50 cm long.
- Secure each of the ribbons to the side of the bonnet by pulling the end through one of the eyelets.
- The cap is ready.
Tips
- Use only soft, washable yarn.
- Please note that the hats offered are designed for newborns / up to 3 months of age. In order to knit a hat for a baby over 3 months old, you will need to add additional loops and rows so that the cap matches the circumference of your baby's head.
- A hat for a newborn should be 35 to 43 cm in circumference and 14-15 cm in length.
- The circumference of the hat for a baby from 3 to 6 months has from 35 to 43 cm in circumference and 16-18 cm in length.
- A hat for babies from 6 to 12 months has a circumference of 40.5-48 cm and a length of 19 cm.
What do you need
- Yarn
- Hook
- Knitting needle
- Scissors
- Ribbon (for bonnet only)


