Author:
Christy White
Date Of Creation:
4 May 2021
Update Date:
1 July 2024

Content
- To step
- Method 1 of 3: Using Paint (Windows)
- Method 2 of 3: Using Preview (Mac)
- Method 3 of 3: Using Adobe Photoshop
This wikiHow teaches you how to reduce the file size of digital images using Paint (Windows), Preview (Mac), or Adobe Photoshop.
To step
Method 1 of 3: Using Paint (Windows)
 Right-click on an image and then click Open with .... This option can be found in the pop-up menu.
  click on Paint. Paint is included in most versions of Windows.
  click on Start. This is a tab at the top of the window.
  click on Resize. This will open the "Resize and Slant" dialog box.
  Finch Maintain aspect ratio On.
 Set a new size for the image. You do this as follows:
 - click on Percentage to enter a percentage in the "Vertical" or "Horizontal" field and reduce the image proportionally.
- click on Pixels to indicate specific dimensions in the "Vertical" or "Horizontal" field.
 click on OK.
 click on File in the main menu, then on Save as….
 Type a name for the image in the "File name" field:’.
  click on Save. The image will be saved in the dimensions specified by you.
Method 2 of 3: Using Preview (Mac)
 Open an image in the Preview app. You do this by double-clicking the blue Preview icon (which looks like photos overlapping each other), on File in the main menu and then click To open... in the drop-down menu. Select a file in the dialog box and click To open.
 - Preview is Apple's app that comes standard with most versions of Mac OS to view images.
 click on Utilities. This option can be found in the menu bar at the top of the screen.
  click on Adjust size ....
 Set a new size for the image. Choose new size or "Adjust" from the "Fit in:" menu.
 - If you select "Adjust", enter the new dimensions in the "Width:" and "Height:" fields, and / or the number of pixels per inch / cm in the "Resolution:" field.
 click on OK.
 click on File from the main menu, and click Save. The image will now be saved according to the dimensions you just entered.
Method 3 of 3: Using Adobe Photoshop
 Open a Photoshop file. Double-click on the blue Photoshop icon with the letters "Ps ’ then click File in the main menu, and To open… in the drop-down menu. Select a file in the dialog box and click To open.
  click on Image in the menu at the top of the screen.
 click on Image size .... This will open a dialog.
 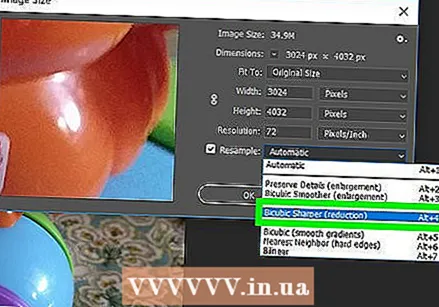 click on Bicubic sharper (best suited for reduction) from the drop-down menu at the bottom of the dialog box.
 Enter the new dimensions. Type it in either the "Width:" or "Height:" field (the other field will be adjusted automatically). You can also adjust the number of pixels per inch / cm in the "Resolution:" field in the "Document Size:" section.
 - If you don't want to keep the same aspect ratio for the image, uncheck Preserve proportions at the bottom of the dialog box.
 click on OK.
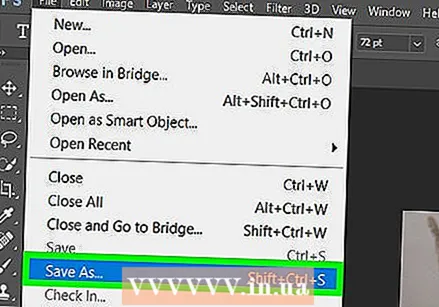 click on File in the main menu, then on Save as….
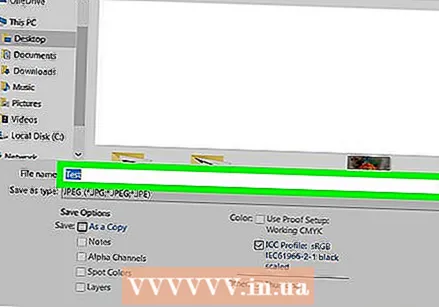 Type a name for the image in the "Save As" field:’.
  Select an image format from the drop-down menu "Layout:’ The default format is Photoshop.
  click on Save. The image will be saved in the dimensions you specified.


