Author:
Carl Weaver
Date Of Creation:
27 February 2021
Update Date:
1 July 2024

Content
- Method 2 of 5: Combat Head and Face Wrap
- Method 3 of 5: Loose Scarf
- Method 4 of 5: A neat scarf
- Method 5 of 5:: Tight Bandana Scarf
- Tips
- What do you need
- This bondage method is a good option if you want to use a shemagh to protect your head and face from cold winds or the hot sun.
 2 Drape the shemagh over your forehead. Pull the folded edge of the shemagh over the forehead, positioning it somewhere between the hairline and eyebrow.
 - Excess material should be draped at the top of your head and along your back, but not in front of your face.
- If you have ever tied a bandana, then in the starting position you can act as if you are about to tie a very large bandana.
- The two ends of the shemagh should be roughly equal for this style, so place the folded edge in the middle of your head.
3 Wrap the right side under your chin. Pull the right side to the left so that it fits completely under your chin. Pull the end over your shoulder and towards the back of your head. - Hold this end in place with your left hand while working on the left side to prevent loosening as the shemagh must be tied tight to be effective.
4 Fold the left side over your face. Grab the leading or folded edge of the left side with your right hand and pull over your entire face, towards the right side. Unlike the right side of the shemagh, the left side should be draped over your nose and mouth, but not over your chin. - In the same way, pull the right end over your shoulder and towards the back of your head.
5 Tie the two ends at the back of the head. Use a tight or double knot to hold the shemagh in place. This knot should be at the back of your head, roughly in the center of your back, and should be tight enough to hold the shemagh in place. - Don't tie the knot too tight to make it difficult for you to breathe or turn your head, but make sure the material is taut all over your neck, face, and head.
6 Adjust as needed. Adjust the shemagh as needed so the material covers the top of your head and the lower half of your face without covering your eyes. After this step, the shemagh is ready. - One of the main advantages of this wrapping is its versatility. You can pull the bottom from your face to create a simple turban, or you can pull both the bottom and top down to create a scarf.
Method 2 of 5: Combat Head and Face Wrap
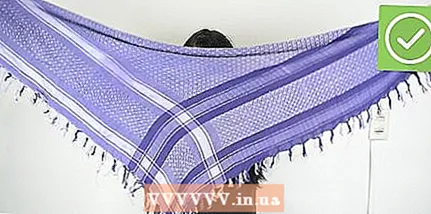 1 Fold the shemagh into a triangle. Open the shemagh fully and connect one corner diagonally to the opposite corner, folding the shemagh in half and into a triangle.
 - This bondage method is a good option if you want to use a shemagh to protect your head and face from cold winds or the hot sun. This is very effective if you also want to protect yourself from breathing in sand or debris that is filling the air.
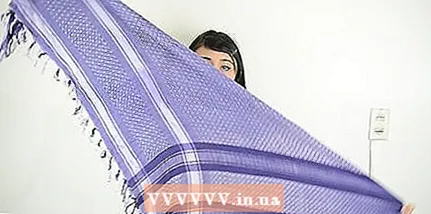
 2 Drape the shemagh over the forehead. Pull the folded edge of the shemagh over the forehead, positioning it somewhere between the hairline and eyebrows.
 - Excess material should be draped at the top of your head and down your back, but not in front of your face.
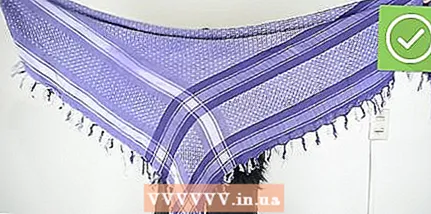
- Pick a point about three quarters along the folded edge. There should be more material on the right end than on the left.
- If you've ever tied a bandana, then hold the shemagh over your forehead as if you were about to tie a really big bandana.
- 3 Pull the short end under your chin. Fold the left side or short side of the shemagh under the chin and up towards the back of your head.
- Hold this piece with your right hand. Do not fold the end into the rest of the shemagh fabric.
- 4 Fold the long side over your face. With your free hand, pull the right side or longer side over your face so that it wraps around your nose and mouth.
- 5 Fold the long side over your head. Continue wrapping the long end of the scarf, bringing it to the top of your head. The edge should be completely draped over your head, and the end should roughly match the end on the opposite side.
- One hand should still hold the first end and pull the side on your head, while the other hand maneuver the other end around.
- 6 Tie the two ends together. Tie two knots to hold the shemagh in place.
- Don't tie the knot too tight to make it difficult for you to breathe or turn your head, but make sure the material is pulled tight against all parts of your neck, face, and head.
- 7 Make the necessary changes. Adjust the shemagh as needed so the material covers the top of your head and the lower half of your face without closing your eyes. After this step, the shemagh is ready.
- The main disadvantage of this tying style is that the shemagh is not easy to remove from the head and turn into a scarf. However, it is a reliable tying style and provides your head with more protection than the traditional or conventional tying methods already mentioned.
Method 3 of 5: Loose Scarf
 1 Fold the shemagh into a triangle. Open the shemagh fully and connect one corner diagonally to the opposite corner, folding the shemagh in half and into a triangle.
 - This style is not the most practical and not particularly traditional, but it can be a casual and fashionable way to wear a shemagh.
- 2 Place the fabric on the lower half of your face. The folded edge of the shemagh should cover the nose and mouth. Two corners should appear on either side of your face, and the other corner should be draped down in front of your face and over the top of your neck and chest.
- 3 Wrap the ends around your neck. Place the short ends at your shoulders and around the back of your neck. Tie them in this place.
- Since you have placed the shemagh around your neck, hold the ends and support the material tight against your face.
- Tie a loose knot at the back of your neck. The knot should be tight enough to hold the shemagh in place, but not so tight that you have difficulty breathing or turning your head.
- 4 Let the ends hang over your chest. Place the left and right ends of the tied shemagh back over your shoulders to drape loosely at the bottom of your chest. You don't need to tuck or hide them.
- 5 Adjust as needed. Pull the top of the shemagh slightly so that the part that covers the nose and mouth is again just below the chin and around the neck.
- This step ends this particular method.
Method 4 of 5: A neat scarf
 1 Fold the shemagh into a triangle. Open the shemagh fully and connect one corner diagonally to the opposite corner, folding the shemagh in half and into a triangle.
 - This style is not the most practical and not particularly traditional, but it can be a casual and fashionable way to wear a shemagh.
 2 Wrap the fabric over the lower half of your face. The folded edge of the shemagh should cover the nose and mouth. Two corners should appear on either side of your face, and the other corner should be draped down in front of your face and over the top of your neck and chest.
 - 3 Wrap the ends around your neck without tying them. Place the short ends over your shoulders and around the back of your neck. Cross them on top of each other at the back of your neck until both sides move forward.
- Since you have placed the shemagh around your neck, hold the ends and support the material tight against your face.
- For this style, you must not tie a shemagh at the back of your neck. Instead, both ends only need to be crossed once. While still holding the two ends securely and tightly, slide each end back over your shoulder to the original side so that it rests on your chest, but still do not let go of the ends.
- 4 Tie the ends at the front. Tie the two ends at the front while still keeping them taut. Hide the ends under the long end or in the remaining corner of the shemagh.
- Use a loose knot at approximately the center of your neck.
- The knot should be tight enough to hold the shemagh in place, but not so tight that you have difficulty breathing or turning your head.
- 5 Tuck the shemagh into your jacket. If you are wearing a jacket, blazer, or other form of outerwear, unbutton the top and tuck the ends of the shemagh down. Zip up your jacket partially to hide those ends and create a tidy look.
- This is an extra step. You can leave the ends hanging out of your jacket if needed. This can make your style a little more relaxed.
- 6 Adjust as needed. Pull the top of the shemagh slightly so that the part that covers the nose and mouth is again just below the chin and around the neck.
- This step completes this particular tying method.
Method 5 of 5:: Tight Bandana Scarf
 1 Fold the shemagh in half to make a triangle.
- 2 Pull it over your face (like a bandana) and hold.
- 3 Pull the two ends towards the back of your neck and wrap around to the front (no tying).
- 4 Pull back again and knit moderately tight. Adjust as needed to avoid choking yourself.
Tips
- If you don't have a real shemagh, you can improvise using a large microfiber towel, sheet, or a large square of fabric. Choose something made of cotton or a similar material, as cotton is absorbent, breathable and unlikely to slip off.
What do you need
- Shemag


