Author:
Helen Garcia
Date Of Creation:
14 April 2021
Update Date:
1 July 2024

Content
- Steps
- Part 1 of 3: Braid your braid
- Part 2 of 3: Convert the scythe to a snake
- Part 3 of 3: Variants of serpentine hairstyles
You got up late today, but still want to have time to get a spectacular hairstyle? Try braiding a snake braid! The snake braid is a variation of the classic braid that resembles a writhing snake. A snake braid is easy to do, so it's good for experimenting with new hairstyles or braids if you're just learning how to create them. Once you learn how to braid a snake braid, you can incorporate it into a wide variety of hairstyles.
Steps
Part 1 of 3: Braid your braid
 1 Start working on clean, dry hair. A snake braid works best on clean, healthy, well-hydrated hair that should be completely dry. Therefore, wash your hair with a gentle shampoo to remove dirt, excess natural oils and styling products.
 - Treat clean hair with your favorite hair conditioner, rinse it off, towel dry it and let it dry on its own.
- If you are in a hurry and have to use a hairdryer, apply a heat protectant to your hair first.
 2 Choose a location for your braid. As with the classic braid, a snake braid can be braided anywhere on the head from a strand of hair, and at the same time it can be of any size. If you are going to do a specific hairstyle with such a braid, then determine its size and position accordingly, as required for such a hairstyle.
 - To simply practice braiding your snake braids, create a regular parting in your hair. Then select a small or medium section of hair on one side of the parting from about the middle of the head and use it for further work.
 3 Divide your hair into sections. To get a snake braid, you first need to braid a classic braid. Comb through a section of hair with a wide-toothed comb to loosen tangles, then divide it into three equal sections.
  4 Braid a classic braid. To create a classic braid, grab the left strand of hair with your left hand, grab the center strand with your right thumb and forefinger, and grab the right with the fingers remaining on your right hand.
 - Twist the right and center strands together in such a way that the right one lies on top of the center one and takes its place in the center. Then twist the left and center strands so that the left strand overlaps the center strand and takes its place.
- As you work, shift the strands from one hand to the other as they change their position between the left, center and right positions.
- Continue sequentially alternating the strands stacked in the center (take either the right or the left of them) so that all three parts of the braid are woven together.
- Stop only when you have a free end of hair about 2.5 cm long in your hands.
Part 2 of 3: Convert the scythe to a snake
 1 Grab the center strand of the braid. Grasp the end of the braid with your left thumb and forefinger to keep the braid from unraveling. With your right hand, separate the unbraided ends of the three strands and grab the center one.
 - Grasping the center strand, continue to hold the end of the braid with your left hand.
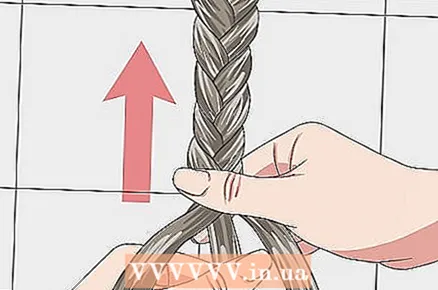 2 Slide the braid up the center strand. While holding the center strand, gently slide the other two strands up along it like a bar.
 - If the offset gets stuck in some place, go to the top of the braid and gently pull up the top of the braid. Then move to the center area of the braid and also pull it up, then return to the bottom area to continue to move the weave.
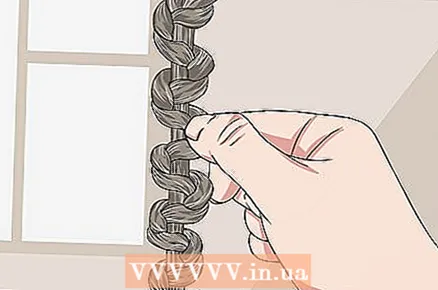 3 Spread the snake out. When you pull the braid up on the center strand, the braid will not gather evenly, so you will need to loosen and straighten the braids in places to make them look like a real snake.
 - Starting at the top, carefully slide the two side strands down slightly, straightening the waves of the weave. Move consistently down the spit until the snake is fully extended.
- In the finished form, the braid will look like a snake, wriggling along the central strand of hair.
 4 Style your braid exactly as you want it to fit in your hair. The braid can be tied with a transparent elastic band and left just hanging, or it can be laid on the head as you like and secured in place with invisibility.
 - For example, try pulling the braid back on the side and securing it in the back.
- When you fix the braid with invisibility, if necessary, mask this place with another lock of hair.
Part 3 of 3: Variants of serpentine hairstyles
 1 Initially, weave the braid in the direction in which you will style it into your hair. If you are going to do a specific hairstyle with a braid-snake, you need to braid it in the right direction, otherwise it will fall down in an uneven wave.
 - For example, if you want to create a braid from the temple that should bend around the circumference of your head towards the back of your head, comb your hair back and braid the first few links of the braid in that direction.
 2 Wrap the snake braid in a rim around your head. Such a wreath should go from one ear to the other along the top of the head. This is a unique and attractive way to hold your hair in place so it doesn't fall on your face. You must have hair long enough so that your braid is long enough for the headband. To create a headband from a serpentine braid, follow these steps.
 - Braid one thin serpentine braid at each ear, taking the hair directly behind the ears. At this stage, simply secure the braids with elastic bands.
- Comb the rest of your hair back from your face. Take the braid behind your left ear and tuck it around your head (over the hair that you slicked back). Use the hairpin to secure the end of the braid behind your right ear.
- Do the same for the right braid, tucking it next to the first and pinning it behind the left ear.
- Use loose strands of hair to mask invisibility. Loose hair can be completely left behind, or brought forward.
 3 Make a side snake braid. Part your hair sideways, use the front larger hair section from the part to create a thick enough snake braid. Pull excess loose hair behind your ear on the same side.
 - When you finish weaving the braid, wind it behind your ear along with the rest of your hair and fix it in its place with an invisible one.
- Bring part of the hair out over the bobbin to hide it along with the end of the braid.
 4 Create a half-wreath from the serpentine braid. You can braid the wreath from anywhere on your head, but first try taking your hair from your temple or the top of your part. When the braid itself is ready, circle it around the head back and fix it with an invisible one. Cover the invisibility with a loose strand of hair.
 - For best results, do not pull on the braid too much; allow it to sag a little.
- To get a symmetrical wreath, braid the same braids on both sides and pin them in the back in one place.
- For a more interesting and intricate hairstyle, try braiding two small snake braids on both sides. Try to create the first pair of braids just above and just behind the ears, and the second pair of braids at the temples. Be sure to let all the braids sag slightly and secure the ends at the back.


