Author:
Mark Sanchez
Date Of Creation:
2 January 2021
Update Date:
29 June 2024

Content
- Steps
- Method 1 of 5: Installation
- Method 2 of 5: Getting Started
- Method 3 of 5: Using Tools and Functions
- Method 4 of 5: Organizing Your Notes
- Method 5 of 5: Using Other Notes
- Tips
Evernote is a useful program for accessing information from different devices. This is a convenient way to quickly organize your time and always have access to the information you need. Read this article to learn how to install and start using Evernote.
Steps
Method 1 of 5: Installation
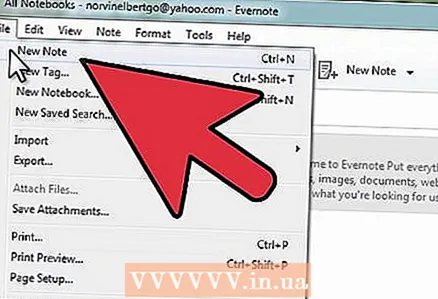
 1 Download the program. Visit the Evernote website at http://www.evernote.com and click the green button that says “Get Evernote - it's free.”
 - The program will be installed automatically on most mobile devices. The installation file will be downloaded to your computer.
- If you need to download a different version, click the “Get Evernote for mobile, tablet, and other devices” button and you will see a list of all available versions of Evernote. Select the one you want.
- The program will be installed automatically on most mobile devices. The installation file will be downloaded to your computer.
 2 Install the program. Open the downloaded file by double clicking on it.
 - Accept the license agreement. Read it first if you like.
- Click the “Install” button.
 3 Install on all your devices. The main function of Evernote is the ability to access information stored on any of your devices. To use it, you need to install the program on all the devices you want.
  4 Register. On your main device or computer, open Evernote. You will see an area on the right labeled New to Evernote where you can create an account. Fill in the fields and click the registration button.
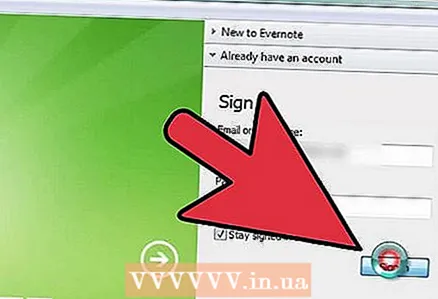
 - If you already have an account, click “Already have an account” in the lower right corner and enter your login information.
Method 2 of 5: Getting Started
 1 Create a new note. Evernote stores all information in “notes”. You can create a new note by clicking “New Note” in the upper right corner of the window. Once you've created a new note, you'll see it in the center of the window as an unnamed one, above the welcome note from Evernote. The content of the note appears in the right column. The note consists of several distinct parts:
 - At the top is a field for entering the name of the note. Nearby there is a drop-down menu in which you can choose which notebook the note will be saved to. (Notebooks are described in the next step).
- Below the input field there is a clickable text “Click to set source URL ...”. This will allow you to remember the source of information if you find it on the Internet.
- Next to the text for entering the URL there is a field for entering tags (search words).
- Below you will find tools for handling note format such as fonts, sizes, etc.
- At the very bottom of the window is its main part - the text entry field for the note. It is currently empty.
 2 Fill out your note. Enter information in different fields to create more effective notes. Evernote saves and updates your notes automatically as you fill them out.
 - Start with a title for the note. This will help you find it in the future, so it's a good habit before you have a hundred notes.
- If you don't enter a title, Evernote counts the first words of the note text as a title.
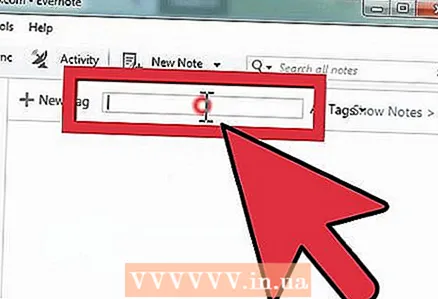
- Go to the field for entering tags and specify them. This is a handy option for searching records. Typically, tags are related to the meaning of the entry.
- Unlike Twitter, you don't have to start tags with a #. If you want, please.
- Try to keep your tags short and informative. If you have done research in geology, you can tag all relevant entries with the "geology" tag.
- You can add as many tags as you like to a post.
- Click on the main field and enter your text. This is the content of your recording, for now you can just record anything you want.
- Start with a title for the note. This will help you find it in the future, so it's a good habit before you have a hundred notes.
Method 3 of 5: Using Tools and Functions
 1 Open a text or PDF document. Drag a text document onto your note and it will be copied into it.
 - If you add a PDF file, it will appear in its mini-window with simple viewing options.
- You can add MS Word files at no extra charge!
 2 Add the copied text. Select the text and drag it onto the note. Just!
 - The web addresses added in this way are automatically converted to links.
 3 Add a photo. Drag the image onto the note. It will appear as a picture inscribed in the note window.
 - You can drag pictures to change their order.
- Animated pictures such as *. GIF will be animated.
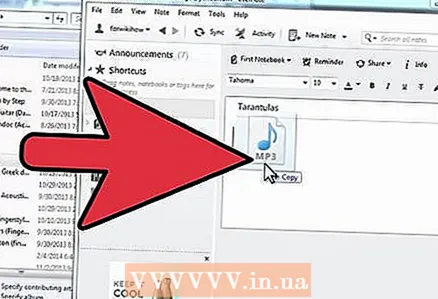 4 Add a music file. Most music files (such as WMA and MP3) will appear inside the note.
 - You can play a music file directly from Evernote by clicking the Play button to the left of the audio file rectangle.
 5 Add other files. In addition to the specified file types, Evernote will display rectangular buttons for all file types added to a note, such as saved web pages or video clips.
 - If you click on this button, the file will open if the required program is installed on the device. Evernote cannot open files by itself.
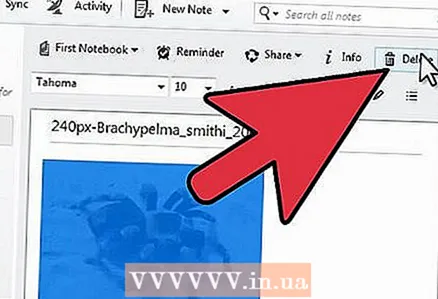 6 Removing an item. It is useful to know how to get rid of unnecessary files in a note. There are two simple methods:
 - Right-click on the file (picture or button) and click “Cut” in the drop-down menu.
- The cut elements can be pasted back or elsewhere. Do this by pressing Control-V.
- Position the cursor directly in front of what you want to delete and click the “Delete” button.
- Right-click on the file (picture or button) and click “Cut” in the drop-down menu.
Method 4 of 5: Organizing Your Notes
 1 Open the list of notes. Between your new note and your Evernote welcome note, you should see 2 notes in the center column of the program. At the top of this column is a drop-down menu and a text entry field.
 - To sort notes by different parameters, use the drop-down menu. Arrange them by tags, titles or other parameters.
- To search for notes, enter some of the text in the field. Evernote will quickly scan your notes and show you the one that contains what you're looking for.
- Evernote can even recognize text printed on images, although the function is not overly reliable yet.
 2 Insert your note into a new notebook. Notebooks contain collections of notes organized according to your chosen criteria. Notebooks are listed in the left column.
 - Create a new notebook. Give it a name, and select options for access from other devices. The new notebook will appear in the list. You will not be able to change these parameters after. There are two ways to create a notebook:
- Right-click on the "Notebooks" section above and select "Create ..."
- Press the Insert button on your keyboard.
- Drag the note into your notebook. To display, click “All exercise books” in the left column.
- Create a new notebook. Give it a name, and select options for access from other devices. The new notebook will appear in the list. You will not be able to change these parameters after. There are two ways to create a notebook:
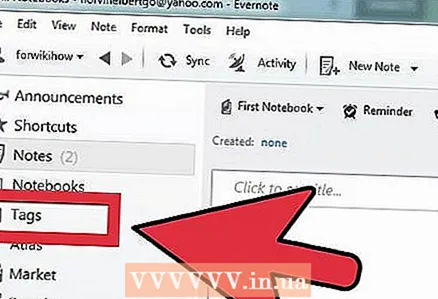
 3 Search by tags. In the left column, under your exercise books, is the Tags menu. Here you will see all the tags you've added to your posts.
 - Click on a tag to display all entries with it.
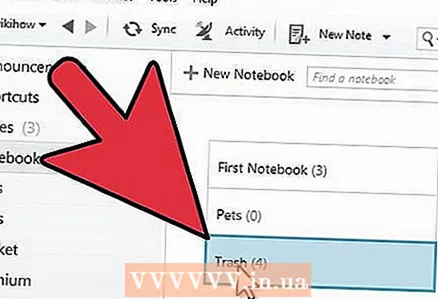 4 Delete notes. At the bottom of the left column is the Recycle Bin. Click on it to see the deleted notes.
 - To recover a note deleted by mistake, select it in the center column and click on the “Recover” button at the top of the right column.
- To permanently delete a note, select it in the center column, and click the “Delete” button at the top of the right column. Evernote will ask you to confirm that you want to delete the note.
Method 5 of 5: Using Other Notes
 1 Try other notes. Evernote offers four different ways to take notes. Different types of notes may be helpful depending on the situation and device you are using.
  2 Fast hand writing. Click on the black triangle next to “New Note” at the top of the window and select “New ink note.” You will see a writing sheet.
 - Click and move the cursor to write on the sheet. It is convenient to do this on devices with stylus or touch screens.
 3 Record an audio note. Click on the black triangle next to “New note” at the top of the window and select “New audio note.” You will see a blue “Record” button for recording.
 - Click on the button and record an audio note. It can be played back later.
- Make sure the noise level indicator is moving before you start recording. If it doesn't, the microphone on your device may not work.
 4 Record a video note. Click on the black triangle next to “New note” at the top of the window and select “New video note.” You will see a square window showing the camera image.
 - Click “Record” to record to webcam or phone camera.
- Click “Take a snapshot” to save the image as a snapshot.
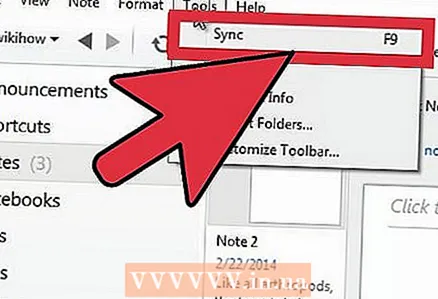 5 Synchronize your notes. When you install Evernote on two or more devices, you can easily sync your notes across any of them.
 - Click on the “Sync” button at the top of the window.
 6 Sign in to Evernote on another device. Your notes from the first device are here.
 - Evernote remembers your sign-in information on the device and doesn't sign out even when you close the app. If you want to sign out of your account (for example, if you share a computer with someone), then go to the "File" menu and select "Sign out".
 7 Keep learning. With this information, you can use the basic functions of Evernote; however, there are a lot more options out there that you can find out about on the official website.
Tips
- While there is no way to force Evernote to recognize MS Word files without paying an upgrade fee, there is no such restriction for OpenOffice.org program files. It is a powerful and free office program that is in no way inferior to MS Word. It can even save files in MS Word format. If you want to save money, download and install the free OpenOffice.org.
- A premium Evernote account has many other features besides full support for all file formats. It allows you to sync all your work, collaborate with other users of the service and upload up to 500MB per month to your account. The free version has a 40MB limit.


