Author:
Alice Brown
Date Of Creation:
27 May 2021
Update Date:
1 July 2024

Content
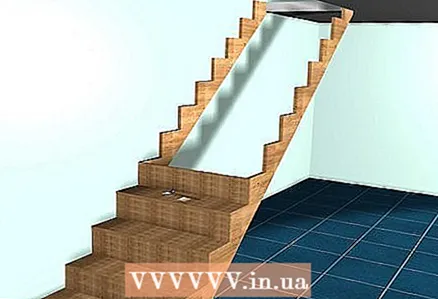
To install a ladder that is functional, safe and eye-catching at the same time, you must follow the directions carefully. First you need to decide on the material. Although a wide variety of materials can be used to create stairs, wood has been unrivaled for many years. Here are some tips on how to install a wooden staircase.
Steps
 1 Establish the perimeters of the space occupied by the stairs. The best way to determine the type of staircase that suits you is to measure the area where it will be erected. If you have enough space, you can choose a traditional two-span staircase with an intermediate landing or a regular straight one.
 - If space is limited, you may need to install a spiral staircase. In this article, we will consider a variant of the simplest wooden staircase, directed diagonally from bottom to top.
 2 Determine the starting point. If possible, place the bottom step away from doors, vents and other obstructions, as well as from busy walkways. A staircase can add beauty to a home and comfort to its owners only if its location is chosen correctly. Ideally, the flight of stairs should be placed along the wall, which will give it more stability.
  3 Draw a line on the wall from the base of the future stairs up. Let one person sit on the floor and the other on a ladder. Using a pencil or chalk, draw a diagonal line for the longitudinal beam of the stairs. The longitudinal beam is the part of the staircase on which the steps and risers perpendicular to them are attached.
  4 Buy materials. You will need two longitudinal beams and planks for steps and risers. They can be purchased in the sawn timber warehouse already cut. Make sure you have correctly measured the length and width of the pieces you need. Avoid warped or cracked lumber.
  5 Install the longitudinal beams of the stairs. With the help of at least one person, place the first beam along the line drawn on the wall. Place horizontal spacers in the space between the beam and the wall.
 - Nail the beam to the uprights of the wall framing, making sure each nail is securely attached to the beam. Fasten the beam with brackets along its entire length to the floor.
- Install the second longitudinal beam parallel to the first at a distance calculated taking into account the length of the steps. This longitudinal beam must be supported by the second floor slab. Support the beam and secure it with screws.
 6 Secure the steps and risers. Position the pre-sawn treads across the longitudinal beams and nail them in place. Vertically, between the steps, nail the previously sawn risers.
  7 Install standard railings using vertical posts. Fasten the entire assembly to the stringers and to the wall at the top of the ladder.
  8 Finish the staircase by protecting the steps with carpet or hardwood.
Tips
- Use the space under a wooden staircase as a pantry or closet.
- Use custom railings and balusters to give your staircase a professional look.
Warnings
- If you are installing the ladder wider than 91.4 cm (36 inches), use a third longitudinal beam in the middle to provide additional support.
What do you need
- Stepladder or ladder
- Pencil or chalk
- Level
- Hammer and nails


