Author:
Virginia Floyd
Date Of Creation:
7 August 2021
Update Date:
22 June 2024

Content
- Steps
- Method 1 of 4: Getting Started with the Control System
- Method 2 of 4: Takeoff
- Method 3 of 4: Flight Control
- Method 4 of 4: Landing
- Tips
- Warnings
If you want to safely (and legally) fly an aircraft, you need to obtain a pilot's license. But if you think that one day you will find yourself in an emergency, or you are just curious about how things work, the ability to fly an airplane can come in handy. This is not an easy task, and the complete guide will take several hundred pages. This article will help you understand what you will face during your first practice flights.
Steps
Method 1 of 4: Getting Started with the Control System
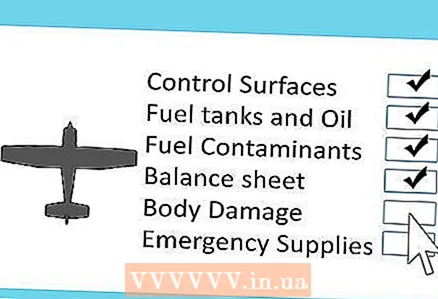 1 Inspect the plane before boarding. It is important to inspect the aircraft prior to takeoff. This is a visual assessment of the aircraft to ensure that all parts of the aircraft are in working order. The instructor will give you a list of actions that you will need to perform both during the flight and before it starts. It is imperative to follow these guidelines. Below are the basic rules for inspecting an aircraft prior to flight.
 - Check control surfaces. Remove control locks. Make sure that the ailerons, flaps, and rudder move smoothly out of the way.
- Inspect gas and oil tanks. Check that they are filled to the correct level. You will need a dipstick to measure the fuel level. There is a dipstick in the engine compartment for measuring the oil level.
- Check fuel for contaminants. To do this, a small amount of fuel is placed in a special glass container and looked for the presence of water or dirt in the sample. An instructor will show you how to do this.
- Complete the allowable weight on board and airplane load distribution forms. This will prevent overloading the aircraft. Again, the instructor will explain how to do this.
- Check the aircraft body for chips, cracks, or other damage. Damage, especially to the propeller blades, can affect airplane behavior. Always check the condition of the propellers and air intakes before takeoff. Approach the propellers with caution. If the aircraft harness is damaged, the propeller may spontaneously rotate, resulting in serious or even fatal injury.
- Check emergency supplies. Of course, you don't want to think about it, but you should always take into account the possibility of an accident. Check for food, water, first aid kit, walkie talkie, flashlight and batteries. You may also need weapons and standard parts for repairs.
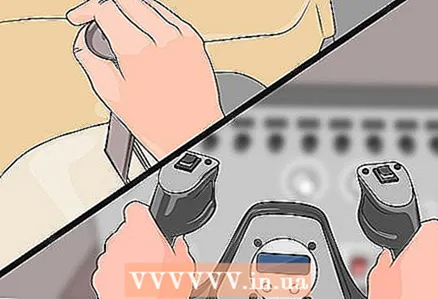
 2 Find the wheel. When you take your seat in the pilot's seat, you will see a complex control panel in front of you, but it will be easier for you to understand it once you understand what each device is responsible for. There will be a long steering wheel in front of you. This is the steering wheel.
 - The steering wheel serves the same role as the steering wheel in a car - it sets the position of the nose of the aircraft (up and down) and the tilt of the wings. Try to hold the steering wheel. Push it away from you, then pull it towards you, move it left and right. Don't pull too hard - small movements are enough.
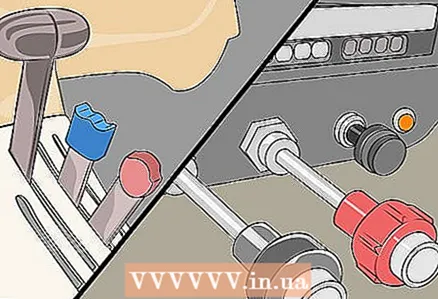 3 Find a gas and a gas control device. These buttons are usually found between the seats in the cockpit. The gas button is black and the gas control button is usually red. In civil aviation, these control tools are usually in the form of conventional buttons.
 - The fuel intake is controlled by the gas button, and the second button is responsible for the control of the combustible mixture.
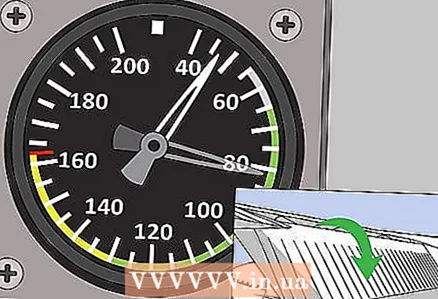
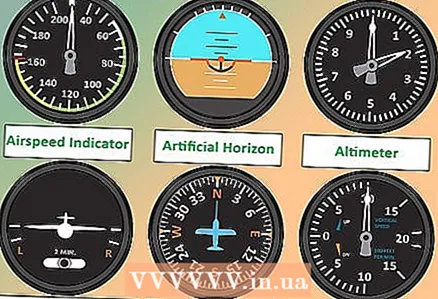 4 Find flight control tools. Most aircraft have six, and they are arranged in two rows horizontally. These instruments show altitude, aircraft attitude, heading, and speed (both climb and descent).
 - Top left: airspeed indicator... It displays the ship's speed in knots. (A knot equals one nautical mile per hour, or approximately 1.85 km / h.)
- Top middle: attitude indicator (artificial horizon). It shows the spatial position of the aircraft, that is, its angle of inclination up or down, left or right.
- Top right: altimeter (altimeter). It shows the altitude above sea level.
- Bottom left: direction indicator and slip... It is a combo tool that shows the yaw of the aircraft, roll and slide angles about the longitudinal axis (if the plane is flying sideways).
- Bottom middle: course pointer... It shows the current heading of the vessel. This instrument is calibrated (usually every 15 minutes) to match the compass. This is done on the ground or in the air, but only during flight in a straight line with constant altitude.
- Bottom right: climb rate indicator... It shows how fast the plane is gaining or dropping altitude. Zero means the plane is flying at a constant altitude.
 5 Find landing control tools. Many small aircraft have fixed gears, in which case there will be no gear lever for landing. If your aircraft has the ability to manually shift gears, the corresponding lever can be in any position. Typically, this is a lever with a white handle. You will use it when taking off, landing and when the plane moves along the ground. In addition to performing other functions, this lever controls the landing gear, skis and floats of the aircraft.
 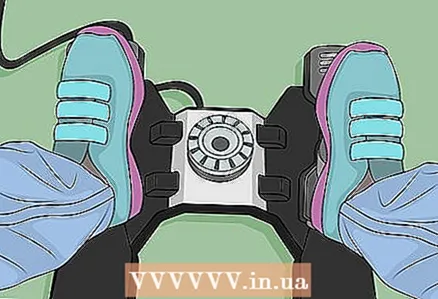 6 Place your feet on the steering pedals. You will have pedals under your feet that you can use to set the turn. They are attached to a vertical stabilizer. If you need to turn slightly to the left or right on the vertical axis, use the pedals. In fact, the pedals set the rotation about the vertical axis. They are also responsible for turning on the ground (many novice pilots assume that the direction of movement on the ground is given by the helm).
Method 2 of 4: Takeoff
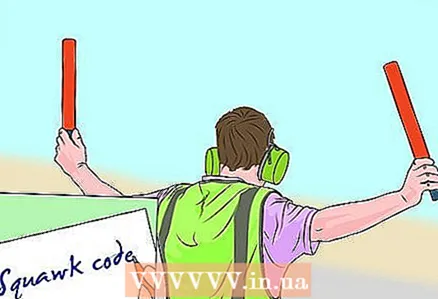 1 Obtain clearance to take off. If you are at an airport with a dispatcher, you need to contact the dispatcher before starting to move on the ground. You will be given all the information you need, including the transponder code. Write it down as this information will need to be repeated for the controller before you are cleared to take off. When clearance is obtained, proceed to the runway in accordance with the instructions of the ground personnel. Never do not enter the runway without a take-off permit!
  2 Adjust the flaps for takeoff. As a rule, they should be at an angle of 10 degrees. Flaps create lift, which is why they are used during takeoff.
 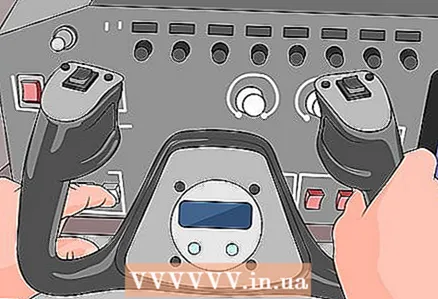 3 Check the operation of the motors. Before entering the runway, stop in the engine check area and follow the appropriate check procedure. This will ensure that it is safe to take off.
 - Ask the instructor to show you how to check the engines.
 4 Tell the dispatcher that you are ready to take off. After a successful check of the engines, inform the dispatcher of your readiness and wait for permission to continue on the runway.
  5 Press the mixture control button down as far as possible. Start gradually pushing the throttle button - the plane will accelerate. He will want to turn left, so hold him in the middle of the runway with the pedals.
 - In a crosswind, you will need to turn the helm slightly towards the wind. As you pick up speed, gradually return the helm to its original position.
- Yaw (yaw) must be controlled using the pedals. If the plane starts spinning, use the pedals to level it.
 6 Accelerate. To get into the air, the plane needs to gain a certain speed. The throttle must be squeezed out to the end, and then the plane will begin to climb (usually for small planes take off speed is about 60 knots). The airspeed indicator will tell you when you reach that speed ..
 - When the necessary lift is achieved, the nose of the aircraft will begin to lift off the ground. Pull on the steering wheel to help the plane take off.
 7 Pull the steering wheel towards you. This will allow the aircraft to take off.
 - Remember to maintain the climb rate and the correct rudder position.
- When the airplane has climbed sufficiently and when the climb rate indicator is positive (that is, the airplane is climbing), return the flaps and landing gear to neutral to reduce drag.
Method 3 of 4: Flight Control
 1 Set up an artificial horizon, or attitude indicator. It will help you keep the plane level. If you go outside the desired values, pull the steering wheel towards you to raise the nose. Don't jerk too hard - it doesn't take much effort.
 - To keep the plane from deviating from the horizon, constantly check the attitude and altimeter readings. But remember that it is not worth looking at this or that sign for too long.
 2 Make a turn. This is also called performing a superelevation. If you have a wheel in front of you, turn it. If it looks like a handle, tilt it to the left or right. To avoid losing control, look at the direction indicator. This tool displays a picture of a small plane overlaid with a level with a black ball. You need the black ball to stay in the middle - adjust the position of the plane with the pedals, and then all your turns will be smooth and accurate.
 - To better remember which pedal to press, imagine that you are stepping on a ball.
- Ailerons are responsible for the roll angle. They work in conjunction with the steering pedals. When turning, coordinate the pedals with the ailerons so that the tail stays behind the nose. Always keep an eye on altitude and airspeed.
- When you turn the steering wheel to the left, the left aileron is raised and the right aileron is lowered. When turning right, the right aileron rises and the left aileron lowers. Do not think too much about how this happens in terms of mechanics and aerodynamics; you are now familiar with the basics.
 3 Control the speed of the plane. Each aircraft has engine settings optimized for cruise flight. When you reach the desired altitude, change the settings so that the engine is running at 75% power. Adjust the settings for constant level flight. You will feel that all levers will begin to move more smoothly. On some airplanes, these settings allow the airplane to be put into a non-torque mode, which does not require pedal control to keep the airplane in a straight line.
 - At 100% engine load, the nose shifts to the side due to the torque generated by the engine, which requires correction using the pedals, so in order to return the plane to the desired position, you have to direct it in the opposite direction.
- In order for the aircraft to maintain its position in space, it is necessary to provide the necessary speed and air supply. If the plane is flying too slowly or at a steep angle, it can lose the airflow it needs and freeze. This is especially dangerous during takeoff and landing, but speed should always be monitored.
- As with driving a car, the more often you push the throttle to the floor, the more stress it puts on the engine. Step on the gas only if you need to pick up speed, and release the gas to descend without acceleration.
 4 Do not overuse control. During turbulence, it is important not to overdo it with adjustments, otherwise you could accidentally force the plane to operate at its maximum capacity, which will lead to equipment damage (in the case of severe turbulence).
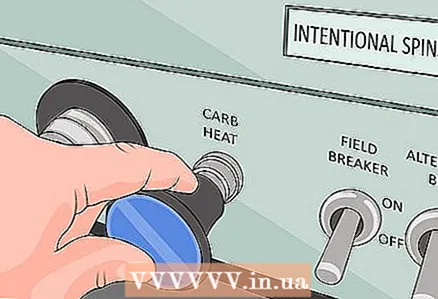
 - Carburetor icing can be another problem. You will see a button labeled "carb heat". Run the heating for short periods of time (eg 10 minutes), especially in high humidity conditions that cause icing. (This only applies to aircraft with a carburetor.)
- Do not shift your attention entirely to this task - you need to keep an eye on all the instruments and check for flying objects near your plane all the time.
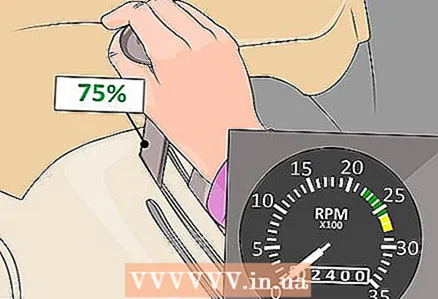 5 Set the cruising engine speed. When the speed levels off, lock the controls in their current position so that the plane is constantly moving at the same speed and you can control the course. Reduce engine load by up to 75%. If you are flying a single engine Cessna, the recommended load is 2,400 rpm.
 - Install the trimmer. The trimmer is a small panel-mounted device that can be moved around in the cab. Correct trim setting will help prevent the rise or fall when cruising.
- There are different types of trimmers. Some are in the form of a wheel or a lever, while others are a handle to pull or a rocking chair. There are also screw and cable trims. There are also electrical systems that are easiest to manage. Trim settings are tailored to the specific speeds that the aircraft can handle. They usually depend on the weight, structure of the ship, center of gravity and weight of cargo and passengers.
Method 4 of 4: Landing
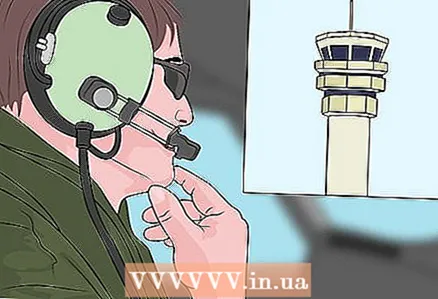 1 Contact the radio control tower to obtain landing clearance. Ground contact during landing is an important part of flight. Find the frequency of the airport you are approaching.
 - When changing frequencies, it is considered good practice to listen for a minute and make sure that the stations are not exchanging data with each other. When you are sure that there are no conversations on the air, submit a request to board. This will avoid cross-communication situations where several stations are trying to communicate on the same frequency.
 2 Start slowing down. Release the throttle and lower the flaps to the desired level. Do not try to control the flaps at high speed. Stabilize your speed and descent angle using the steering wheel. Over time, you will begin to feel when and how to do everything for a smooth landing.
 - Determine the landing site and start descending.
 3 Find a suitable sink angle and speed. This can be controlled using the steering wheel and the fuel button. When you see the landing strip, you will need to set the descent angle and the corresponding speed. This is one of the most difficult tasks when flying an airplane.
 - As a general rule, you should land at 1.3 times the stall speed. You will see this speed on the airspeed indicator. Remember to take wind speed into account as well.
 4 Lower your nose and look at the numbers on the runway. They are applied to the surface of the earth for a reason - they help the pilot understand if he is landing at the correct speed. Lower the nose of the plane and watch the numbers that will be seen on the horizon.
 - If the numbers disappear under the nose of the plane, you are landing too slowly.
- If the numbers move away from the nose of the plane, you are landing too quickly.
- As you get closer to the ground, you will feel the effect of the air cushion. The instructor will tell you about this phenomenon in more detail, but in general it means that near the ground the plane will float slightly through the air due to the reduced drag near the surface of the earth.
 5 Release the gas. Raise the nose slowly by pulling the steering wheel towards you until the two main landing gears touch the ground. Continue to hold the nose gear off the ground; it will descend by itself.
  6 Stop. When the nose gear touches the ground, you can use the brake to slow down and leave the runway. Leave the runway as soon as possible on the exit indicated by the controller. Never do not stop at the runway.
Tips
- If you have a familiar pilot, ask him to talk about aircraft control tools. This will help you cope with an emergency on board the aircraft.
Warnings
- A person without a flight certificate can sit at the helm of an aircraft only in emergency situations. Operating the aircraft under any other conditions may result in a fine or criminal liability.
- If the situation is critical and one pilot is unable to do his job, but there is another pilot on board with permission to fly the aircraft, let him take over. Do not sit at the helm unless absolutely necessary.


