
Content
- Steps
- Part 1 of 4: Measuring and Clearing Walls
- Part 2 of 4: Choosing a Tile Laying Design
- Part 3 of 4: Laying the tiles
- Part 4 of 4: Grouting
- Tips
- What do you need
- Measuring and clearing walls
- Choosing a tile laying design
- Laying tiles
- Grouting
There is nothing more beautiful than an attractively tiled wall. Tiles are often placed on walls in bathrooms and decorated with protective kitchen aprons, but tiles can also be used for decorative purposes almost anywhere you want to decorate the walls with it. While it may seem like a daunting task to lay your own ceramic tiles on your walls, the whole process can be broken down into successive steps, making it less difficult. First, you will need to take measurements, clear the walls, decide on the design for laying the tiles, and then lay the tiles and grind the inter-tile joints.
Steps
Part 1 of 4: Measuring and Clearing Walls
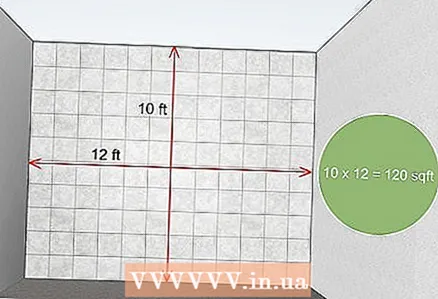 1 Measure the height and width of the wall to find out how many tiles you need. Use a tape measure to get an accurate estimate of the width and height of the wall you will be tiling on. To calculate its surface area, multiply the height by the width (in meters), and then divide the resulting wall area by the area that one package of tiles you choose covers. This is necessary to find out the total number of tile packages.
 - When buying tiles, be sure to take one more box of tiles in order to take into account the margin for trimming and possible damage to some tiles during work.
- For example, if the dimensions of the wall are 3 x 3.6 m, then its area is 10.8 m.In this case, if the tile packaging is designed for 1.2 m, dividing 10.8 by 1.2 we get 9 boxes of tiles, which are necessary to completely cover the area of the wall. After that, it is necessary to increase the number of packages by one more to account for trimming and potential damage to the tiles.
- Since the seams between the tiles do not take up much space, and the tiles may not perfectly fit into the declared area, there is no need to take into account the width of the seams in your calculations.
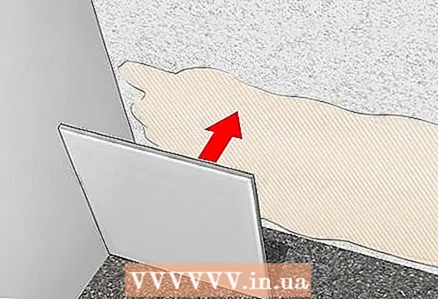
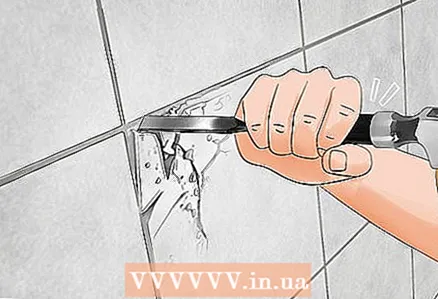 2 Use a chisel and hammer if you need to remove old tiles from the wall. Wear safety goggles before removing tiles. Then place the tip of the chisel at a 45-degree angle to the space between the two tiles and hit the handle with a hammer to remove the tiles from the wall. Next, continue hammering the chisel into the space between the wall and the tiles, as if scraping them. Work until you have removed all of the tile and old tile adhesive.
 - It can be easier to start removing tiles from the corner of a wall or from above when you can press a chisel to the side of the joint, as the mortar or glue is usually weaker than the tile itself.
- Be careful when removing tiles. If the tile was laid on drywall, then it is easy to accidentally damage it, for example, forgetting to hold the chisel strictly at an angle of 45 degrees.
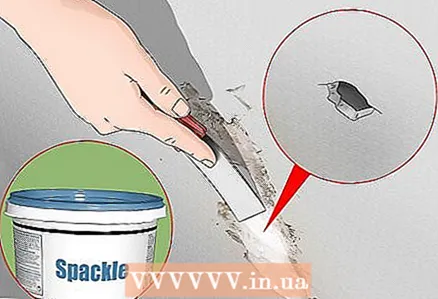 3 Repair cracks and chips walls with putty. When you clear a brick or plasterboard wall of tiles, you can identify problem areas. Use a putty knife to apply the filler where required and allow it to dry according to the directions on the package (usually 4-6 hours).
 - Cracks and holes in plasterboard larger than 10–12.5 cm often require a plasterboard patch. If you have no experience with drywall, contact the professionals to find out the cost of repair services for the problem area.
- If there was no tile on the wall before, it may have been painted or wallpaper. Before laying the tiles, the wallpaper will need to be removed from the wall, and the previously painted or previously pasted drywall can be repaired in the same ways as above.
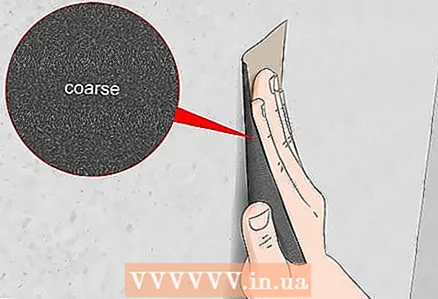 4 Sand the walls with coarse sandpaper to roughen and smooth out any raised bumps. If you have removed the old tiles from the wall, it is likely that some irregularities could remain on it after that. Of course, tiles can also be laid on top of them, but smoothing out irregularities will avoid uneven laying of tiles. You will need 12-H (P100) or 20-H (P80) grit sandpaper. Wear a respirator to protect your lungs from dust while working.
 - If you need to sand a large area, it may be easier to use a sander.
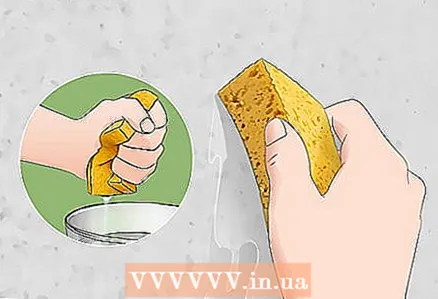 5 Wipe the wall with a damp sponge to remove dust from it. Dip the sponge into a bucket of clean water and squeeze out. Then, starting from the very top, run the sponge along the wall, collecting dust from it. Rinse off the sponge and continue working until you've wiped off the entire wall. Wait at least an hour until the wall is completely dry.
 - If you are working in a very large area, you may need to refresh the bucket every few passes with the sponge to keep the water clean and the sponge actually collecting dust.
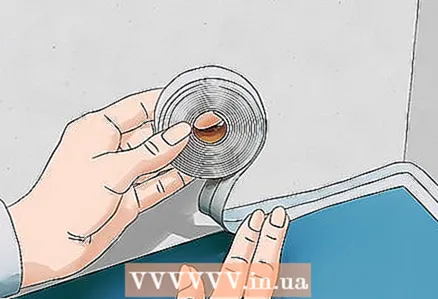 6 Protect the walls with a waterproofing agent when laying tiles in the bathroom. For example, buy several rolls of waterproofing tape to cover the area where the tiles will be laid. Use waterproof adhesive to secure the waterproofing film to the wall. Make sure waterproofing is provided over the entire area to be tiled and wait 2-3 hours for the adhesive to dry. Liquid waterproofing compounds can also be used.
 - The waterproofing layer will prevent water from seeping through the tile joints and mortar to the walls and building structures, which can begin to rot as a result.
Part 2 of 4: Choosing a Tile Laying Design
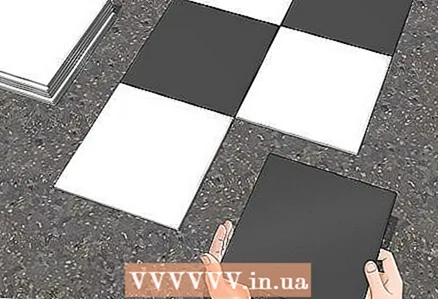
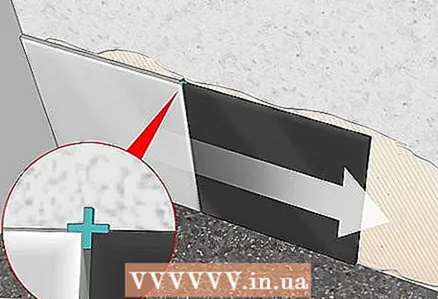
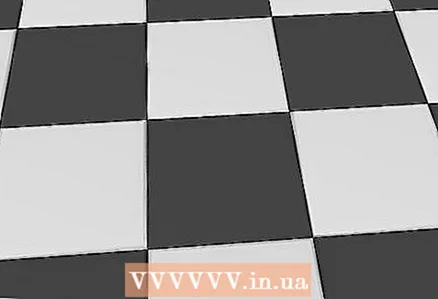 1 Choose a checkerboard pattern for a classic look. This pattern is made up of tiles alternating in a checkerboard pattern. Through one, the same tiles are repeated, but at the same time the horizontal rows and vertical columns of the laying are strictly observed. You can choose any two colors to get the pattern you want, so feel free to get creative.
 - This is one of the lightest patterns, but it can feel overwhelmed if there are already enough other designs and colors in the room.
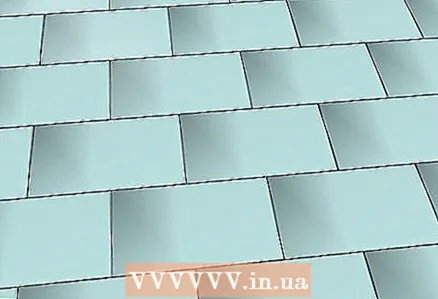 2 Use a stacking with a horizontal offset of the rows exactly half the tiles. Take one tile in the center of the pattern and imagine a vertical line running through the middle. Arrange the laying above and below the underlying rows of tiles along this line. Use tiles of the same color so that the vertical tile joints alternately separate two tiles, or disappear in the middle of the whole tile.
 - In general, the effect of displacement of the horizontal rows relative to each other should be obtained, creating a stepped pattern.
- This method is used to imitate brickwork.
 3 Use a strict stacking order for vertical and horizontal rows to better protect your walls from moisture. This easy tiling method also makes subsequent grouting much easier. Just lay out rectangular tiles, strictly observing the horizontal and vertical rows.
 - This pattern looks especially good with large tiles as it looks very natural and clean.
- If you are using tiles of the same color, then this is a good chance to use it to make a bright accent in the room.
 4 Test a row of tiles without mortar to find out which tiles you will need to trim. Lay out the tiles on the floor in accordance with the pattern of your choice and taking into account the width of the tile joints. Then compare the width of the wall and the resulting length of the row of tiles.Use a wax pencil to mark the tile you want to trim.
 - Consider offsetting the entire tiling pattern if you find that you need to trim the last tiles of all rows by less than 5 cm. This is because it will be difficult for you to trim a small section of tile evenly, be it with a cutter or tongs.
Part 3 of 4: Laying the tiles
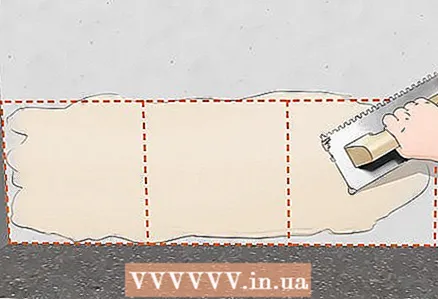 1 Apply a layer of tile adhesive about 3 mm thick to the wall. Start applying the adhesive to the bottom corner of the wall, backing off the bottom and side by about one tile, leaving room for the outermost tiles. Use a trowel to pick up some of the prepared tile adhesive and spread it in a thin layer over the wall, over an area large enough to lay two or three tiles.
 - You may need to run the trowel over the tile adhesive several times to make it thin and even on the wall.
- Ready-to-use tile adhesive can be found in hardware stores. Sometimes it even costs less and is well suited for laying tiles on the wall. If you bought a powder mixture, do not forget to prepare the glue in advance according to the instructions on the package, having achieved a sufficiently thick consistency of the solution.
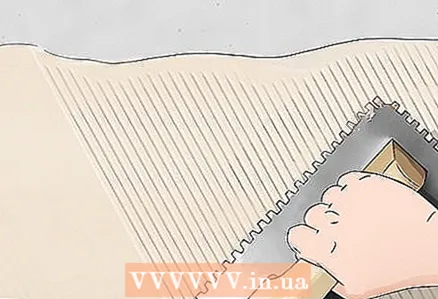 2 Use a notched trowel to create grooves in the tile adhesive. Take and hold the notched trowel at a 45-degree angle to the wall. Using even pressure on the trowel, slide it horizontally across the wall to create grooves in the tile adhesive. They are necessary for high-quality subsequent gluing of tiles to the wall.
 - Be sure to check the instructions for the tile adhesive - make sure you use a notched trowel of the correct size for the tile you intend to lay so that it adheres well. In some cases, you can purchase a trowel with different notch sizes on both sides.
 3 Glue the first tiles and then continue laying the row, adding glue and the next tiles of the row to the wall. Carefully line up the very first tile and press it against the adhesive, wiggling slightly to ensure adhesion before releasing and leaving in place. Then continue to lay the tiles in rows (horizontally or vertically) according to the design chosen. After using the entire wall area with the tile adhesive already applied, apply more adhesive and continue gluing the tiles further.
 - Remember that you should work in small areas, applying tile glue only where you will stick the next tile in the very near future.
- Any excess glue that will seep into the joints between the tiles should be wiped off with a damp cloth.
 4 Insert spacers between the tiles to keep the joints even. When installing tiles on the wall, insert plastic spacers between the tiles (in the tile adhesive layer), which will also provide the necessary grouting space.
 - Sometimes on sale you can find tiles with "built-in" dividers. Therefore, check your materials before purchasing anything else for them.
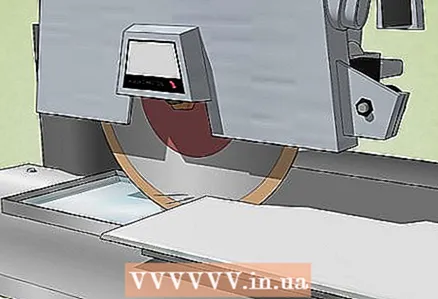 5 Trim tiles to size using a cutter or special tongs. Gather together all the tiles that you marked for cutting with a wax crayon during a dry test run. Recheck the labels to make sure they are the correct size. Put on your safety goggles and carefully align the tile with the cutting line under the blade or cutting edge of the pliers. Then run the cutter over the tile or squeeze the tongs to cut the tile.
 - To cut large tiles, you may need to rent a dedicated tile circular saw.
- You can cut a strip less than 5 cm wide from the tile with special nippers, also used to cut small pieces of glass.
Allow extra time to cut porcelain tiles, especially those with beveled corners, as these tiles are very sturdy.

Mitchell Newman
Construction Specialist Mitchell Newman is the head of Habitar Design and its sister company Stratagem Construction in Chicago, Illinois. Has 20 years of experience in construction, interior design and real estate development.Mitchell Newman
Construction specialist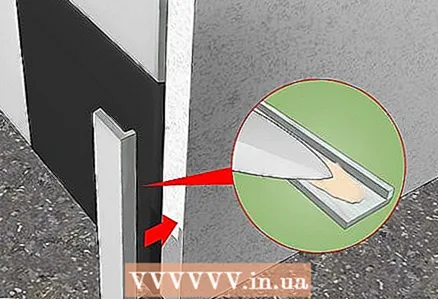 6 Install outer tiles with tile adhesive directly on them (from the back). Take the tile you want to lay along the edge of the wall and apply tile adhesive to the back of the tile as if you were spreading butter on bread. Then slide the tiles back into place and insert the dividers. If you've trimmed the tile before, make sure to install it with the right edge and in the right place.
 - If the tile size allows it to perfectly fit into the available space and there is no need to cut it, you will still need to follow the rule for laying the bottom and top horizontal and extreme vertical rows last. This way you will not stain the already laid tiles and other surfaces around with tile glue.
Part 4 of 4: Grouting
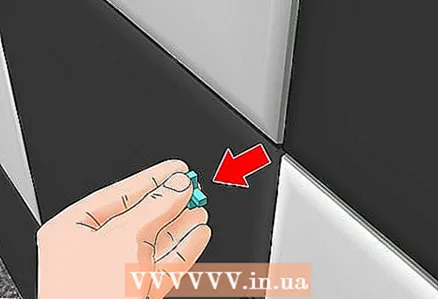 1 Remove plastic spacers before grouting. While the tile adhesive has not yet fully cured, remove the spacers previously inserted between the tiles. This can be done about 1.5 hours after laying the tiles and installing the spacers. Be sure to remove all separators before moving on to the next stage of work.
 - Leaving the spacers in the glue for too long can make them much more problematic to remove.
- Tile adhesive dries and hardens quite quickly compared to grout, you may even need to wait an hour (depending on the specific brand of tile adhesive you are using).
- If the tile came with spacers, chances are you can remove them too. However, sometimes the built-in spacers are not removed - they are left and then simply closed with grout. Check the information on the tile packaging to find out how to handle spacers for your particular application.
 2 Prepare the grout and start sequentially processing tile joints with it in certain sections of the wall. The grout fills the joints between the tiles, protecting them and additionally fixing them to the wall. Choose a grout that matches your tile and room color scheme. Mix it with water according to the instructions. About 15 minutes after removing the spacers, use a rubber trowel to spread the grout over the tile joints on one section of the wall before moving on to the next.
 - The grout can be spread directly over the tiles. Don't worry - you will be able to wipe down the tiles as soon as the grout starts to dry.
- It is especially important to work in small areas when you are dealing with a large area. This is necessary so that the grout does not have time to harden and you have the opportunity to remove excess grout from the tile.
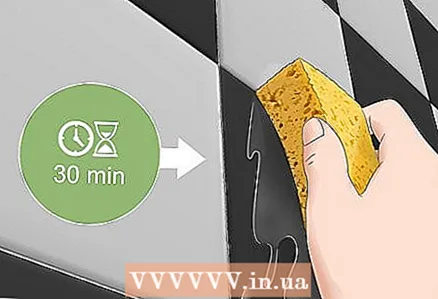 3 Use a wet sponge to wipe off grout marks 30 minutes after application. After finishing grouting the joints on the first section of the wall, set the timer, when you finish working with the second section, set another timer, and so on ... As soon as the first timer works, dampen the sponge with water, squeeze and wipe the first section of the wall with it to remove traces of grout from the surface tiles.
 - When you wipe the first section, wait for the second timer to sound and wipe the next section of the wall. Try to work with no more than 2-3 sections of the wall at the same time so as not to get confused.
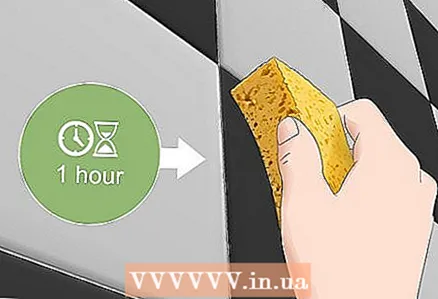 4 Wipe the tiles with a dry sponge to remove white grout deposits after wet wiping. Let the grout dry further after wiping it with a wet sponge. Then take a dry sponge and scrub the surface of the wall with it to clean each individual tile and remove any residual plaque.
 - If after this a dirty film or plaque is still visible, use a tile cleaner, after allowing it to dry for an additional hour.
 5 Apply a hydrophobic agent to porous tiles to protect them from moisture. Follow the instructions for your chosen hydrophobic impregnation to properly apply it to the tiles using a brush, sponge or spray. Make sure you have finished all tiles, including those around the edges and corners. Let the product dry for 6-8 hours before wetting the tiles.
 - If you want to make sure that the hydrophobic agent really works, put a drop of water on the treated surface - it should collect in drops, and not absorb. If this is exactly what happens, then the hydrophobic impregnation works! Otherwise, you need to make sure that the expiration date of the applied product has not yet expired, and apply another layer of impregnation. Allow the second coat another 6 hours to dry before checking the impregnation again.
Tips
- If you are unsure of which tiles you should buy, check with your store dealer about which tiles are best for the room you are tiling.
What do you need
Measuring and clearing walls
- Roulette
- Chisel and hammer
- Protective glasses
- Respirator
- Putty
- Sandpaper
- Waterproofing (for walls in rooms with high humidity)
Choosing a tile laying design
- Tile
- Roulette
Laying tiles
- Mortar or tile adhesive
- Notched trowel or trowel
- Damp rag
- Tile dividers
- Tile cutter or tongs
Grouting
- Grout for tile joints
- Rubber trowel (for spreading grout)
- Sponges
- Water
- Hydrophobic impregnation for porous tiles


